Grilled Onion Summer Side: Balsamic and Smoky
- Time: 10 min active + 15 min grilling
- Flavor/Texture Hook: Tangy, velvety glaze with a charred, smoky bite
- Perfect for: Backyard BBQ, burger nights, or a quick weeknight veggie side
- Easy Grilled Onion Summer Side
- How the Char Creates Flavor
- Essential Ingredient Details
- Basic Tools for Success
- Step by Step Grilling
- Fixing Common Grilling Issues
- Troubleshooting Common Issues
- Flavor Tweaks and Variations
- Scaling the Recipe
- Truth About Grilled Onions
- Storage and Waste Tips
- Serving and Plating Ideas
- Recipe FAQs
- 📝 Recipe Card
Easy Grilled Onion Summer Side
The smell of charcoal and searing vegetables always takes me back to my grandfather's backyard in July. He had this old, rusted grill that he swore had "memory," and every single summer, he'd toss thick slices of red onion onto the grates.
I remember the way the scent would shift from a sharp, pungent onion smell to something deeply sweet and caramelized that drifted across the whole neighborhood. It wasn't fancy, but it was the heart of every meal.
For a long time, I tried to recreate that taste indoors, but it just didn't hit the same. I'd end up with mushy onions or something that tasted like a cafeteria side dish. It wasn't until I started playing with a balsamic and maple glaze that I realized the secret was in the timing of the sugar.
Adding the glaze too early burns it; adding it too late means it doesn't stick.
Making this Grilled Onion Summer Side is now my go to for any outdoor gathering. It's simple enough for a Tuesday night but tastes like you actually put in effort. Trust me on this, once you see that mahogany lacquer form on the edges of the onion, you'll never go back to raw rings on a burger.
How the Char Creates Flavor
The magic of this dish isn't just the heat, it's how the ingredients react to it. I've spent a lot of time figuring out why some onions turn into charcoal while others get that beautiful, silky texture.
- Sugar Concentration
- The maple syrup and balsamic vinegar concentrate under heat, creating a thick syrup that clings to the onion.
- Surface Caramelization
- High heat breaks down the natural sugars in the red onion, turning them from sharp to sweet in minutes.
- Acid Balance
- The vinegar cuts through the richness of the olive oil, keeping the side from feeling too heavy.
- Mahogany Glaze
- Brushing the glaze at the very end prevents the sugars from burning while allowing them to bubble and thicken.
But what about the method? Some people love foil, and some love the grate. Here is how I break it down based on what you're actually looking for.
| Method | Time | Texture | Best For |
|---|---|---|---|
| Direct Grate | 15 mins | Charred & Firm | Bold flavor, grill marks |
| Foil Packet | 20 mins | Steamed & Soft | Low mess, sweeter taste |
| Grill Basket | 15 mins | Evenly Browned | Easier flipping, high volume |
It's a bit of a toss up, but I personally prefer the direct grate because that slight char provides a necessary contrast to the sweet glaze.
Essential Ingredient Details
I don't believe in over complicating things, but the specific ingredients here do heavy lifting. If you use a generic white onion, you'll lose that deep purple hue and a bit of the natural sweetness that red onions bring to the table.
| Ingredient | Science Role | Pro Secret |
|---|---|---|
| Red Onion | Structural Base | Slice 1/2 inch thick so they don't collapse |
| Balsamic Vinegar | Acid/Color | Use a thick, aged balsamic for more "syrup" |
| Maple Syrup | Sugar Source | Real maple syrup adds a woody depth honey lacks |
| Olive Oil | Heat Conduit | Helps the seasoning stick and prevents sticking |
Right then, let's look at what you actually need to get this on the table.
For the Onion Base
- 3 large red onions (approx. 2 lbs), peeled and sliced into 1/2 inch thick rounds Why this? Thick rounds hold their shape on the grill
- 3 tbsp extra virgin olive oil Why this? High smoke point and classic flavor
- 1 tsp kosher salt Why this? Draws out moisture for better searing
- 1/2 tsp black pepper Why this? Adds a subtle back end heat
For the Balsamic Glaze
- 1/4 cup balsamic vinegar Why this? Provides the signature tang and dark color
- 1 tbsp maple syrup Why this? Balances the acid and helps it glaze
- 1/2 tsp garlic powder Why this? Adds a savory punch without burning fresh garlic
If you're missing something, don't panic. Most of these can be swapped without ruining the vibe.
| Original Ingredient | Substitute | Why It Works |
|---|---|---|
| Red Onion | Vidalia/Yellow Onion | Sweeter, but loses the purple color. Note: Slices may be softer |
| Balsamic Vinegar | Apple Cider Vinegar + Soy Sauce | Similar acid and color. Note: Less sweetness, more salty |
| Maple Syrup | Honey or Brown Sugar | Similar sugar content. Note: Honey is more floral; sugar is more molasses like |
| Olive Oil | Avocado Oil | Very high smoke point. Note: More neutral flavor |
Basic Tools for Success
You don't need a fancy kitchen setup for this. Honestly, a few basic tools are all that stand between you and a great meal. I usually keep it minimal so I'm not stuck cleaning for an hour after the party.
First, you'll need a large mixing bowl. This is where the onions get their first coat of oil and seasoning. If you try to oil them on the grill, you'll get patchy spots and a lot of wasted oil. A simple stainless steel or glass bowl works best.
Next is the grill. Whether it's a gas grill or a charcoal one, just make sure the grates are clean. If they're covered in old residue, your onions will stick and tear. I use a wire brush and a bit of oil on a paper towel to prep the surface.
Finally, a silicone basting brush. This is a lifesaver for the glaze step. You want to be able to paint the balsamic mixture onto the onions quickly while they're still sizzling. Metal tongs are also non negotiable here, as they let you flip the rounds without breaking them.
Step by step Grilling
Getting your Grilled Onion Summer Side on the grill is all about managing the heat. If the grill is too cold, the onions just stew in their own juices. Too hot, and you've got charcoal.
Step 1: The Prep and Seasoning
Whisk together the olive oil, salt, and pepper in a large bowl. Toss the onion rounds gently until every slice is glistening and evenly coated. Note: Don't over mix or the rounds will break
Step 2: The over High heat Sear
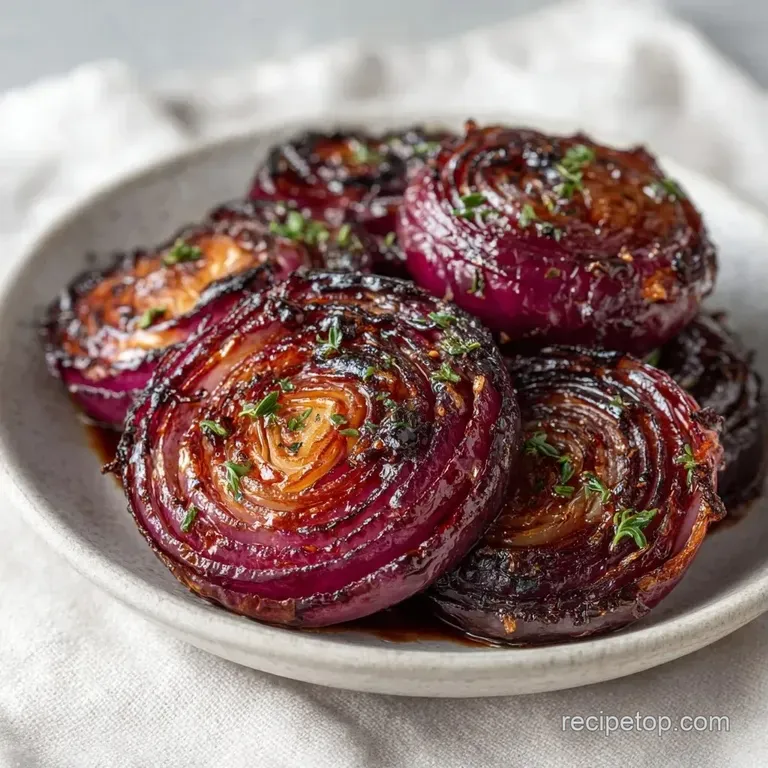
Preheat your grill to medium high (approx. 400°F / 200°C). Place the onions directly on the grates or in a grill basket. Grill for 5–7 minutes per side until deep, dark grill marks appear and the onions release easily from the grate.
Step 3: The Balsamic Finish
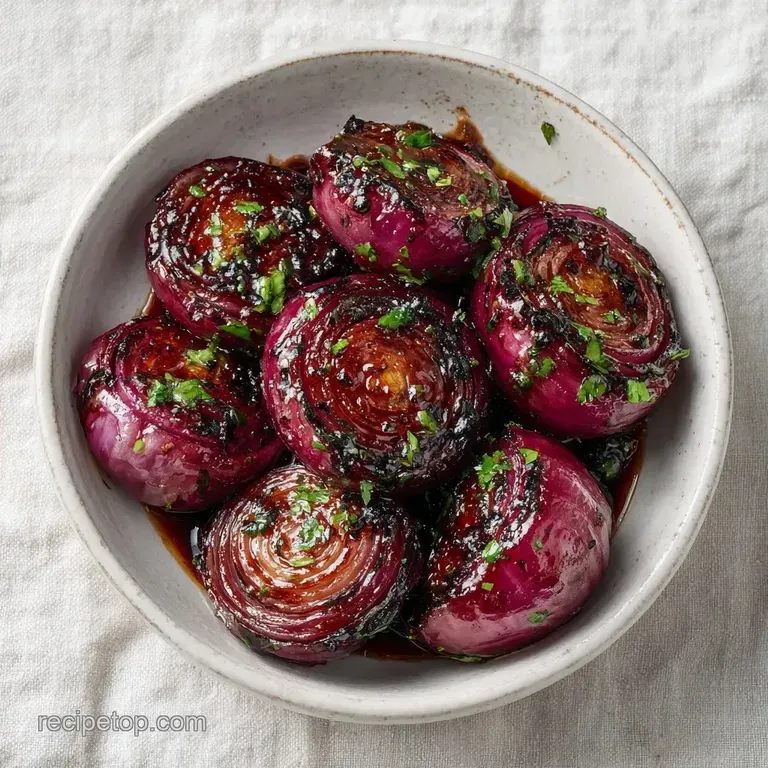
While the onions are grilling, whisk the balsamic vinegar, maple syrup, and garlic powder in a small bowl. During the last 2 minutes of cooking, brush the glaze generously onto both sides of the onions until it bubbles and thickens into a mahogany colored lacquer.
Chef's Note: If you see the glaze starting to smoke aggressively, move the onions to a cooler part of the grill immediately. The sugar in the maple syrup can go from "caramelized" to "burnt" in about 30 seconds.
Once they're glazed and sticky, take them off the heat immediately. Let them rest for just a minute so the glaze sets. This is the part where the aroma really hits you sweet, tangy, and smoky all at once.
Fixing Common Grilling Issues
Even the best home cooks hit a snag now and then. When I first started, I used to burn the glaze every single time because I was too eager to get that dark color. The key is patience and watching the bubbles.
Troubleshooting Common Issues
| Issue | Solution |
|---|---|
| Why Your Onions Are Burning | If the edges are black but the center is raw, your grill is too hot. Move them to the edges of the heat zone. This happens a lot on gas grills where the center is a hotspot. |
| Why the Glaze Is Too Thin | If the glaze isn't sticking and just runs off, it's likely because the onions were too wet when you brushed them. |
| Why the Onions Are Mushy | This usually happens if you crowd the grill. If the onions are touching or overlapping, they steam instead of sear. Give them at least an inch of space. |
Common Mistakes Checklist:
- ✓ Don't slice the onions too thin (they'll fall through the grates).
- ✓ Avoid adding the balsamic glaze at the start of the cook.
- ✓ Don't flip the onions too often; let the char develop.
- ✓ Make sure the oil is evenly distributed to prevent sticking.
Flavor Tweaks and Variations
While the classic version is brilliant, you can easily pivot this recipe to fit whatever else is on your menu. I've found that a few small changes can make this a totally different experience.
If you're serving these with burgers, try adding a pinch of smoked paprika to the initial oil mix. It deepens the color and adds an extra layer of earthiness that pairs perfectly with beef.
For those who want a bit of a kick, a drizzle of sriracha or a sprinkle of red pepper flakes right after they come off the grill works wonders.
For a more sophisticated vibe, you could swap the maple syrup for a bit of honey and add a sprig of fresh thyme to the glaze. It makes the dish feel more like something you'd find at a bistro. If you're looking for another hearty pairing, these go great alongside a BBQ chicken pizza for a full summer feast.
The Burger Upgrade
Instead of serving them on the side, stack two grilled rounds directly on a patty. The sweetness of the balsamic glaze acts as a condiment, meaning you can skip the ketchup entirely.
The Summer Platter
Lay the onions on a platter with grilled zucchini and asparagus. Drizzle any leftover glaze from the bowl over the entire vegetable spread for a cohesive look and taste.
Scaling the Recipe
When you're cooking for a crowd, you can't just multiply everything by four and hope for the best. I've learned the hard way that too much glaze can make the onions soggy if you're working in big batches.
Scaling Down (½ Batch): Use 1.5 large red onions and half the glaze ingredients. Use a smaller skillet or a concentrated area of the grill. Reduce your total cook time by about 20% as smaller batches often heat up faster.
Scaling Up (2x-4x Batch): If you're doubling the recipe, only increase the salt and pepper to 1.5x. Too much salt can draw out too much water, preventing that sear. For the glaze, you can double it, but work in batches. Don't crowd the grill, or you'll end up steaming the onions.
If you're doing a massive party, I recommend using a grill basket. It allows you to toss a large amount of onions at once without worrying about individual slices falling through the grates. Just be sure to shake the basket every few minutes to ensure even browning.
Truth About Grilled Onions
There are a few things people always say about grilling vegetables that just aren't true. I've heard them at every BBQ I've ever attended, so let's clear the air.
First, some say you must wrap onions in foil to keep them from drying out. While foil works, it actually prevents the charring process. You're essentially steaming the onion. For this Grilled Onion Summer Side, the open grate is where the flavor is.
Second, there's a myth that you should soak onions in water to remove the "bite." Don't do this here. We want that natural sulfur to react with the heat and the sugar, which creates the complex flavor profile. Soaking them just makes them harder to sear.
Storage and Waste Tips
If you happen to have leftovers which is rare, but it happens they actually store surprisingly well. Just keep in mind that the texture will change slightly as the sugars settle.
Store the onions in an airtight container in the fridge for up to 4 days. To reheat, I avoid the microwave because it makes them rubbery. Instead, toss them in a hot pan for 2 minutes or put them back on the grill for a quick sear.
They don't freeze well because the cell structure of the onion breaks down, leaving them mushy upon thawing.
As for zero waste, don't throw away the onion peels! If you have a compost bin, they're gold. But if you're making a stock, you can throw the clean outer skins into a pot with other veggie scraps. They add a beautiful golden color to the broth. Also, if you have a bit of leftover glaze in the bowl, it's amazing stirred into a summer tomato sauce for a touch of sweetness and acidity.
Serving and Plating Ideas
The way you present this dish can make it feel like a simple side or a center piece. Since the colors are so vibrant, I like to keep the plating minimal to let the mahogany glaze shine.
I usually serve these on a dark slate platter or a simple white ceramic dish. The contrast of the deep purple and the charred edges looks stunning. To brighten things up, I scatter a handful of freshly chopped parsley or a few crumbles of goat cheese over the top right before serving.
The cold, creamy cheese against the hot, tangy onions is a total win.
If you're serving them as a side for steaks or chops, place the onion rounds in a neat stack to the side of the meat. It looks intentional and professional. Just remember to drizzle any extra glaze from the pan over the top for that final, glossy finish.
Your new favorite Grilled Onion Summer Side is now ready to hit the table.
Recipe FAQs
What should I serve with grilled onions?
Steaks, burgers, or grilled salmon. These savory mains balance the sweetness of the balsamic glaze. Pair them with a healthy summer green salad for a complete meal.
How to prevent the onions from burning on the edges?
Move the onions to the edges of the heat zone. If the edges are black but the center remains raw, your grill is too hot. This happens frequently on gas grills with central hotspots.
Why are my grilled onions mushy instead of charred?
Stop crowding the grill. When onion rounds touch or overlap, they steam instead of sear. Give each slice enough space to maintain direct contact with the grates.
How to get the balsamic glaze to stick to the onions?
Ensure the onions are not too wet before brushing. If the glaze runs off, it is likely because the surfaces were too moist. Brush the glaze during the last 2 minutes of cooking to create a mahogany lacquer.
Can I freeze leftover grilled onions?
No, avoid freezing them. The cell structure of the onion breaks down during the freezing process. This results in a mushy texture upon thawing.
How to reheat leftover grilled onions?
Toss them in a hot pan for 2 minutes. Avoid using a microwave, which makes the onions rubbery. Alternatively, place them back on a hot grill for a quick sear.
Is it true that any grill temperature works for this recipe?
No, this is a common misconception. You must preheat the grill to medium high (approx. 400°F / 200°C). Lower temperatures cause the onions to stew in their own juices rather than develop deep grill marks.
Grilled Onion Summer Side

