Easy Homemade Indian Fry Bread: Fluffy and Golden
- Time: 10 min active + 10 min resting = Total 30 minutes
- Flavor/Texture Hook: Puffy, mahogany colored exterior with a soft, steamy center
- Perfect for: Quick weeknight sides, taco bases, or a sweet breakfast treat
- Easy Homemade Indian Fry Bread Recipe
- The Secret to Fluffy Bread
- What Each Ingredient Does
- Tools You Actually Need
- Easy Steps to Follow
- Common Mistakes to Avoid
- Troubleshooting Common Issues
- Tasty Ways to Change It
- Adjusting the Batch Size
- Debunking Bread Myths
- Keeping the Bread Fresh
- Plating Your Fresh Bread
- Recipe FAQs
- 📝 Recipe Card
Easy Homemade Indian Fry Bread Recipe
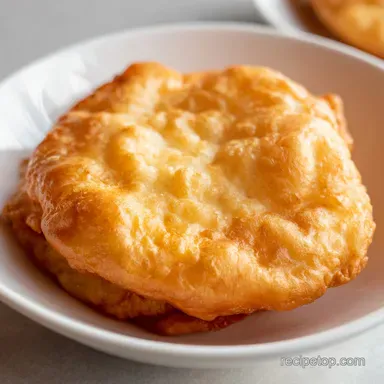
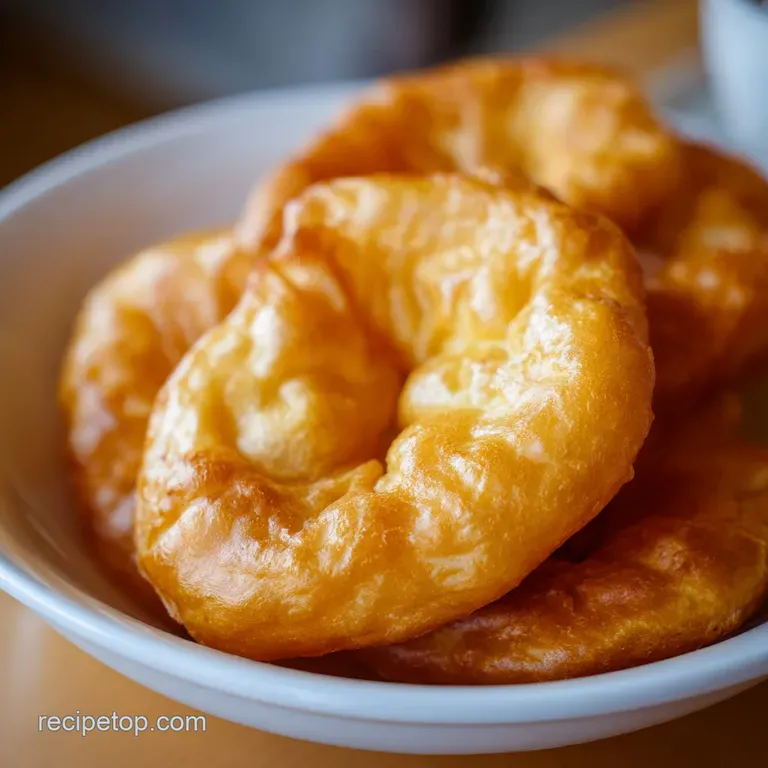
The sound of the first piece of dough hitting the hot oil is a specific kind of sizzle, a loud, aggressive pop that tells you the temperature is just right. When it happens, the dough immediately puffs up, creating these gorgeous air pockets that make the bread feel light despite being fried.
I can still smell the toasted flour and warm oil wafting through my kitchen, which always reminds me of the first time I tried to make these for a family brunch.
Honestly, my first attempt was a disaster. I treated it like a traditional loaf and kneaded the life out of the dough, thinking that's how you get a good structure. The result? I basically made edible rubber frisbees.
They were tough, chewy, and completely lacked that airy, cloud like interior that makes this dish special. I realized that the less you touch the dough, the better the result.
Once I stopped over working it and focused on a short rest period, everything changed. This easy homemade indian fry bread recipe is all about restraint. You want just enough structure to hold the shape, but enough relaxation to let the baking powder do its thing.
It's a fast process that delivers a result that feels like it took hours of effort, making it my go to for when I want something comforting without spending the whole afternoon in the kitchen.
The Secret to Fluffy Bread
Since we aren't using yeast, we have to rely on a few different tricks to get that puff. It's not about complex techniques, just understanding how the ingredients interact in the pan.
Warm Water Wake up: Using warm water instead of cold helps the flour hydrate faster and softens the gluten immediately. This means you don't have to knead as much to get a smooth dough.
The 10 Minute Pause: Letting the dough sit is non negotiable. This allows the proteins in the flour to relax, so when you pat the dough out, it doesn't spring back like a rubber band. If you've ever made an easy homemade naan bread, you know that resting the dough is where the magic happens.
Air Pocket Creation: The baking powder reacts twice - once when it hits the water and again when it hits the heat. This double action creates those internal bubbles that make the bread feel light. According to the guides at King Arthur Baking, the balance of leavening is key to preventing the bread from becoming too dense.
Oil Temp Stability: Frying at a steady heat ensures the outside sets quickly. If the oil is too cool, the bread just absorbs the fat like a sponge; too hot, and you get a burnt shell with a raw, doughy middle.
| Method | Time | Texture | Best For |
|---|---|---|---|
| Baking Powder (This) | 30 mins | Puffy & Airy | Fast weeknight meals |
| Yeast Based | 3 hours | Chewier/Bready | Traditional batches |
| No Leaven (Flat) | 20 mins | Dense/Thin | Simple wraps |
What Each Ingredient Does
I like to think of the ingredients as a team where everyone has a specific job. If you skip one or use the wrong version, the whole team struggles.
| Ingredient | Science Role | Pro Secret |
|---|---|---|
| All Purpose Flour | Structure/Bulk | Use a spoon and level it off; too much flour makes it tough |
| Baking Powder | Lift/Bubbles | Check the expiration date; old powder means flat bread |
| Warm Water | Hydration | Warm to the touch, but not boiling, or you'll kill the lift |
| Neutral Oil | Heat Transfer | Use oil with a high smoke point like canola or peanut |
Tools You Actually Need
You don't need a fancy kitchen for this. In fact, using too many tools can actually make it harder. I've found that a few basics are all that's required to get this right.
For the dough, a large mixing bowl and a sturdy spoon are your best friends. You can use a stand mixer such as KitchenAid if you're making a massive batch, but for 6 pieces, hand mixing is faster and prevents over working. You'll also need a floured surface - a clean countertop or a large wooden board works perfectly.
For the frying, a heavy bottomed skillet is a must. Cast iron is the gold standard here because it holds heat evenly, meaning the oil temperature won't drop significantly when you slide the dough in.
If you have one, a digital thermometer is great, but you can also use the "wooden spoon test" - dip the handle of a wooden spoon in the oil, and if steady bubbles dance around it, you're ready to go.
Finally, have a plate lined with paper towels ready. The moment that bread comes out of the oil, it'll want to shed excess fat. If you leave it in the pan, the bottom will get soggy from the residual oil.
Easy Steps to Follow
Right then, let's get into the actual cooking. Remember, the goal here is a "shaggy" dough, not a perfectly smooth ball.
- Whisk together the flour, baking powder, and salt in a large bowl. Note: Whisking removes lumps and ensures the baking powder is evenly spread.
- Create a well in the center and pour in the warm water and oil.
- Stir with a spoon until a shaggy dough forms. Note: Stop stirring the second the flour is incorporated.
- Gently knead by hand for only 1-2 minutes until the dough holds together. Do not over work it or the bread will be tough.
- Cover the dough with a clean towel and let it rest for 10 minutes to relax the gluten.
- Divide the dough into 6 equal portions.
- On a floured surface, gently pat each ball into a circle about ½ inch thick using your fingertips. Note: Avoid using a rolling pin if you can, as it squashes the air bubbles.
- Heat the neutral oil in a skillet over medium high heat until it reaches 350°F (180°C).
- Carefully slide in one piece of dough and fry for 2-3 minutes per side until mahogany colored and puffed.
- Drain on paper towels for 1 minute before serving.
Common Mistakes to Avoid

Even with an easy fry bread recipe, things can go sideways. Usually, it comes down to temperature or timing.
Troubleshooting Common Issues
| Issue | Solution |
|---|---|
| Why Your Bread Is Greasy | This is the most common complaint. When the oil isn't hot enough, the dough doesn't "seal" instantly. Instead of frying, it essentially soaks up the oil, leaving you with a heavy, oily piece of bread. |
| Why Your Bread Is Tough | If your bread feels like a tortilla instead of a pillow, you likely over kneaded the dough. The more you work the flour, the more gluten develops. While gluten is great for sourdough, it's the enemy o |
| Why Your Bread Is Raw Inside | This happens when the oil is too hot. The outside browns almost instantly, but the heat never reaches the center. If you see the bread turning dark brown in under 60 seconds, turn the heat down. |
Common Mistakes Checklist:
- ✓ Used warm water, not boiling or cold.
- ✓ Kneaded for less than 2 minutes.
- ✓ Let the dough rest for a full 10 minutes.
- ✓ Patted dough with fingers instead of a heavy roller.
- ✓ Verified oil temperature before adding dough.
Tasty Ways to Change It
Once you've got the base down, you can really play around with this. The beauty of this homemade indian fry bread is how well it pairs with both salty and sweet things.
Savory Garlic & Herb: Brush the hot bread with melted butter mixed with garlic powder and chopped parsley. It's a brilliant way to turn the bread into a side dish for dinner. If you like a mix of textures, try serving it alongside some BBQ Chicken Pizza for a feast of comfort foods.
Sweet Cinnamon Sugar: While the bread is still glistening with a bit of oil, toss it in a bowl of cinnamon and sugar. It's very similar to the vibe of Easy Churros, but with a softer, fluffier center.
The Cornmeal Swap: Replace ¼ cup of the all purpose flour with fine yellow cornmeal. This adds a slight crunch to the exterior and a subtle nuttiness to the flavor. It makes the bread feel a bit more rustic.
Dairy-free Option: This recipe is naturally dairy-free as it uses vegetable oil. To keep it that way, just avoid the butter brush and use a drizzle of maple syrup or honey for sweetness.
| Original Ingredient | Substitute | Why It Works |
|---|---|---|
| All Purpose Flour | Bread Flour | More protein. Note: Results in a chewier, less airy bread |
| Vegetable Oil | Grapeseed Oil | Very high smoke point. Note: Completely neutral flavor |
| Warm Water | Warm Milk | Adds richness. Note: Makes the crust brown faster due to lactose |
Adjusting the Batch Size
If you're cooking for a crowd or just for yourself, you'll need to tweak the process slightly. You can't always just multiply everything by two and expect the same result.
Scaling Down (Half Batch): When making 3 pieces instead of 6, use 1 cup of flour. Be careful with the water; you might need a tablespoon less since smaller amounts of flour can sometimes feel "wetter." Use a smaller skillet so the oil stays deep enough to allow the bread to float.
Scaling Up (Double/Triple Batch): If you're doubling the recipe, don't double the salt or baking powder exactly - go for about 1.5x to 1.7x. Too much leavening in a large batch can create a metallic aftertaste. Most importantly, work in batches.
If you crowd the pan, the oil temperature will plummet, and you'll end up with the "oil soak" issue we talked about earlier.
Baking Adjustment: If you absolutely can't fry, you can bake these at 400°F (200°C) for about 10-12 minutes. However, be warned: you'll lose that signature shatter crisp exterior and the puffed up air pockets.
It becomes more of a thick biscuit than a fry bread.
Debunking Bread Myths
There's a lot of old school advice out there that actually does more harm than good for this specific recipe.
The Yeast Myth: Many people think you need yeast for a "real" bread. For this easy fry bread recipe, yeast is actually optional. Baking powder provides a more consistent, immediate lift that suits the frying process better than a slow yeast rise.
The Rolling Pin Myth: You'll see a lot of recipes telling you to roll the dough thin. Trust me on this: don't. A rolling pin compresses the air bubbles. Using your fingertips to pat the dough keeps it airy.
The "Seal the Juices" Myth: Some say frying "seals" the bread. In reality, frying is just a very fast way to cook the outside through intense heat. The "puff" comes from steam expanding inside the dough, not from any kind of seal.
Keeping the Bread Fresh
Fry bread is at its absolute peak the second it leaves the pan, but you can still save the leftovers if you're not eating them all at once.
Storage Guidelines: Store any leftover bread in a paper bag or wrap them loosely in a clean kitchen towel. Avoid airtight plastic containers while they're still warm, or they'll steam themselves into a soggy mess. In the fridge, they'll stay okay for about 2 days.
Freezing Tips: You can freeze the fried pieces for up to 2 months. Place them in a single layer on a baking sheet first so they don't stick together, then transfer them to a freezer bag. When you're ready to eat, just pop them in a toaster oven for a few minutes.
Zero Waste Ideas: If you have a little bit of dough left over that wasn't enough for a full piece, don't toss it. Roll it into tiny balls and fry them as "bread pops." They make great croutons for a salad or a fun snack for kids.
If the bread has gone stale, cube it and fry it with cinnamon and sugar for a quick version of french toast bites.
Plating Your Fresh Bread
How you serve this depends on the vibe of the meal. For a casual family dinner, I just pile them in a basket lined with a checkered cloth. It keeps them warm and looks inviting.
If you're doing a more "composed" dish, like Navajo style tacos, place one piece of bread on a plate and heap seasoned beans, shredded lettuce, diced tomatoes, and a dollop of sour cream right in the center. The bread acts as a sturdy, edible plate that soaks up all the juices from the toppings.
For a sweet treat, stack three pieces with a thin layer of honey or jam between them, like a fry bread sandwich. Top it with a dusting of powdered sugar and a few fresh berries to make it look like something from a cafe. It's simple, but it feels special.
Recipe FAQs
How to prevent the dough from becoming tough?
Knead the dough for only 1-2 minutes. Overworking the flour develops too much gluten, which makes the bread chewy instead of tender.
Is it true that I must knead the dough for several minutes to make it fluffy?
No, this is a common misconception. Only knead until the dough just holds together to ensure a light, airy texture.
How to verify the oil is at the right temperature?
Use a thermometer to hit 350°F (175°C). If you don't have one, drop a small piece of dough into the oil; it should sizzle and rise to the surface immediately.
Can I skip the 10-minute resting period?
No, keep the rest period. Letting the dough sit relaxes the gluten, making it much easier to pat the circles to 1/2 inch thickness without them shrinking back.
How to ensure the fry bread puffs up?
Maintain a consistent oil temperature of 350°F (175°C). This heat triggers the baking powder to react quickly for a mahogany color and airy center. If you enjoyed mastering the dough handling here, see how we adapt similar shaping principles in our classic pumpkin pie.
What to do if the bread browns too quickly but stays raw inside?
Reduce the heat slightly. This happens when the oil exceeds 350°F (175°C), searing the outside before the center can cook through.
How to reheat leftover fry bread?
Warm the pieces in an oven or toaster oven. This restores the original crispness much better than a microwave, which often makes the bread soggy.
Easy Indian Fry Bread