Spicy Red Pepper Pickles with Garlic
- Time: 15 min active + 24 hours chilling
- Flavor/Texture Hook: Bright, vinegary snap with a slow heat
- Perfect for: Meal prep, sandwich toppers, or a healthy snack
- Spicy Red Pepper Pickles
- The Reason Peppers Stay Crisp
- Ingredient Deep Dive
- Quick Recipe Specs
- Essential Ingredients List
- Kitchen Tools Needed
- Step By Step Instructions
- Fix Common Problems
- Variations and Substitutions
- Storage and Freezing Guide
- Serving and Pairing Ideas
- The Key Texture Trick
- Recipe FAQs
- 📝 Recipe Card
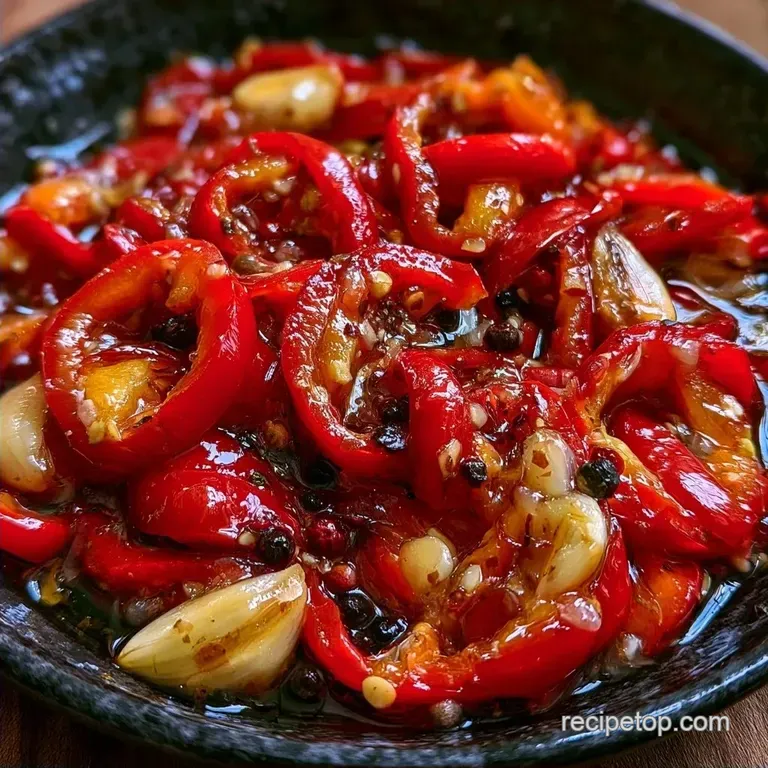
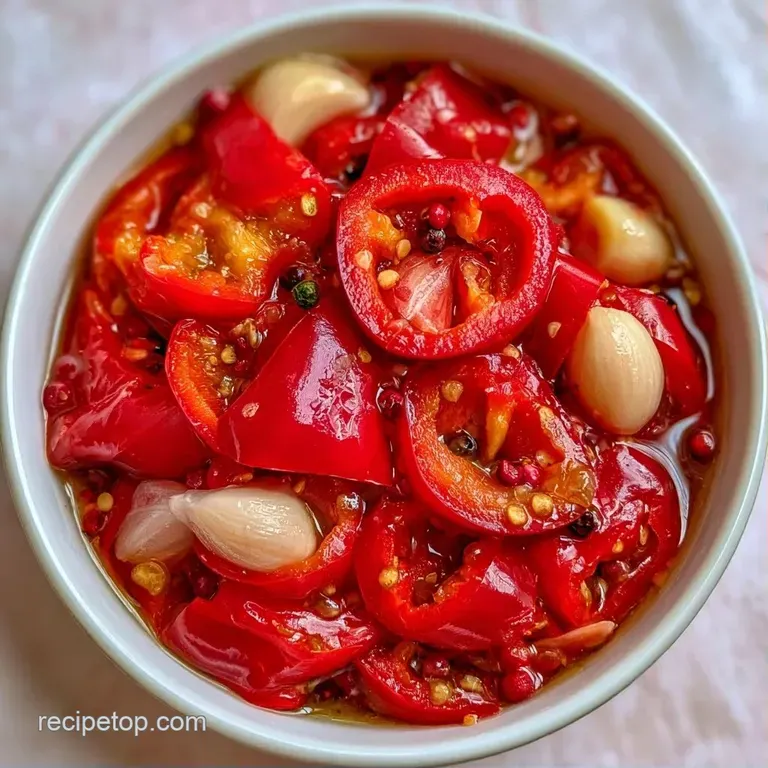
Spicy Red Pepper Pickles
The smell of simmering vinegar and garlic always takes me back to my grandmother's kitchen in the autumn. Pickling isn't just about preservation, it's a cultural ritual that turns the summer harvest into something that lasts through the winter.
In many Eastern European and Mediterranean homes, a jar of pickled vegetables on the table is as standard as salt or pepper.
These Spicy Red Pepper Pickles bring that tradition into a modern kitchen. They offer a punchy, acidic contrast to rich foods, and the heat builds slowly rather than hitting you all at once. It's a simple process, but there's a lot of chemistry happening in those jars.
You can expect a vegetable that retains a satisfying crunch. By using a specific combination of acids and salts, we prevent the cell walls of the peppers from breaking down too quickly. The result is a bright, glossy pickle that tastes like it came from a high end deli.
The Reason Peppers Stay Crisp
Vinegar Blend: Combining white and apple cider vinegar creates a balanced pH that preserves the pepper's structure. Salt Selection: Using pickling salt prevents the brine from becoming cloudy and keeps the vegetables firm.
| Method | Time | Texture | Best For |
|---|---|---|---|
| Fast Soak | 2 hours | Slightly soft | Immediate use |
| Classic Chill | 24 hours | Firm and snap | Meal prep |
Ingredient Deep Dive
| Ingredient | What It Does | Best Swap |
|---|---|---|
| Distilled White Vinegar | Provides sharp acidity | Rice vinegar (slightly sweeter) |
| Apple Cider Vinegar | Adds fruity depth | Champagne vinegar |
| Pickling Salt | Firms the pepper walls | Kosher salt (non iodized) |
| Red Pepper Flakes | Supplies the heat | Fresh Thai chilies |
Quick Recipe Specs
This recipe focuses on nutritional balance and longevity. By avoiding excessive sugar, we keep the glycemic load low while maximizing the probiotic potential of the vinegar.
The prep is fast, but the patience is where the flavor lives. If you rush the chilling process, the brine won't penetrate the core of the pepper rings, leaving them bland in the middle.
Essential Ingredients List
- 1 lb (450g) mini red bell peppers, sliced into rings Why this? Mini peppers have thicker walls for better crunch
- 4 cloves (20g) garlic, smashed Why this? Smashed cloves release more oils than minced
- 1 tbsp (5g) red pepper flakes Why this? Provides a consistent, distributed heat
- 1 tsp (2g) black peppercorns Why this? Adds a woody, floral bass note
- 1 cup (240ml) distilled white vinegar Why this? High acidity for safety and snap
- 1 cup (240ml) apple cider vinegar Why this? Mellows the sharp edge of white vinegar
- ½ cup (100g) granulated sugar Why this? Balances the acid without over sweetening
- 2 tbsp (36g) pickling salt Why this? Pure salt without additives that cloud the jar
- 1 tsp (5g) sea salt Why this? Adds trace minerals and depth
Kitchen Tools Needed
You don't need a professional lab for this. A few basic items will do.
First, get two quart sized Mason jars. Glass is non reactive, which is vital when dealing with high acidity. You'll also need a medium saucepan to brew the brine and a sharp knife for the pepper rings.
Chef's Note: Use a stainless steel or enamel pot. Avoid aluminum, as the vinegar can react with the metal and leave a metallic taste in your peppers.
Step by step Instructions
- Distribute the smashed garlic cloves, black peppercorns, and red pepper flakes evenly between two clean quart sized Mason jars.
- Pack the sliced red peppers tightly into the jars, leaving about ½ inch of headspace at the top, pressing them down firmly. Note: Packing tightly prevents the peppers from floating
- In a medium saucepan, combine the white vinegar, apple cider vinegar, sugar, pickling salt, and sea salt.
- Bring the mixture to a simmer over medium heat, stirring constantly until the sugar and salt have completely dissolved, then remove from heat immediately.
- Carefully pour the hot brine over the peppers, ensuring they are completely covered.
- Tap the jars gently on the counter to release trapped air bubbles, seal the lids tightly, and allow to cool to room temperature.
- Transfer jars to the refrigerator and chill for 24 hours until the peppers are translucent and bright red.
Fix Common Problems
If your peppers come out tasting like plain vinegar or feeling like wet cardboard, something went wrong in the process. Usually, it comes down to the salt or the temperature of the brine.
For Peppers That Turn Out Mushy
This usually happens if the brine was boiling rather than simmering, or if you used iodized table salt. The iodine can break down pectin, which is what keeps the pepper walls strong. If you're struggling with crispness, check out my garlic dill pickles for another approach to vegetable firmness.
For a Brine That Looks Cloudy
Cloudiness is almost always due to impurities in the salt. Pickling salt is filtered to remove the minerals that cause a hazy appearance.
| Problem | Root Cause | Solution |
|---|---|---|
| Mushy Texture | Boiling brine | Keep it at a simmer |
| Cloudy Liquid | Iodized salt | Use pickling or sea salt |
| Bland Center | Short chill time | Wait full 24 hours |
Variations and Substitutions
You can tweak this recipe depending on your heat tolerance. For a "sweet heat" style, increase the sugar by 2 tablespoons. This makes them taste more like the ones you find in New York delis.
If you want something less spicy, try these sweet red pepper pickles instead. To add a different dimension, toss in some sliced carrots or cauliflower florets. The brine works just as well for those, though they might need an extra day to fully pickle.
For a low sugar alternative, replace the granulated sugar with a monk fruit sweetener. Use a 1:1 ratio, but taste the brine first, as some sugar alternatives have a cooling aftertaste that can clash with the vinegar.
Storage and Freezing Guide
Store these in the fridge for up to 4 weeks. Keep them tightly sealed to prevent the vinegar aroma from taking over your refrigerator.
Do not freeze these. Freezing destroys the cell structure of the peppers, and once they thaw, they will be completely mushy. The vinegar also doesn't freeze well, leading to a separated, watery mess.
To avoid waste, don't throw away the leftover brine. It's a fantastic base for a spicy vinaigrette. Just whisk in some olive oil and a bit of Dijon mustard for a quick salad dressing.
Serving and Pairing Ideas
These are a nutrition dense addition to any meal. Because they provide a sharp, acidic hit, they work best with fatty or rich proteins.
Try them on a grilled turkey burger or sliced over a bowl of quinoa and roasted chickpeas. They also make a great garnish for a charcuterie board, pairing well with a sharp cheddar or a creamy brie.
If you're using them in a sandwich, pat the pepper rings dry with a paper towel first. This prevents the brine from making your bread soggy.
The Key Texture Trick
The one thing that changes everything is the temperature window. You must pour the brine while it's hot, but not boiling.
The heat opens up the pores of the pepper, allowing the vinegar and salt to enter the vegetable quickly. However, if the liquid is too hot, it actually cooks the pepper, destroying the crispness. Aim for that point just as the first bubbles break the surface.
This ensures the peppers stay taut while the flavors infuse deeply.
Recipe FAQs
What are the best spicy peppers for pickles?
Mini red bell peppers combined with red pepper flakes. This pairing offers a sweet, crisp base with a heat level you can easily customize.
How do you make hot pepper pickles?
Pack sliced red peppers, garlic, and peppercorns into jars. Pour over a simmering mixture of white vinegar, apple cider vinegar, sugar, and salt, then refrigerate for 24 hours.
Do homemade vinegar pickles need to be refrigerated?
Yes, they must be refrigerated. Since these are not processed through canning, the fridge keeps them safe and crisp for up to 4 weeks.
How to make spicy pickles without canning?
Follow a refrigerator pickle method. Fill your jars with peppers and aromatics, pour in the hot brine, and store the sealed jars directly in the refrigerator.
Why did my peppers turn out mushy?
You likely froze them. Freezing destroys the cell structure of the peppers, which results in a soft, watery texture once they thaw.
Is it true that any salt can be used for the brine?
No, this is a common misconception. Stick to pickling salt or sea salt to ensure the brine remains clear and free of metallic off-flavors.
What can I serve these spicy pickles with?
Pair them with burgers, sandwiches, or charcuterie boards. If you enjoyed balancing the acidity and heat here, see how the same principle works in our Bang Bang Chicken.
Spicy Red Pepper Pickles

