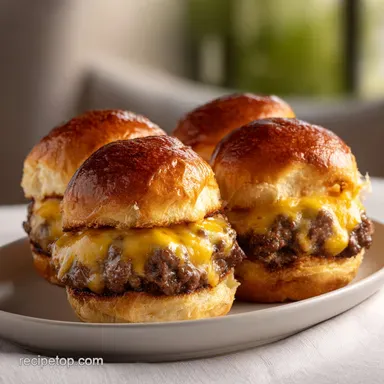
Cheeseburger Sliders: Baked and Gooey
- Time: 20 min active + 25 min cooking = Total 45 mins
- Flavor/Texture Hook: Buttery, garlic brushed tops with a sharp cheddar melt
- Perfect for: Game day, quick family dinners, or beginner friendly party food
Ever wondered why some party sliders feel like a chore to make while others just seem to appear? I used to be the person who insisted on shaping 24 tiny, individual patties, searing them one by one, and then frantically trying to assemble them while the first batch went cold.
It was a total nightmare, and I spent more time at the stove than with my guests.
Then I discovered the "slab method" for Cheeseburger Sliders. Instead of treating them like miniature burgers, you treat them like a savory cake. You bake the whole block of rolls at once, which means the middle stays velvety and steamy while the edges get that golden, buttery crunch.
Once I switched to this, I stopped stressing about patty thickness and started actually enjoying the party.
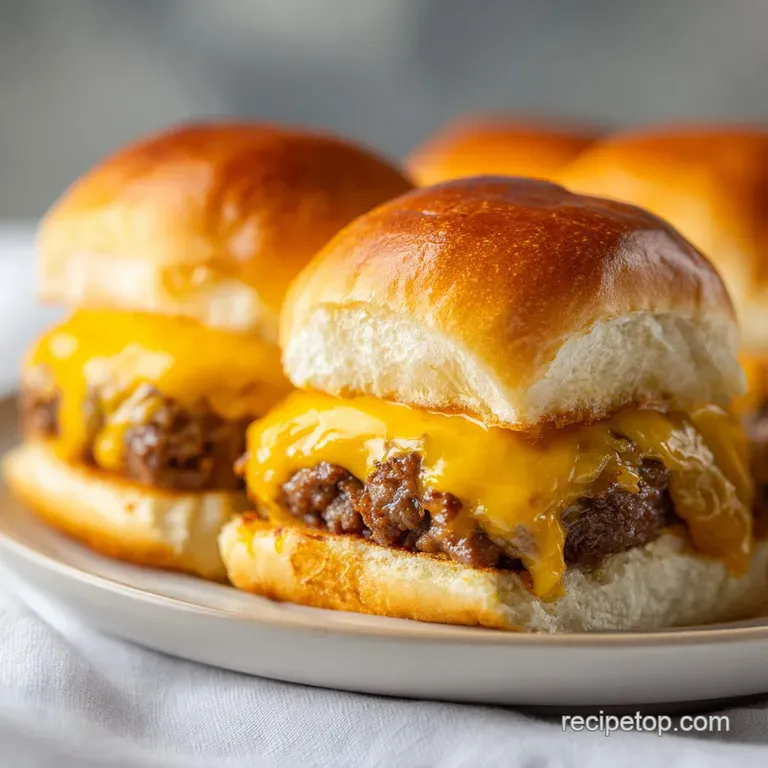
You can expect a result that tastes exactly like a classic drive thru burger but with the comfort of a home cooked meal. We're talking about melted sharp cheddar, a hit of tangy pickle, and a garlic butter glaze that makes the bread shatter slightly when you bite into it.
It's a straightforward process that uses minimal tools, making these Cheeseburger Sliders a reliable win for any weeknight.
Easy Baked Cheeseburger Sliders
But what actually makes this version different from just putting a burger on a small bun? It's all about the moisture management. When you bake these as a single unit, the buns protect the meat from drying out in the oven's dry heat.
The fat from the beef and cheese steams the inside of the rolls, creating a texture that's more like a cloud than a piece of bread.
If you're looking for something even more indulgent, you might like my Crack Burger recipe, but for a crowd, these sliders are just more efficient. The goal here is maximum flavor with minimum fuss. We're skipping the complex shaping and focusing on a seasoned beef crumble that packs a punch.
Right then, let's look at why this specific method works so well. Most people think you need to sear every single side of a patty to get flavor, but when you're making Cheeseburger Sliders in a batch, a well browned crumble provides plenty of surface area for those savory notes to develop.
The Secret Glaze Trick
Slab Baking: Cooking the rolls as one piece creates a steam chamber, keeping the centers soft while the tops crisp.
Fat Distribution: Using lean beef (90%) prevents the bottom rolls from becoming greasy sponges, ensuring they hold their shape.
Garlic Butter Seal: The glaze doesn't just add flavor, it creates a barrier that stops the bread from drying out during the 25 minute bake.
Cheese Blanket: Placing the cheese directly on the meat before the top bun goes on ensures the cheese melts into the beef, acting as a "glue" for the whole slider.
| Method | Time | Texture | Best For |
|---|---|---|---|
| Individual Patties | 60 mins | Charred/Firm | Gourmet dinner |
| Slab Bake (This) | 45 mins | Soft/Velvety | Parties/Family |
| Slow Cooker | 4 hours | Shredded/Wet | Potlucks |
Essential Ingredient List
To get the best result, we need to look at what each part does. According to the USDA FoodData, lean ground beef provides a concentrated protein hit without the excess grease that can ruin a soft roll.
| Ingredient | Science Role | Pro Secret |
|---|---|---|
| 90% Lean Beef | Protein Base | Don't overwork the meat or it gets tough |
| Hawaiian Rolls | Sweet Contrast | Keep them connected to trap steam |
| Sharp Cheddar | Binding Agent | Thin slices melt faster and more evenly |
| Garlic Butter | Flavor Seal | Use melted Greek yogurt for a tangier finish |
For the Beef Filling
- 450g (1 lb) lean ground beef (90% lean) Why this? Prevents soggy buns while keeping the meat juicy
- 60g (1/2 cup) white onion, finely diced Why this? Adds aromatic sweetness to the beef
- 5g (1 tsp) garlic powder Why this? Even distribution of flavor
- 3g (1/2 tsp) smoked paprika Why this? Adds a hint of "grill" flavor without a grill
- 3g (1/2 tsp) salt Why this? Essential for flavor extraction
- 1g (1/4 tsp) cracked black pepper Why this? Sharp, spicy contrast
- 15ml (1 tbsp) olive oil Why this? High smoke point for browning
For the Assembly
- 1 pack (12 count) Hawaiian rolls Why this? The sweetness balances the salty cheese
- 168g (6 slices) thin cut sharp cheddar cheese Why this? Strong flavor that doesn't get lost
- 150g (1 cup) sliced dill pickles Why this? Acid cuts through the fat
- Fresh shredded lettuce Why this? Adds a fresh, cool crunch
For the Garlic Glaze
- 28g (2 tbsp) melted unsalted butter Why this? Classic richness
- 15g (1 tbsp) melted light butter or Greek yogurt Why this? Adds a slight tang and lightens the feel
- 5g (1 clove) minced garlic Why this? Pungent, savory top note
- 15ml (1 tbsp) chopped fresh parsley Why this? Visual brightness and freshness
Tools You'll Use
You don't need a professional kitchen for this. A standard skillet and a sheet pan are the only heavy hitters here.
- 9x13 inch sheet pan (to fit the roll block)
- Large non stick skillet
- Serrated knife (critical for slicing rolls without squashing them)
- Small whisk or fork
- Pastry brush (or the back of a spoon)
Cooking step by step
Let's crack on. Trust me on the slicing part - if you use a regular chef's knife, you'll likely crush the bottom buns. A serrated blade is your best friend here.
- Heat olive oil in a skillet over medium high heat. Add the ground beef and diced onions, cooking until the beef is browned and the onions are translucent. Note: Don't stir too often so the beef can actually sear.
- Stir in the garlic powder, smoked paprika, salt, and pepper. Cook for another 2 minutes, then drain any residual liquid. Note: Draining is key to avoid soggy Cheeseburger Sliders.
- Preheat the oven to 175°C (350°F).
- Using a serrated knife, slice the entire block of Hawaiian rolls in half horizontally without separating them.
- Place the bottom half of the rolls in a 9x13 inch sheet pan. Spread the cooked ground beef evenly across the bread.
- Layer the cheddar cheese slices over the meat, add sliced dill pickles if desired, and place the top half of the rolls back on.
- Whisk together melted butter, light butter or Greek yogurt, minced garlic, and fresh parsley to create a glaze. Brush the glaze evenly over the top of the rolls.
- Bake for 25 minutes until the rolls are golden brown and the cheese is melted.
- Serve with fresh shredded lettuce.
Fix Common Mistakes

The most common issue people have with Cheeseburger Sliders is the "soggy bottom" syndrome. This usually happens when the beef isn't drained or the rolls aren't sliced cleanly. If you're seeing a pool of grease at the bottom of your pan, you likely used beef with too much fat (like 80/20) without draining it properly.
Why Your Rolls Are Soggy
This usually stems from excess moisture in the meat or using too many "wet" toppings like raw onions or extra sauce inside the bake. To prevent this, always brown the beef fully and drain the fat.
Why Your Cheese Isn't Melting
If your cheese looks like plastic sheets instead of a molten blanket, your oven temperature might be too low, or you used "pre shredded" cheese. Pre shredded cheese is coated in potato starch to prevent clumping, which slows down the melting process.
| Problem | Root Cause | Solution |
|---|---|---|
| Soggy buns | Excess beef fat | Drain meat thoroughly in a colander |
| Burnt tops | Oven rack too high | Move pan to the middle rack |
| Dry meat | Overcooked in skillet | Remove beef from heat as soon as it's brown |
Common Mistakes Checklist:
- ✓ Used a serrated knife for the rolls
- ✓ Drained the beef fat before assembly
- ✓ Oven preheated to exactly 175°C
- ✓ Cheese slices cover the entire surface
- ✓ Glaze applied only to the top, not the sides
Easy Dietary Changes
If you need to tweak this recipe for your family, there are a few ways to do it without losing the soul of the dish. For those looking for a lower calorie version, replacing the butter in the glaze with more Greek yogurt works surprisingly well.
For a gluten-free version, you can find gluten-free slider buns, but since you can't bake them as a "slab," you'll have to assemble them individually. To keep them from drying out, brush them with the garlic butter and toast them in the oven for 5-8 minutes before adding the meat.
If you want a plant based alternative, use a high-quality meat substitute like Beyond or Impossible beef. These typically have a similar fat profile to lean beef, so the bake time remains the same. Just swap the cheddar for a vegan melt.
If you find you have leftover ground beef from a larger batch, you could try making my Cheeseburger Macaroni Soup, which uses similar flavors but in a comforting bowl.
Adjusting Serving Sizes
When you're scaling these Cheeseburger Sliders, you can't just double everything and hope for the best. The physics of the pan changes when you increase the volume.
Scaling Down (6 Sliders): Use a smaller baking dish (like an 8x8 square pan). Reduce the baking time by about 5 minutes, as a smaller mass heats through faster. You'll only need half the beef and 3 slices of cheese.
Scaling Up (24-48 Sliders): Work in batches using two 9x13 pans. I recommend increasing the salt and spices to 1.5x rather than 2x, as these flavors can become overwhelming in large quantities. Keep the liquids (butter/yogurt) at a 1:1 ratio.
Baking Large Batches: If you're cramming two pans into one oven, lower the temperature to 160°C (325°F) and extend the bake time by 10 minutes. This prevents the rolls on the top rack from burning while the bottom rack is still cold.
Debunking Slider Myths
There's a lot of bad advice out there about ground beef. Let's clear a few things up.
Myth: You should wash your ground beef before cooking. Honestly, don't do this. Washing beef doesn't remove bacteria; it just splashes those bacteria all over your kitchen sink and counters. Heat is the only thing that makes beef safe to eat.
Myth: Searing the meat "seals in the juices." This is a classic kitchen lie. Searing actually causes the meat to lose more moisture. The reason we do it is for the flavor - those browned bits are where all the savory goodness lives.
Freeze and Reheat Guide
These Cheeseburger Sliders are surprisingly freezer friendly, provided you leave the lettuce and pickles out of the freezing process.
Storage: Keep leftovers in an airtight container in the fridge for up to 3 days. The rolls will stay soft if you keep them tightly sealed.
Freezing: You can freeze these before the final bake. Assemble the rolls with beef and cheese, wrap the whole block in foil and then plastic wrap, and freeze for up to 2 months. When you're ready, thaw in the fridge overnight, apply the garlic glaze, and bake as usual.
Reheating: Avoid the microwave if you can, as it makes the buns rubbery. The best way is to put them back in the oven at 175°C for 10 minutes. If you must use a microwave, wrap them in a damp paper towel to keep the moisture in.
Zero Waste Tip: Don't throw away the onion scraps or the beef drippings. Save the onion skins in a bag in the freezer to make a dark vegetable stock later. Any leftover garlic butter glaze can be brushed onto toasted sourdough for a quick snack.
Serving and Plating Tips
To make these Cheeseburger Sliders look like they came from a bistro, the presentation is key. Since they're baked as a block, the "pull apart" moment is the best part.
The Burger Board Layout: Instead of a plate, use a wooden cutting board. Place the slab of sliders in the center and surround them with bowls of extra pickles, sliced jalapeños, and a side of spicy mayo. It creates a communal feel that's great for parties.
Fresh Contrast: Since these are rich and buttery, you need something to cut through that weight. Serve them with a side of crisp coleslaw or a simple cucumber salad. The acidity of a vinegar based side dish makes the Cheeseburger Sliders taste even more savory.
The Final Touch: Right before serving, sprinkle a little extra fresh parsley over the top. It adds a pop of green that contrasts beautifully with the golden brown buns and yellow cheese. Use a sharp knife to cut through the rolls cleanly, ensuring every guest gets a perfect, intact mini burger.
Recipe FAQs
How to slice the rolls for the slab bake method?
Slice the entire block of Hawaiian rolls in half horizontally using a serrated knife without separating the individual buns. This creates two large slabs that are easier to assemble and glaze.
Should I use 90% lean ground beef?
Yes, 90% lean is recommended. Using leaner beef prevents excess grease from soaking into the bottom rolls during the baking process.
How to bake the sliders to get a golden brown finish?
Bake at 350°F (175°C) for 25 minutes. This ensures the cheese is fully melted and the garlic butter glaze is toasted.
Is it true that I must shape individual patties for these sliders?
No, this is a common misconception. Browning the beef and onions together in a skillet and spreading the mixture evenly across the bread saves time and keeps the meat moist.
Can I use Greek yogurt instead of light butter in the glaze?
Yes, Greek yogurt is a great alternative. It creates a similar creamy consistency for the garlic and parsley glaze while adding a slight tang.
How to incorporate the fresh shredded lettuce?
Add the lettuce after baking. Serve it on the side or place it on the sliders just before eating to keep the texture crisp and cool.
How to reheat leftover sliders without drying them out?
Warm them in the oven at 350°F until the cheese reaches a melt. This preserves the buttery texture of the rolls better than a microwave.
Cheeseburger Sliders