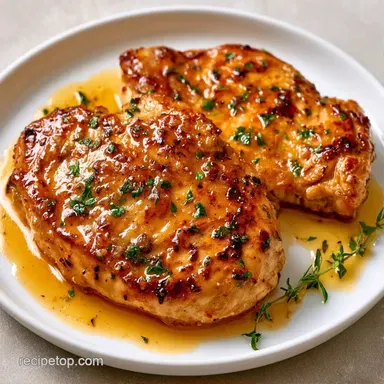
Failure-Proof Pan Seared Chicken Breast

- Time: 5 min active + 10 min cooking + 5 min resting
- Flavor & Texture: Golden-brown crust with tender, juicy meat
- Perfect for: Weeknight dinners and meal prep
Golden and Juicy Pan Seared Chicken
There is nothing more frustrating than chicken that is burnt on the outside but still raw in the middle. Or worse, that rubbery, gray protein that looks like it was boiled in a pan.
It usually happens because chicken breasts are uneven, with a thick end and a thin end, meaning one part overcooks while the other barely warms up.
The fix is simple. By evening out the thickness and controlling the heat, you get a consistent sear across the whole piece of meat. This method removes the guesswork.
You can expect a deep golden brown crust and a center that stays moist. This pan seared chicken works as a base for almost any meal, from salads to hearty pastas.
Why the Method Works
- Uniform Thickness: Pounding the meat to 3/4 inch means every part of the breast hits the pan at the same time and cooks at the same speed.
- Surface Moisture: Patting the meat bone-dry prevents it from steaming. Dry meat browns in minutes, while wet meat turns gray.
Choosing the right cooking method depends on your schedule. Stovetop searing is faster for a few pieces, while the oven is better for larger batches.
| Method | Time | Texture | Best For |
|---|---|---|---|
| Stovetop | 9-11 mins | Crispy crust | 1-4 breasts |
| Oven | 25-35 mins | Evenly tender | Large families |
Quick Cooking Specs
This recipe uses a high-heat sear followed by a butter baste to keep the meat moist. It is a budget-friendly approach that uses basic pantry spices to get high-end results.
The Ingredient List
These seasonings form a savory crust that balances the buttery finish. I prefer smoked paprika to introduce a touch of smokiness.
| Ingredient | Purpose | Alternative |
|---|---|---|
| Neutral Oil | Withstands high heat | Avocado or Grapeseed oil |
| Unsalted Butter | Enhances richness and color | Salted butter (decrease added salt) |
| Smoked Paprika | Contributes earthiness and hue | Sweet paprika (less smoky) |
| Kosher Salt | Aids the searing process | Table salt (use half the quantity) |
The type of oil you use is important; ensure it has a high smoke point to avoid burning in the pan.
- 4 (6 oz) boneless skinless chicken breasts
- 1 tbsp neutral oil
- 1 tbsp unsalted butter
- 1 tsp kosher salt
- 1/2 tsp cracked black pepper
- 1 tsp garlic powder
- 1 tsp smoked paprika
- 1/2 tsp onion powder
| Original Ingredient | Substitute | Why It Works |
|---|---|---|
| Smoked Paprika | Garlic Powder | Offers a similar savory depth. Note: Produces a pale gold hue |
| Unsalted Butter | Olive Oil | Introduces a fruity flavor. Note: Lacks the creamy texture |
Tools You'll Need
A heavy-bottomed skillet is the best choice here. Cast iron or stainless steel holds heat better than non-stick, which helps in forming that brown crust. You will also need a meat mallet (or a heavy rolling pin) and a digital meat thermometer to ensure food safety.
Step by step Process
Flattening the Meat
Lay each breast between two pieces of parchment paper. Using a meat mallet, lightly pound the thicker areas until the chicken is a uniform 3/4 inch thick.

Preparing the Surface
Use paper towels to dry the chicken thoroughly. In a small bowl, mix 1 tsp kosher salt, 1/2 tsp cracked black pepper, 1 tsp garlic powder, 1 tsp smoked paprika, and 1/2 tsp onion powder. Rub the seasonings generously into both sides of the meat.
Achieving the Sear
Warm 1 tbsp neutral oil in a heavy skillet over medium-high heat until it starts to shimmer and smoke. Carefully place the chicken in the pan and sear without moving for 5–6 minutes until a dark golden crust forms.

Finishing the Cook
Flip the chicken and add 1 tbsp unsalted butter to the pan. Spoon the melted butter over the meat for another 4–5 minutes. Remove the chicken from the skillet once the internal temperature reaches 160°F.
Resting the Meat
Move the chicken to a plate and let it rest for 5 minutes. The residual heat will bring the meat up to 165°F, which is the USDA-recommended safe internal temperature.
What Can Go Wrong
Preventing Meat Sticking
If the chicken feels stuck to the pan when you try to flip it, wait. The meat releases naturally once the crust is fully developed. Forcing it will just tear the golden layer off.
Avoiding Dry Protein
Using a thermometer is the most reliable way to avoid overcooking. If you rely on a timer, you might miss the window by a minute, which can turn the meat rubbery. Pull it at 160°F and let it carry over.
Managing Pan Heat
If the oil smokes aggressively or the spices burn before the meat browns, your heat is too high. Turn it down to medium and add a tiny bit more oil to stabilize the temperature.
Simple Flavor Twists
You can easily change the profile by swapping the spices. For a Garlic Herb Twist, omit the paprika and add dried oregano and thyme.
If you want a more indulgent meal, this is a great base for a creamy horseradish sauce or a rich mushroom sauce. To make a quick pan sauce, deglaze the skillet after removing the meat with a splash of beef or chicken stock, scraping up the brown bits before stirring in a knob of butter.
Storage and Reheating
Place any leftovers in a tightly sealed container and refrigerate for up to 4 days.
To reheat without drying out the meat, slice the chicken and place it in a skillet over medium heat. Add a small amount of water or broth and cover with a lid for 2-3 minutes. Heat until the thickest part reads 165°F (74°C) on a digital meat thermometer.
Serving Suggestions

This protein pairs wonderfully with mashed potatoes, steamed broccoli, or a fresh green salad. To balance the richness of the butter baste, adding a touch of lemon juice just before serving brightens the entire dish.
Recipe FAQs
Can I serve pan seared chicken breast with sauce?
Yes, it pairs well with a variety of savory sauces.
Tip: pair it with a cherry tomato sauce for a bright, acidic contrast.
Is it possible to finish this chicken in the oven?
Yes, you can sear the meat in the pan and then transfer the skillet to the oven to reach the final temperature.
Tip: check that your skillet is oven-safe before beginning the process.
Do I have to use boneless skinless chicken breasts?
This recipe is designed for boneless skinless breasts to ensure fast and uniform cooking.
Tip: pound the thickest part to 3/4 inch to avoid overcooking the edges.
Why is boneless meat preferred for this method?
Boneless cuts cook more evenly and quickly in a heavy-bottomed skillet than bone-in pieces.
Tip: pat the surface completely dry with paper towels to ensure a deep golden brown crust.
How do I stop the meat from sticking to the pan?
Heat the neutral oil until it shimmers and just begins to smoke before adding the chicken.
Tip: leave the chicken undisturbed for 5-6 minutes so the crust forms and releases naturally.
What is the cooking time for each side?
Sear the first side for 5-6 minutes and the second side for 4-5 minutes.
Tip: pull the chicken at 160°F (71°C) and let it rest for 5 minutes to reach 165°F (74°C).
Pan Seared Chicken in 20 Minutes