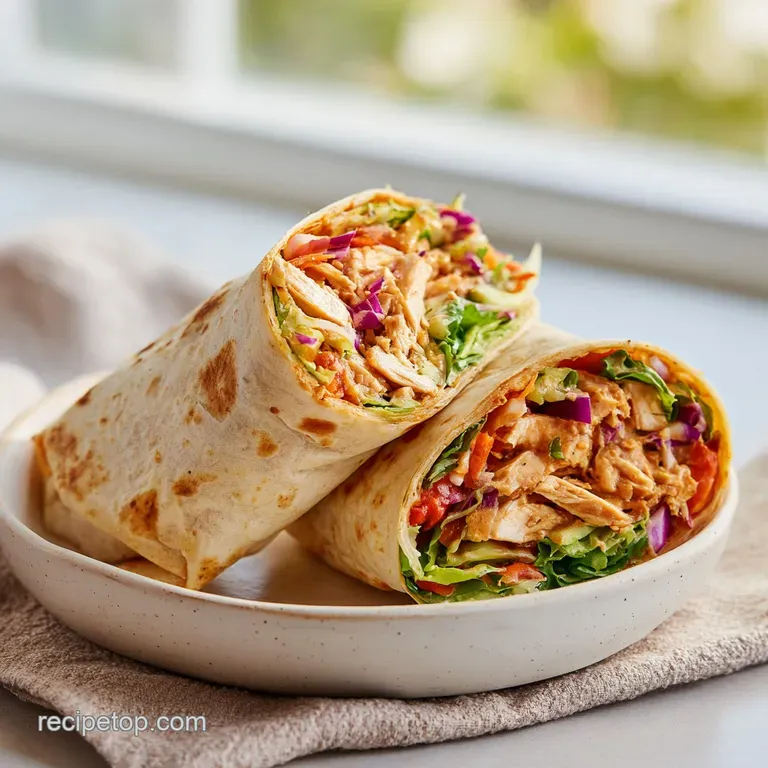
Thai Peanut Chicken Wrap: Fresh and Creamy
- Time:15 minutes prep + 10 minutes cook = 25 minutes total
- Flavor/Texture Hook: Crunchy raw vegetables meet velvety, nutty warmth
- Perfect for: High protein office lunches or quick weeknight recovery meals
- Make-ahead: Prep the sauce and chop vegetables up to 3 days in advance
- Master the Ultimate Thai Peanut Chicken Wrap
- Essential Specifications for Success
- Components of the Perfect Wrap
- Tools for Precise Cooking
- The Alchemy of Ingredients
- Step-by-Step Construction Guide
- Fixes for Common Cooking Issues
- Flavor Swaps and Dietary Tweaks
- Tips for Storage and Freshness
- Side Dishes to Serve Along
- Debunking Common Kitchen Myths
- Recipe FAQs
- 📝 Recipe Card
Master the Ultimate Thai Peanut Chicken Wrap
Yesterday, I was standing in my kitchen at 6:00 PM, starving after a long workout, and I realized I had exactly zero interest in a complicated meal. I pulled out a head of purple cabbage and some chicken breast, and the second those thin strips hit the hot avocado oil, that distinctive, sharp sizzle filled the room.
The aroma of searing protein followed by the nutty, deep scent of warming peanut butter is something that still gets me every time. It’s that specific sensory trigger that tells my brain a high nutrition, high satisfaction meal is only minutes away.
Discover our incredible recipe for the Delicious Thai Peanut Chicken Wrap with Fresh Vegetables and Creamy Peanut Sauce. I used to think that a wrap was just a sad, cold tortilla filled with leftovers, but this version changed my perspective entirely.
We are talking about a warm, mahogany crusted chicken paired with a sauce that is so velvety it coats every fiber of the vegetables without making them weep. It’s a balanced approach to eating that doesn't sacrifice the punchy, vibrant flavors we usually associate with takeout.
This recipe is designed for the cook who wants precision and efficiency. We aren't just throwing things into a flour disk and hoping for the best. We are using specific ratios to ensure the peanut sauce has the right viscosity and the chicken retains its internal moisture.
If you’ve ever had a wrap fall apart in your hands or felt like the flavor was a bit one note, this technique driven approach is going to be your new best friend. Let's get into the mechanics of why this works so well.
Essential Specifications for Success
To get the most out of your Thai Peanut Chicken Wrap with Fresh Vegetables and Creamy Peanut Sauce, we need to look at the timing and temperatures that lead to a superior texture. Cooking chicken breast is a game of seconds; go too long, and it becomes stringy and dry.
Stop too early, and you miss that beautiful crust that provides the savory base for the entire dish.
The Barrier Method: Placing the cabbage directly against the tortilla creates a hydrophobic layer that prevents the sauce from soaking into the starch. This simple structural move ensures the wrap stays firm even if you’re eating it two hours later at your desk.
| Chicken Thickness | Target Internal Temp | Rest Time | Visual Cue |
|---|---|---|---|
| 1/2 inch strips | 165°F (74°C) | 2 minutes | Opaque center with gold edges |
| 1 inch cubes | 165°F (74°C) | 3 minutes | Firm to the touch, no pink |
| Thin shavings | 165°F (74°C) | 1 minute | Quick browning, edges curl |
The interaction between the warm chicken and the cold vegetables is what creates that refreshing mouthfeel. If the chicken is too hot, it wilts the cabbage instantly. If it's too cold, the peanut fats in the sauce will seize up and become clumpy rather than smooth. Timing the assembly for when the chicken is just slightly above room temperature is the pro move for a balanced chicken meal that feels intentional.
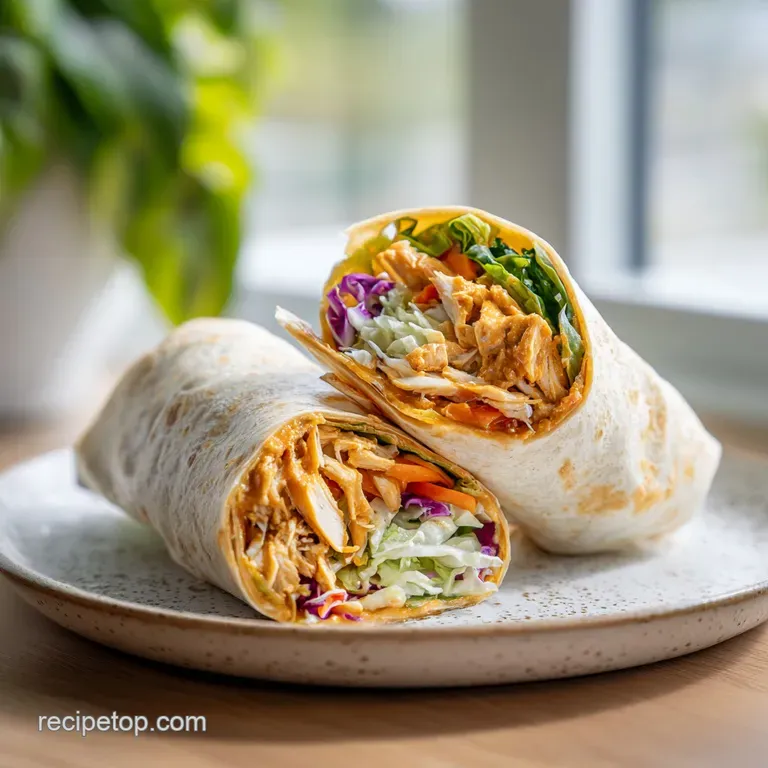
Components of the Perfect Wrap
When we look at the Peanut Chicken Wrap with Fresh Vegetables and Creamy Peanut Sauce, every ingredient has a specific job. We aren't just looking for flavor; we are looking for functional nutrition and structural integrity.
The use of natural creamy peanut butter is non negotiable here because the added oils in commercial brands can interfere with how the sauce binds to the lime juice and honey.
| Ingredient | Science Role | Pro Secret |
|---|---|---|
| Natural Peanut Butter | High fat binding agent | Use room temp for easier whisking |
| Fresh Lime Juice | Acid driven tenderizer | Brightens the heavy fats in the nuts |
| Warm Water | Viscosity regulator | Add 1 tbsp at a time to prevent breaking |
| Avocado Oil | High smoke point fat | Allows for a hard sear without burning |
The Fresh Vegetables and Creamy Peanut Sauce provide a massive hit of micronutrients and fiber. The purple cabbage isn't just there for the color; its sturdy cell walls stand up to the acidity of the lime juice much better than iceberg or romaine lettuce ever could.
This makes it the ideal candidate for meal prep because it won't turn into a watery mess by lunchtime the next day.
Tools for Precise Cooking
You don't need a professional kitchen to make a Thai Peanut Chicken Wrap, but a few specific tools will make the process much smoother. I personally swear by a heavy bottomed non stick skillet. This allows you to get that mahogany sear on the chicken with minimal oil, keeping the dish light but flavorful.
A cast iron pan also works beautifully, though you’ll need to watch your heat levels more closely to avoid scorched ginger.
For the sauce, a small balloon whisk is significantly better than a fork. You are essentially creating a stable mixture of fats and liquids, and the extra tines of a whisk help to incorporate the warm water into the peanut butter more effectively.
Also, a microplane for the ginger and garlic is a must you want those aromatics to be a paste so they melt into the sauce rather than leaving you with a spicy, raw chunk of garlic mid bite.
The Alchemy of Ingredients
To make this Thai Peanut Chicken Wrap with Fresh Vegetables and Creamy Peanut Sauce, you’ll need to gather these specific items. I’ve included some substitutions just in case your local market is out of something, though I highly recommend sticking to the original list for the most authentic experience.
- 1 lb chicken breast: Sliced into thin strips. Why this? Strips maximize surface area for better seasoning coverage.
- Substitute: Firm tofu pressed and sliced into batons.
- 1 tbsp avocado oil: For the over high heat sear. Why this? Neutral flavor and a smoke point over 500°F.
- Substitute: Grapeseed oil or light olive oil.
- 0.5 tsp sea salt & 0.25 tsp black pepper: Fundamental seasoning.
- 0.5 cup natural creamy peanut butter: The base of our sauce. Why this? No added sugar or palm oil means better emulsification.
- Substitute: Almond butter or sunflower seed butter for nut free.
- 2 tbsp low sodium soy sauce: Adds umami and salt.
- Substitute: Tamari for a gluten-free option.
- 1 tbsp fresh lime juice: Essential acid.
- Substitute: Rice vinegar in a pinch.
- 1 tbsp honey: Balances the salt and heat.
- Substitute: Maple syrup or agave nectar.
- 1 tsp fresh ginger & 1 clove garlic: The aromatic backbone.
- 4 large whole wheat tortillas: 10 inch size is best for rolling.
- 2 cups shredded purple cabbage: For maximum crunch.
- 1 large red bell pepper: Julienned.
- 0.5 cup grated carrots: Sweetness and color.
- 0.25 cup fresh cilantro & 2 green onions: Freshness.
- 0.25 cup crushed roasted peanuts: The final texture hit.
When choosing your tortillas, look for ones that are pliable. If they feel stiff in the package, they will likely crack when you try to fold them. A quick 10 second warm up in a dry pan or microwave can make even the most stubborn whole wheat wrap cooperate. If you’re looking for a similar flavor profile but want something even crunchier, you might also enjoy a crispy sesame chicken preparation as a side.
step-by-step Construction Guide
- Pat the chicken breast strips completely dry with a paper towel. Note: Moisture on the surface creates steam, which prevents that golden brown crust from forming.
- Season the strips evenly with sea salt and cracked black pepper.
- Heat the avocado oil in a large skillet over medium high heat until it shimmers and just begins to wisps of smoke.
- Add the chicken in a single layer, ensuring they aren't crowded, and cook for 6-8 minutes until a deep mahogany crust forms.
- In a glass bowl, whisk the peanut butter, soy sauce, lime juice, honey, ginger, and garlic.
- Gradually whisk in warm water one tablespoon at a time until the sauce is velvety and falls in ribbons.
- Prepare your vegetables by shredding the cabbage and julienning the peppers into matchsticks.
- Warm the tortillas slightly to increase flexibility.
- Lay a thick bed of cabbage on the bottom third of the tortilla. Note: This is the 'Greens Barrier' that keeps the bread from getting soggy.
- Add the seared chicken strips, bell peppers, and carrots on top of the cabbage.
- Drizzle the peanut sauce generously over the fillings.
- Top with cilantro, green onions, and the crushed peanuts for a satisfying shatter in every bite.
- Fold the sides in, then roll from the bottom up as tightly as possible.
- Slice diagonally with a sharp serrated knife and serve immediately.
| Fresh Ingredients | Shortcut Version | Impact on Dish |
|---|---|---|
| Fresh Grated Ginger | Ginger Powder (1/4 tsp) | Loses the sharp, bright zing |
| Shredded Fresh Cabbage | Bagged Coleslaw Mix | Drier texture, less vibrant color |
| Seared Chicken Strips | Rotisserie Chicken | Faster, but lacks the savory crust |
The key to a Peanut Chicken Wrap with Fresh Vegetables and Creamy Peanut Sauce is the temperature contrast. You want that chicken to be warm, but the vegetables must be ice cold and crisp.
If you have time, keeping your shredded cabbage in a bowl of ice water for 10 minutes (then spinning it dry) makes the crunch almost deafening. It’s a small extra step that makes a world of difference.
Fixes for Common Cooking Issues
Even a simple Peanut Chicken Wrap can have its moments of frustration. Usually, the issues stem from the sauce consistency or the structural integrity of the wrap itself. If your sauce looks "broken" or curdled, don't panic. This usually happens when the lime juice is added too quickly or the peanut butter is too cold.
Why is my peanut sauce clumping?
Natural peanut butter is high in fat, and when cold liquids are introduced, those fats can seize up. The solution is warmth. Using warm water instead of cold tap water helps the fats stay fluid as they incorporate the other ingredients.
If it's already clumped, a 5 second burst in the microwave and a vigorous whisking session will usually bring it back to a velvety state.
| Problem | Root Cause | Solution |
|---|---|---|
| Soggy Tortilla | Sauce touching the bread | Use cabbage as the base layer |
| Tortilla Cracking | Bread is too cold or dry | Microwave for 10 seconds under damp towel |
| Bland Filling | Chicken wasn't seared hard | Use higher heat and don't stir too often |
- ✓ Always pat the chicken dry before it hits the pan to ensure a sear.
- ✓ Whisk the sauce until completely smooth before adding to the wrap.
- ✓ Shred the cabbage as thinly as possible for a better mouthfeel.
- ✓ Don't overfill leave at least 2 inches of space at the top and sides.
- ✓ Slice the chicken against the grain for maximum tenderness.
Flavor Swaps and Dietary Tweaks
The beauty of the Thai Peanut Chicken Wrap with Fresh Vegetables and Creamy Peanut Sauce is how easily it adapts to what you have in the fridge. If you aren't a fan of chicken, this recipe works remarkably well with grilled shrimp or even thinly sliced steak.
The creamy peanut sauce is the unifying factor that makes almost any protein taste intentional and cohesive.
If you’re looking to cut carbs, you can skip the tortilla entirely and serve the fillings inside large butter lettuce leaves. This creates a "larb" style wrap that is incredibly refreshing. For a spicy version, I like to add a teaspoon of sambal oelek or sriracha directly into the peanut sauce.
It adds a fermented heat that plays beautifully off the honey and lime.
- If you want it vegan: Swap the chicken for pan seared tempeh and use maple syrup instead of honey.
- If you want it gluten-free: Ensure your tortillas are corn based or grain free and use tamari instead of soy sauce.
- If you want it crunchy: Double the amount of crushed peanuts and add some sliced radishes for an extra peppery bite.
Scaling this recipe is straightforward. If you're cooking for a crowd, keep the spices at the original ratio but work in batches with the chicken. Overcrowding the pan will drop the temperature, and you’ll end up boiling the meat in its own juices rather than searing it. For the sauce, you can make a double batch and keep it in a jar; it’s also fantastic as a dip for raw bell peppers or a dressing for a Thai quinoa salad.
Tips for Storage and Freshness
When it comes to the Thai Peanut Chicken Wrap, assembly is best done right before eating. However, you can definitely meal prep the components. Store the seared chicken in one container and the chopped vegetables in another. Keep the peanut sauce in a separate small jar or dressing container.
This prevents the "wicking" effect where the vegetables release moisture and the sauce makes everything limp.
In the fridge, the chicken will stay fresh for up to 4 days, while the pre cut vegetables are best used within 3. The peanut sauce might thicken significantly in the cold, so just add a tiny splash of warm water and give it a stir before you're ready to eat.
I don't recommend freezing the assembled wraps, as the cabbage and peppers will lose their cellular structure and become mushy upon thawing.
Zero Waste Tip: Don't throw away the stems of your cilantro or the white parts of the green onions! Finely mince them and throw them into the pan with the chicken during the last minute of cooking. They hold a ton of flavor that often gets wasted.
Also, any leftover cabbage and carrots can be tossed with the remaining peanut sauce to make a quick Asian style slaw for lunch the next day.
Side Dishes to Serve Along
While this wrap is a complete meal on its own, sometimes you want a little something extra to round out the plate. A cold cucumber salad with rice vinegar and sesame seeds provides a nice acidic counterpoint to the rich peanut sauce.
If you want something warm, a simple bowl of miso soup or some steamed edamame with sea salt works perfectly.
For those who want a bit more substance, serving these wraps alongside some jasmine rice or even a small portion of rice noodles can turn it into a much larger feast. The flavors are bold enough that they can stand up to neutral sides, and the leftover sauce acts as a perfect condiment for almost anything on the table.
Debunking Common Kitchen Myths
One of the biggest myths in cooking is that searing meat "seals in the juices." In reality, searing is all about the creation of new flavor compounds through heat. The moisture loss actually happens more rapidly at high temperatures, which is why we cook the chicken quickly and then let it rest.
Resting allows the muscle fibers to relax and reabsorb some of the liquid, ensuring your wrap isn't dry.
Another misconception is that "natural" peanut butter is harder to use in sauces. While it does require a bit more elbow grease to stir initially, the lack of emulsifiers like palm oil means it actually integrates better with the lime juice and soy sauce.
It creates a cleaner flavor profile that lets the ginger and garlic shine through without a waxy aftertaste. Trust the process, and you’ll see why the natural stuff is the gold standard for this Peanut Chicken Wrap with Fresh Vegetables and Creamy Peanut Sauce.

Recipe FAQs
How to ensure the chicken develops a deep mahogany crust?
Pat the chicken strips completely dry with a paper towel before seasoning. Excess moisture creates steam that prevents browning, so keeping the surface dry is the secret to a perfect sear.
Can I assemble these wraps ahead of time for lunch?
No, assemble just before eating to maintain texture. If you pre-assemble, the peanut sauce and vegetable moisture will cause the tortillas to become soggy; instead, store components separately and combine them right before serving.
How to fix the peanut sauce if it becomes too thick?
Whisk in warm water one teaspoon at a time until reaching a pourable consistency. If you enjoyed mastering this emulsification technique, you can apply the same whisking logic to create balanced dressings for our Chipotle Ranch Chicken Burrito.
Is it true that I should crowd the skillet to cook the chicken faster?
No, this is a common misconception. Crowding the pan lowers the temperature and causes the chicken to steam in its own juices rather than searing, which prevents the development of that signature mahogany crust.
How to prevent the wraps from falling apart during assembly?
Place a sturdy layer of shredded cabbage directly onto the tortilla first. This "greens barrier" acts as a structural base that protects the tortilla from direct contact with the moisture of the other fillings.
How long can I safely store the cooked chicken in the refrigerator?
Keep the chicken in an airtight container for up to 4 days. Ensure it has cooled completely to room temperature before sealing to maintain the best quality for your meal prep.
Should I use cold water to thin out the peanut sauce?
No, always use warm water when mixing the sauce. Warm water helps the natural peanut butter and honey emulsify more easily, resulting in a smoother, velvety texture for your drizzle.
Thai Peanut Chicken Wrap
Ingredients:
Instructions:
Nutrition Facts:
| Calories | 518 kcal |
|---|---|
| Protein | 36.2 g |
| Fat | 24.8 g |
| Carbs | 41.5 g |
| Fiber | 6.4 g |
| Sugar | 8.9 g |
| Sodium | 795 mg |
