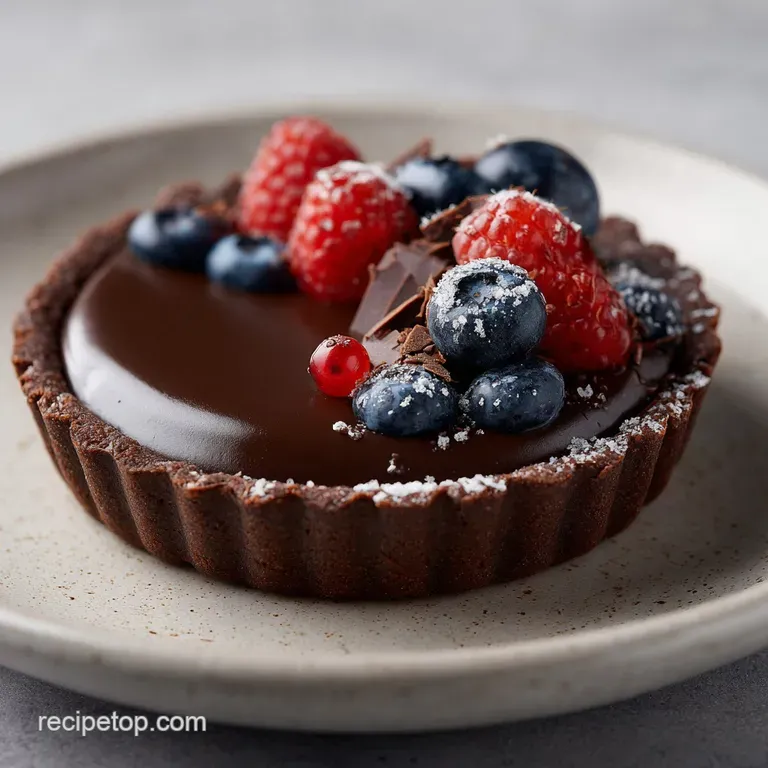
Dark Chocolate Tart: Rich and Silky
- Time: Active 25 minutes, Passive 15 minutes, Total 40 minutes
- Flavor/Texture Hook: Intense dark cocoa with a buttery, shattering crust
- Perfect for: Impressing guests at a dinner party or a decadent weekend treat
- Master the Ultimate Silk Chocolate Tart
- Why This Recipe Works
- Essential Stats for Planning Ahead
- Components of the Perfect Slice
- Gear for Professional Results
- Step-by-Step Tart Construction
- Solving Common Baking Blunders
- Flavor Tweaks and Creative Twists
- Misconceptions About Ganache Stability
- Storing Your Dessert Properly
- Plating Like a Fine Restaurant
- Recipe FAQs
- 📝 Recipe Card
Master the Ultimate Silk Chocolate Tart
Picture this: the dining room lights are dimmed, the last of the wine has been poured, and you bring out a dessert that looks like it belongs in a Parisian window. There is a specific sound when a sharp knife meets a well made Chocolate Tart.
It is a clean, crisp "snap" followed by a silent, velvety glide through a rich ganache. I remember the first time I got this right; I had spent years settling for tarts with soggy bottoms or grainy fillings that felt heavy on the tongue.
This specific version is my go to because it skips the fussy parts. We aren't rolling out dough or worrying about a temperamental pastry. Instead, we are building layers of flavor bitter dark chocolate, floral vanilla, and a hint of honey for that mirror like shine.
It is a straightforward process that yields a result so refined, your friends will swear you spent all afternoon hovering over a double boiler. Trust me, once you see that glossy emulsion come together, you’ll never go back to store-bought.
We are aiming for a balance of textures here. The crust needs to be firm enough to hold a slice but fragile enough to crumble when you take a bite. The filling should be dense but not fudge like; it should feel like silk against the roof of your mouth.
It is about that contrast between the golden, toasted notes of the shortcrust and the deep, brooding intensity of the 70% cacao. Let's get into how we make that happen without the stress.
Why This Recipe Works
Getting a professional finish at home isn't about luck; it is about how the ingredients interact under heat. We aren't just mixing things; we are creating a stable structure that holds its shape even at room temperature.
- Starch Softening: The addition of cornstarch to the all purpose flour interrupts gluten formation, ensuring the crust stays "short" and crumbly rather than bread like.
- Emulsion Control: By heating the cream to exactly 80°C, we provide enough energy to melt the chocolate fats without causing the cocoa solids to separate or "break."
- Gloss Factor: Honey acts as an invert sugar, which prevents the chocolate from crystallizing and gives the surface that signature professional shimmer.
- Fat Stabilization: Adding room temperature butter at the very end of the ganache process creates a secondary emulsion that makes the filling extra creamy.
| Cook Method | Time | Texture | Best For |
|---|---|---|---|
| Oven (Recipe Standard) | 15 minutes | Golden, toasted, sturdy | Classic pastry finish |
| Toaster Oven | 18 minutes | Extra crispy edges | Small batches/Single tarts |
| Air Fryer | 12 minutes | Very flaky, rapid browning | Quick prep, needs a 7 inch pan |
We use the oven for this specific recipe because it provides the most even heat distribution for the crust. A toaster oven can work in a pinch, but the proximity to the heating elements can sometimes scorch the delicate butter in the dough before the flour is fully cooked. If you are looking for more buttery inspiration, you might enjoy reading about my Brown Butter Chocolate Chip Cookies which use a similar fat to flour logic for maximum flavor.
Essential Stats for Planning Ahead
Knowing your numbers is half the battle in the kitchen. When you are working with chocolate, precision is your best friend. A few degrees too hot and your filling is oily; a few grams too much flour and your crust is a brick.
| Component | Science Role | Pro Secret |
|---|---|---|
| Cornstarch | Texture modifier | Provides the "shatter" by weakening gluten bonds. |
| 70% Dark Chocolate | Structural base | The high cocoa butter content ensures a firm set without gelatin. |
| Heavy Cream (36%) | Liquid fat | High fat content creates a stable, non runny emulsion. |
| Egg Yolk | Binding agent | Adds richness and prevents the crust from being too sandy to slice. |
You'll notice we are using a specific type of chocolate here. While you can use milk chocolate, the lack of cocoa solids means it won't set as firmly, and you might end up with a pudding like consistency rather than a sliceable tart. For a different take on chocolate textures, check out this Black Forest Cake recipe which uses cocoa in a much lighter, airy sponge format.
Components of the Perfect Slice
Let's talk about what we are actually putting in the bowl. Every gram matters here, especially since we aren't using a lot of bulky fillers. We want the highest quality ingredients you can find.
- 180g All purpose flour: The backbone of our crust. Why this? Provides enough structure to hold the heavy ganache without being too tough.
- 20g Cornstarch: Our secret for that biscuit like snap. Why this? Lowers the protein content of the flour for a tender crumb.
- 50g Powdered sugar: Adds sweetness and helps with browning. Why this? Dissolves faster than granulated sugar in a cold butter dough.
- 115g Unsalted butter (cold and cubed): The fat for the crust. Why this? Cold butter creates tiny steam pockets for a light texture.
- 1 Large egg yolk: For color and cohesion. Why this? Fats in the yolk enrich the dough and help it brown evenly.
- 0.25 tsp Fine sea salt: To balance the sugar.
- 250g Dark chocolate (70% cacao): The star of the show. Why this? The fat to sugar ratio is perfect for a stable ganache.
- 240ml Heavy cream (36% fat): The emulsifier. Why this? Provides the velvety mouthfeel we are after.
- 1 tbsp Honey: For shine and texture.
- 30g Unsalted butter (room temp): For the final ganache finish.
- 1 tsp Vanilla bean paste: Adds depth and those beautiful little black flecks.
If you don't have vanilla bean paste, a high-quality extract works, but you'll miss those visual speckles that make it look truly artisanal. For the chocolate, avoid "chocolate chips" as they often contain stabilizers that prevent them from melting into a perfectly smooth liquid.
Gear for Professional Results
You don't need a kitchen full of gadgets, but a few specific items make this Chocolate Tart much easier to pull off. First, a 9 inch tart pan with a removable bottom is non negotiable. If you try to use a pie dish, you’ll never get the tart out in one piece without a struggle.
A food processor makes the crust work a breeze, but you can absolutely do it by hand with a pastry cutter or two knives. Just be careful not to let the warmth of your hands melt that butter. You also need a heat proof glass or metal bowl for the chocolate.
Avoid plastic, as it can retain odors or oils that might mess with the delicate flavor of the dark chocolate. Finally, an instant read thermometer is your best insurance policy. Guessing 80°C is how ganaches get ruined.
step-by-step Tart Construction
Now, let's get into the flow of the kitchen. This process is about moving with purpose but not rushing. The dough needs to be handled minimally, and the ganache needs a gentle touch.
Phase 1: The No Roll Crust
- Preheat your oven to 175°C (350°F). Make sure the rack is in the center.
- Combine 180g flour, 20g cornstarch, 50g powdered sugar, and 0.25 tsp salt in your processor. Pulse twice to mix.
- Add the 115g of cold, cubed butter. Pulse until the mixture resembles coarse breadcrumbs. You should still see tiny flecks of butter.
- Drop in the egg yolk. Pulse until the dough starts to clump together in small pea sized balls. Don't let it form a single big ball or it will be over processed.
- Dump the crumbs into your 9 inch tart pan. Using the bottom of a measuring cup, press the mixture firmly into the bottom and up the sides. Note: Packing it tight prevents it from crumbling when sliced.
- Bake for 15 minutes until golden brown and smelling like toasted butter. Take it out and let it cool completely on a wire rack.
Phase 2: The Perfect Emulsion
- Finely chop your 250g of dark chocolate. The smaller the pieces, the faster and more evenly they melt. Place them in your heat proof bowl.
- In a small saucepan over medium heat, combine 240ml heavy cream and 1 tbsp honey. Heat until it reaches exactly 80°C (176°F). You'll see tiny bubbles just starting to form at the edges.
- Pour the hot cream over the chocolate. Let it sit undisturbed for 2 minutes. Note: This allows the heat to penetrate the core of the chocolate pieces.
- Using a silicone spatula, stir in small, tight circles from the center outward until a glossy, dark emulsion forms. It will look broken at first, then suddenly turn smooth.
- Add the 30g of room temperature butter and 1 tsp vanilla bean paste. Stir gently until the butter disappears and the mixture is mirror shiny.
- Pour the ganache into the cooled tart shell. Give the pan a gentle shake to level the top.
- Refrigerate for at least 2 hours until the center is firm to the touch.
Solving Common Baking Blunders
Even with the best intentions, things can go sideways. The most common issue with a Chocolate Tart is the ganache "breaking" that's when it looks oily or curdled rather than smooth. Usually, this happens if the cream was boiling hot (above 90°C) or if you stirred it too vigorously too soon.
Why Your Crust Is Shrinking
If you find your crust pulling away from the sides or sliding down into a puddle at the bottom of the pan, it's usually because the butter got too warm before it hit the oven. When butter melts before the flour structure sets, the whole thing collapses.
If your kitchen is hot, pop the pressed tart shell into the freezer for 10 minutes before you bake it.
| Problem | Root Cause | Solution |
|---|---|---|
| Oily Filling | Cream was too hot (>85°C) | Add 1 tsp cold cream and stir gently to bring it back together. |
| Sandy Crust | Not enough pressing | Use a flat bottomed glass to pack the crumbs more tightly next time. |
| Sticky Ganache | Didn't chill long enough | Return to the fridge; it needs a full 2 hours to set properly. |
Another common mistake is over baking the crust. Because it has powdered sugar and cornstarch, it goes from "perfectly golden" to "burnt" very quickly. Keep a close eye on it at the 12 minute mark.
Common Mistakes Checklist
- ✓ Never use "light" cream; you need the 36% fat to ensure the ganache sets.
- ✓ Don't skip the cornstarch; it's the difference between a tough crust and a tender one.
- ✓ Ensure the tart shell is completely cold before adding the filling.
- ✓ Resist the urge to use a whisk; it incorporates air bubbles that ruin the glossy finish.
- ✓ Check your oven temperature with a separate thermometer to ensure it's truly 175°C.
Flavor Tweaks and Creative Twists
Once you have the base Chocolate Tart down, you can start playing with the profile. This recipe is essentially a blank canvas for high-quality fats and sugars.
Scaling for Different Crowds
- Downsizing (1/2 batch): Use a 6 inch tart pan. Reduce the bake time to about 12 minutes. For the half egg yolk, whisk one egg in a small bowl and use exactly 1 tablespoon of the mixture.
- Upsizing (2x batch): Use two 9 inch pans. You can bake them at the same time if your oven has good airflow. For the ganache, work in two separate bowls to ensure the cream doesn't cool down too much while you're stirring the first one.
- Baking 2x: If you are making multiple tarts, lower the oven temperature by 10°C (to 165°C) and extend the time by 5 minutes to prevent the edges from browning too fast.
If you want a sharper flavor, try adding the zest of one orange to the cream while it heats. The oils will infuse the ganache with a bright, citrusy note that cuts through the richness of the dark chocolate.
Alternatively, a layer of sea salt caramel at the bottom of the crust before you pour the ganache creates an incredible "millionaire's" style tart.
| Serving Size | Crust Ingredients | Ganache Volume | Total Time |
|---|---|---|---|
| 4 People | 90g flour, 10g cornstarch | 120ml cream, 125g chocolate | 35 minutes |
| 10 People | 180g flour, 20g cornstarch | 240ml cream, 250g chocolate | 40 minutes |
| 20 People | 360g flour, 40g cornstarch | 480ml cream, 500g chocolate | 55 minutes |
Misconceptions About Ganache Stability
One of the biggest myths in home baking is that you need gelatin or cornstarch to make a ganache set. That is simply not true. A 1:1 ratio of heavy cream to 70% dark chocolate is naturally stable because of the high percentage of cocoa butter in the chocolate.
As the tart cools, that fat solidifies into a firm but creamy structure.
Another myth is that you must use a double boiler. While it's a safe method, pouring hot cream over chopped chocolate is actually more efficient and less likely to introduce unwanted moisture (steam) into the bowl, which can cause the chocolate to seize. Keep it simple and use the pour over method.
Storing Your Dessert Properly
Because of the high dairy content in the cream and butter, this tart needs to stay chilled. However, serving it straight from the fridge can mute the flavors of the dark chocolate. I recommend taking it out about 20 minutes before you plan to eat.
- Fridge: Keep the tart in its pan, covered tightly with plastic wrap or in an airtight container, for up to 4 days.
- Freezer: You can freeze the tart for up to 2 months. Wrap it in a double layer of plastic wrap and then foil. Thaw it overnight in the fridge never on the counter, or the ganache will "sweat."
- Zero Waste Tip: If you have leftover tart crust crumbs that didn't make it into the pan, bake them on a small tray alongside the tart. They make a fantastic "butter soil" to sprinkle over vanilla ice cream later.
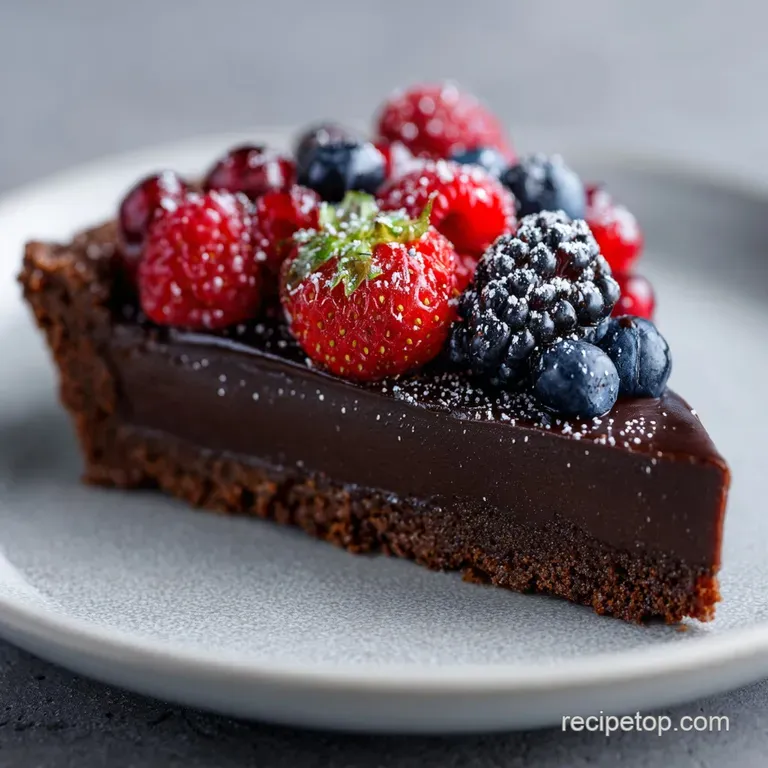
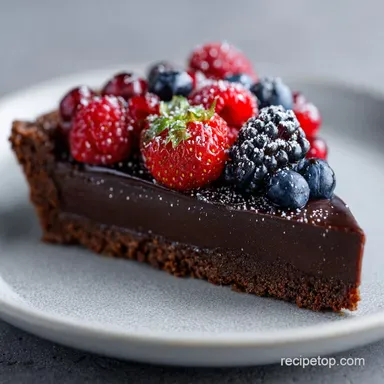
Plating Like a Fine Restaurant
To get that perfectly clean slice you see in magazines, run a long, thin knife under hot water for 30 seconds. Wipe it completely dry, then make one decisive cut. Clean the knife and reheat it under the water between every single slice.
This prevents the ganache from sticking to the blade and dragging through the crust.
For a final touch, a light dusting of high-quality cocoa powder or a few flakes of Maldon sea salt on top will make the colors pop. If you're feeling fancy, serve it with a dollop of unsweetened whipped cream or a handful of fresh raspberries.
The acidity of the berries is a brilliant foil to the deep, earthy notes of the cacao. Whether you're making this for a big celebration or just a Tuesday that needs a bit of magic, this tart always delivers. Enjoy the process, and don't forget to lick the spatula!

Recipe FAQs
How to ensure the crust turns out tender instead of tough?
Measure the cornstarch carefully and process the dough only until it clumps together. If you enjoyed mastering the texture of a dense dessert, you will appreciate how this small amount of starch prevents gluten development for a delicate, melt-in-the-mouth base.
Why is my ganache not setting with a glossy finish?
You likely whisked too vigorously or used low-fat cream. Only use heavy cream with 36% fat and always use a silicone spatula to stir in gentle, small circles to avoid incorporating air bubbles.
Is it true I can use a whisk to mix the ganache for a faster result?
No, this is a common misconception. Using a whisk introduces air into the emulsion, which creates unsightly bubbles and dulls the final sheen of your chocolate.
How to prevent the crust from cracking when pressing it into the pan?
Work with the dough immediately after pulsing in the egg yolk while the butter remains cold. If the dough feels too soft or sticky, briefly refrigerate it for 5 minutes before pressing it into the 9 inch tart pan.
Is it possible to bake the tart shell ahead of time?
Yes, you can bake it up to two days in advance. Ensure the shell is completely cool before wrapping it tightly in plastic wrap to keep it crisp until you are ready for the filling.
How to tell when the ganache has reached the perfect temperature?
Use a digital thermometer to heat the cream and honey until it hits exactly 80°C. Do not guess, as this precise temperature ensures the cream is hot enough to melt the 70% cacao chocolate without breaking the emulsion.
How to serve the tart for the best flavor experience?
Remove the tart from the refrigerator 20 minutes before serving. Letting the chocolate soften slightly at room temperature prevents the texture from feeling waxy and allows the complex notes of the dark chocolate to fully shine.
Rich Dark Chocolate Tart
Ingredients:
Instructions:
Nutrition Facts:
| Calories | 438 kcal |
|---|---|
| Protein | 4.9 g |
| Fat | 31.4 g |
| Carbs | 34.7 g |
| Fiber | 2.8 g |
| Sugar | 14.8 g |
| Sodium | 66 mg |
