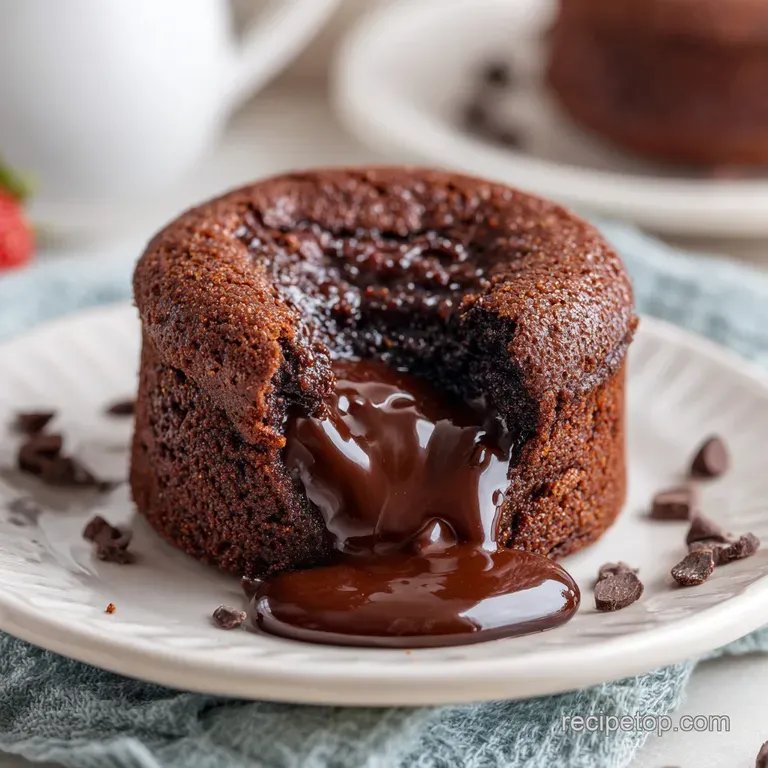
Fudgy Chocolate Lava Cookies: Gooey and Rich
- Time: Active 20 minutes, Passive 10 minutes, Total 30 minutes
- Flavor/Texture Hook: Intense dark chocolate with a silky, liquid center and crackly exterior
- Perfect for: Impressing dinner guests or satisfying a deep chocolate craving
- Achieve the Ultimate Texture with a Fudgy Chocolate Lava Cookie
- Why This Triple Chocolate Method Creates a Gooey Center
- Key Metrics for Success with These Chocolate Lava Cookies
- Selecting the Best Components for a Decadent Chocolate Dessert
- Essential Kitchen Tools for Making Molten Lava Center Cookies
- Step by Step Instructions for a Fudgy Chocolate Lava Cookie
- Preventing Common Mistakes for the Best Molten Cookie Results
- Scaling the Recipe Up or Down
- Creative Flavor Variations for Your Homemade Chocolate Lava Cookies
- Storing and Reheating Your Fudgy Chocolate Lava Cookies Correctly
- The Best Ways to Serve Your Fudgy Chocolate Lava Cookies
- Recipe FAQs
- 📝 Recipe Card
Achieve the Ultimate Texture with a Fudgy Chocolate Lava Cookie
Imagine standing in your kitchen as the timer dings. You pull out a tray of dark, obsidian hued cookies, their surfaces webbed with a beautiful network of cracks. As you break one open, the center doesn't just look soft, it actually flows like a miniature volcano.
The aroma is intoxicating, a mix of roasted coffee notes and high-quality cocoa that fills the room and makes your mouth water instantly. Discover the ultimate recipe for a fudgy chocolate lava cookie with a gooey center and crackly top.
I remember the first time I tried a version of these at a high end bakery. I was obsessed with how the outside was almost crispy, like the edge of a brownie, while the inside stayed completely liquid. It felt like a magic trick.
For a long time, I thought you just had to underbake a regular cookie to get that effect, but that usually just leads to a raw, floury center. The secret isn't just timing, it's about building a recipe with two distinct parts that work in harmony.
We are going to walk through how to build that molten core and how to ensure the dough around it stays fudgy without being greasy. This isn't a complicated bake, but there are a few specific techniques, like blooming your cocoa, that make a world of difference in the depth of flavor.
You won't need any fancy equipment, just some good dark chocolate and a little bit of patience while the ganache sets. Let's get into the details so you can have these warm treats on your counter tonight.
Why This Triple Chocolate Method Creates a Gooey Center
Before we start mixing, let's talk about why this specific method works so well. It’s all about managing fat and moisture to create that "lava" effect without the cookie collapsing into a puddle on your baking sheet.
- The Frozen Core Strategy: By freezing small mounds of ganache before stuffing them into the dough, we ensure the center stays cold longer than the exterior. This prevents the "lava" from soaking into the dough or evaporating before the outside of the cookie has a chance to set and form that crackly crust.
- Cocoa Blooming Power: Mixing the Dutch processed cocoa with warm, melted butter isn't just for texture. The heat actually opens up the cocoa particles, releasing hidden flavor compounds that stay dormant in cold mixtures, resulting in a much more intense chocolate profile.
- Sugar Ratio Physics: We use a specific blend of granulated and light brown sugar. The granulated sugar is what creates that signature "shatter" on the top, while the molasses in the brown sugar keeps the interior crumb moist and fudgy rather than cakey.
- The Espresso Catalyst: Adding a tiny amount of espresso powder doesn't make the cookie taste like coffee. Instead, it acts as a flavor enhancer that highlights the fruity and earthy notes of the dark chocolate chips, making the whole experience much richer.
| Cookie Thickness | Internal Temperature | Rest Time | Visual Cue |
|---|---|---|---|
| 2.5 cm (approx.) | 175°C (Oven Temp) | 5 minutes | Surface is crackled; edges are firm to touch |
| 3.5 cm (stuffed) | 175°C (Oven Temp) | 10 minutes | Top loses its raw shine but feels soft |
| 1.5 cm (flat) | 175°C (Oven Temp) | 3 minutes | Edge is darkened and crisp |
Choosing the right ingredients is the foundation of any great dessert. When you are dealing with a recipe this chocolate heavy, the quality of your cocoa and chips really shines through. If you use a cheap, waxy chocolate, the "lava" center won't have that silky, velvety mouthfeel we're looking for.
I always recommend a dark chocolate with at least 60% cacao for the best balance of sweetness and bitterness.
Key Metrics for Success with These Chocolate Lava Cookies
| Component | Science Role | Pro Secret |
|---|---|---|
| Unsalted Butter | Fat & Flavor | Use warm melted butter to "bloom" the cocoa for deeper color. |
| Dutch Processed Cocoa | Structural Base | Provides a neutral pH which reacts with baking powder for a soft lift. |
| Espresso Powder | Flavor Amplifier | Cuts through the sugar to make the chocolate taste "darker." |
| Heavy Cream | Ganache Stability | Keeps the chocolate center liquid even after it cools slightly. |
Selecting the Best Components for a Decadent Chocolate Dessert
Here is everything you need to gather. I've included the exact metric measurements from the recipe data to ensure your cookies come out exactly like mine. Don't skip the espresso powder, it's the secret weapon here.
- 115g dark chocolate chips (60% cacao): Why this? Higher cacao content ensures the center flows better and isn't overly cloying. (Sub: Semi sweet chocolate bars, chopped finely)
- 60ml heavy cream: Why this? This creates the ganache consistency for the molten core. (Sub: Full fat coconut milk)
- 1 pinch sea salt: Why this? Enhances the sweetness and balances the richness. (Sub: Table salt)
- 115g unsalted butter, melted and warm: Why this? Provides moisture and aids in blooming the cocoa. (Sub: Salted butter, but omit extra sea salt)
- 45g Dutch processed cocoa powder: Why this? Gives that deep, dark color and smooth flavor. (Sub: Natural cocoa powder, though the color will be lighter)
- 150g granulated sugar: Why this? Essential for achieving the crackly, crisp top texture. (Sub: Caster sugar)
- 50g light brown sugar, packed: Why this? Adds moisture and a slight caramel note to the dough. (Sub: Dark brown sugar for more molasses flavor)
- 1 large egg, room temperature: Why this? Binds the dough and adds structure. (Sub: Flax egg, though the texture will be denser)
- 5ml pure vanilla extract: Why this? Rounds out the chocolate flavors. (Sub: Vanilla bean paste)
- 160g all purpose flour: Why this? Provides the structure for the cookie walls. (Sub: 1:1 gluten-free flour blend)
- 2g baking powder: Why this? Gives a slight lift to keep the cookie from being too heavy. (Sub: Baking soda, but use only 1g)
- 1g espresso powder: Why this? Intensifies the chocolate without adding coffee flavor. (Sub: Instant coffee granules, crushed fine)
Essential Kitchen Tools for Making Molten Lava Center Cookies
You don't need a stand mixer for this recipe, which is one of the reasons I love it so much. A simple whisk and a sturdy spatula will get the job done perfectly.
- Microwave safe bowl: For melting the chocolate and cream into the ganache.
- Baking sheets: Line these with parchment paper to prevent sticking.
- Large mixing bowl: For the main cookie dough.
- Cookie scoop: A 3 tablespoon scoop helps keep your portions consistent.
- Whisk: To incorporate the eggs and sugars until they are glossy.
- Spatula: For gently folding in the flour so you don't overwork the gluten.
step-by-step Instructions for a Fudgy Chocolate Lava Cookie

- Construct the Lava Core: Combine 115g dark chocolate and 60ml heavy cream in a microwave safe bowl. Heat in 20 second bursts, stirring until smooth. Drop 12 small mounds (approx. 1 tsp each) onto parchment paper and freeze for 10 minutes. Note: Freezing them makes the assembly much less messy.
- Bloom the Cocoa: In a separate large bowl, whisk 115g warm melted butter and 45g Dutch processed cocoa powder together to release the flavor compounds. Cook until the mixture looks like dark, liquid silk.
- Mix Sugars and Wet Ingredients: Add 150g granulated sugar, 50g light brown sugar, the egg, and 5ml vanilla extract to the butter cocoa mixture. Whisk vigorously until the batter is glossy and smooth.
- Incorporate Dry Ingredients: Gently fold in 160g all purpose flour, 2g baking powder, a pinch of sea salt, and 1g espresso powder using a spatula until no white streaks remain.
- Assemble the Cookies: Scoop approximately 3 tablespoons of dough. Flatten slightly, place a chilled ganache core in the center, and wrap the dough around it, sealing it completely. Ensure there are no cracks where the chocolate could leak out.
- Bake: Place cookies on a parchment lined sheet and bake at 350°F (175°C) for 10 minutes until the edges are set and the tops show a crackled texture.
- Rest: Let the cookies sit on the hot pan for at least 5 minutes. Wait until they firm up enough to move without breaking.
- Final Touch: Sprinkle a few extra flakes of sea salt on top while they are still warm.
Preventing Common Mistakes for the Best Molten Cookie Results
Making these cookies is usually straightforward, but the "lava" part can be a bit temperamental if the temperature isn't just right. The most common issue people face is the chocolate center leaking out of the dough during the bake.
Why Your Lava Centers Leaked
If you see a puddle of chocolate on your baking sheet, it usually means the dough wasn't sealed properly around the ganache. When you wrap the dough, make sure you pinch the seams shut firmly. Another cause could be the ganache wasn't frozen enough.
If it's too soft, it starts to melt the dough from the inside out before the crust can form.
Why Your Cookies Are Flat
Flattened cookies often come from butter that was too hot when the sugars were added. If the butter is greasy and bubbling, it will melt the sugar and lead to a spread out cookie. Let the butter cool for just a minute or two after melting before you add your cocoa and sugars.
Also, check your baking powder; if it's old, you won't get that slight puff that keeps the cookie thick.
| Problem | Root Cause | Solution |
|---|---|---|
| Center is solid | Overbaking or small core | Reduce bake time by 1 min or use a larger ganache mound. |
| Top isn't crackly | Not enough whisking | Whisk the egg and sugars for a full minute until glossy. |
| Dough is too sticky | Room is too warm | Chill the dough for 15 minutes before stuffing with ganache. |
Common Mistakes Checklist
- ✓ Ensure the ganache mounds are fully frozen before handling (prevents messy leaks).
- ✓ Use room temperature eggs to prevent the melted butter from seizing.
- ✓ Don't overmix after adding the flour (keeps the texture fudgy, not tough).
- ✓ Preheat your oven for at least 20 minutes to ensure a consistent 175°C environment.
- ✓ Use a kitchen scale for the 160g of flour (cups can be very inaccurate).
Scaling the Recipe Up or Down
If you only want a small batch of 6 cookies, you can easily halve this recipe. Since the recipe calls for one egg, simply whisk the egg in a small bowl first, then use roughly 25-30g of it. Reduce your bake time by about 1-2 minutes since the smaller mass in the oven might cook slightly faster.
When scaling up to 24 cookies, I suggest making the ganache first in a larger batch. You can double the ingredients exactly, but I recommend only using 1.5x the amount of espresso powder and salt to avoid overpowering the dough.
Work in batches for the baking; don't try to cram 24 stuffed cookies onto one tray, or they will merge into one giant chocolate lake.
Creative Flavor Variations for Your Homemade Chocolate Lava Cookies
If you want to get creative, there are plenty of ways to tweak this base recipe. For a festive twist, you might consider trying something like my Mississippi Mud Cake recipe for inspiration on how to layer different textures.
- Salted Caramel Twist: Instead of a pure chocolate ganache, place a small frozen cube of salted caramel inside with the chocolate. It adds a wonderful chewy contrast to the liquid center.
- Peanut Butter Core: Whisk a tablespoon of creamy peanut butter into your ganache before freezing. Chocolate and peanut butter are a classic pairing for a reason.
- Peppermint Bark Style: Add a drop of peppermint extract to the dough and top the finished cookies with crushed candy canes for a holiday version.
Storing and Reheating Your Fudgy Chocolate Lava Cookies Correctly
These cookies are best enjoyed warm, right after the 5 minute rest period. However, you can store them in an airtight container at room temperature for up to 3 days. To get that lava center back, just pop a cookie in the microwave for 10-15 seconds.
For long term storage, you can freeze the baked cookies for up to 2 months. To save on waste, I often save any leftover ganache scraps, roll them into tiny balls, and toss them into my morning coffee or use them as a topping for vanilla ice cream. Never throw away good chocolate!
The Best Ways to Serve Your Fudgy Chocolate Lava Cookies
While these cookies are a powerhouse on their own, serving them with a scoop of cold vanilla bean ice cream is the classic move. The contrast between the hot, flowing chocolate and the freezing cream is something you have to experience.
If you’re feeling extra fancy, a drizzle of raspberry coulis provides a tart brightness that cuts through the intense richness of the dark cacao.
If you enjoy this kind of decadent dessert, you might also love making a Dark Chocolate Tart for your next gathering. Both recipes rely on that high-quality chocolate punch. To finish the plate, a simple dusting of powdered sugar can make these cookies look like they came straight from a professional pastry shop. Trust me, once you master that molten center, this will become your most requested recipe.

Recipe FAQs
How to achieve the perfect crackly top?
Whisk the butter and sugar thoroughly until the mixture becomes glossy. This aeration process is essential for creating the signature crinkle surface, a technique you can also explore in our light and buttery treat guide.
Is it true I can bake these at a higher temperature for a quicker lava center?
No, this is a common misconception. You must bake these at 350°F (175°C) for 10 minutes; using a higher heat will set the edges before the center reaches the correct temperature, ruining the gooey texture.
How to prevent the lava core from leaking during baking?
Seal the chilled ganache core completely inside the dough. Ensure no chocolate is touching the surface of the dough, as any gaps will cause the center to escape into the oven instead of staying inside the cookie.
Should I use regular cocoa powder instead of Dutch processed?
No, stick to Dutch processed cocoa powder. It has a higher pH level that reacts differently with the butter, providing the deep color and rich flavor profile necessary for this specific recipe.
How to store leftovers while maintaining the gooey center?
Place them in an airtight container at room temperature for up to 3 days. When you are ready to eat, microwave the cookie for 10-15 seconds to soften the chocolate core back to its liquid state.
Can I skip the freezing step for the ganache cores?
No, the 10-minute freeze is mandatory. Chilled ganache cores are significantly easier to handle and prevent the center from melting into the dough before the cookie finishes baking.
How to ensure the cocoa powder is fully incorporated?
Whisk the warm melted butter and cocoa powder together before adding other ingredients. This blooming process ensures the flavor compounds are released and prevents dry, bitter pockets of powder in your final dough.
Fudgy Chocolate Lava Cookies
Ingredients:
Instructions:
Nutrition Facts:
| Calories | 267 kcal |
|---|---|
| Protein | 3.2 g |
| Fat | 13.3 g |
| Carbs | 33.5 g |
| Fiber | 2.2 g |
| Sugar | 20.2 g |
| Sodium | 42 mg |
