3-Minute Blender Hummus: Silky and Zesty
- Time:3 minutes active + 0 minutes chilling = Total 3 minutes
- Flavor/Texture Hook: Velvety, bright, and zesty
- Perfect for: Last minute appetizers, healthy meal prep, and protein rich snacking
- Easy 3 Minute Hummus Recipe
- Key Techniques for Texture
- Recipe Specs and Details
- The Essential Building Blocks
- Necessary Equipment
- The Blending Process
- Troubleshooting Common Issues
- Flavor Variations
- Scaling Your Batch
- Debunking Hummus Myths
- Storage and Zero Waste
- Best Pairing Ideas
- Recipe FAQs
- 📝 Recipe Card
Easy 3 Minute Hummus Recipe
The sharp, bright scent of fresh lemon juice hitting minced garlic is one of my favorite smells in the kitchen. It's an instant signal that something fresh is happening. I remember the first time I tried to make a "professional" version of this dip.
I spent an hour meticulously rubbing canned chickpeas between paper towels to remove the skins, convinced that was the only way to get that restaurant style smoothness. I was exhausted, and honestly, the result wasn't even that different from the store-bought tub.
Then I discovered that the secret isn't in the peeling, it's in the emulsion and temperature. By whipping the tahini and lemon first and adding ice cold water at the end, you get a result that is completely velvety without the manual labor.
This easy 3 minute hummus recipe is my go to because it respects my time while delivering the high protein, nutrient dense fuel my body needs.
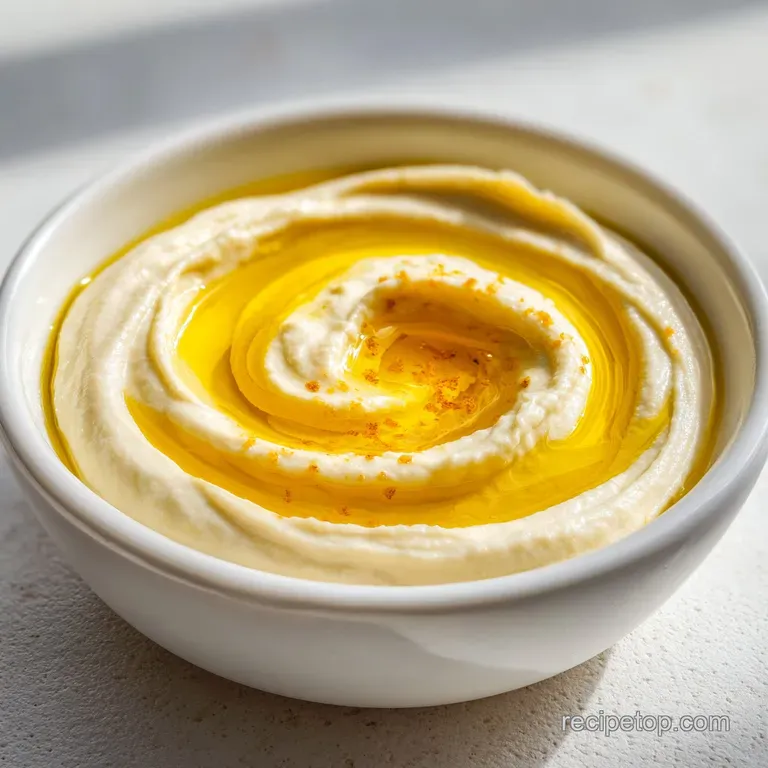
You can expect a dip that is light in color and incredibly smooth. We aren't going for a chunky spread here, but a whipped, airy consistency that feels light on the palate but remains filling. It's the kind of healthy snack that actually satisfies you.
Key Techniques for Texture
I've always been curious about why some hummus feels like paste and others feel like whipped cream. It turns out it's all about the order of operations and the temperature of your liquids.
Lipid Binding: Blending tahini and olive oil first creates a stable fat base. This traps the lemon juice and salt, ensuring the flavor is evenly distributed before the bulk of the chickpeas are added.
Thermal Shock: Adding ice cold water while the blender is running creates a specific reaction with the fats. The cold temperature helps stabilize the emulsion, which is why the hummus turns a pale, creamy white instead of staying a dark beige.
High Shear Force: A high speed blender breaks down the chickpea fibers much more efficiently than a food processor. This eliminates the need to peel the skins, as the blades shatter the cellulose walls of the legumes.
| Method | Time | Texture | Best For |
|---|---|---|---|
| Blender | 3 mins | Velvety/Airy | Quick snacks, smooth dips |
| Food Processor | 7 mins | Thick/Grainy | Hearty spreads, rustic style |
| Manual Mash | 15 mins | Chunky | Texture heavy appetizers |
Recipe Specs and Details
When we look at the components of this dish, it's really a study in balance. You have the earthiness of the chickpeas and tahini, the acidity of the lemon, and the pungent bite of the garlic.
For those who track their macros, this is a powerhouse. You're getting a significant amount of plant based protein and fiber in every scoop. I love using this as a base for a balanced plate. If you're looking for more nutrient dense options for your weekly menu, you might enjoy my Marry Me Salmon recipe for a high protein dinner.
The precision here is key. If you add too much water, it becomes a sauce. Too little, and it's a thick paste. The goal is a "spreadable" consistency, meaning it holds a peak but glides across a cracker.
The Essential Building Blocks
I've found that the quality of your tahini makes or breaks the dish. Look for a brand that is runny and smooth, not the kind that has separated into a thick cake of solids at the bottom of the jar.
Component Analysis
| Ingredient | Science Role | Pro Secret |
|---|---|---|
| Tahini | Lipid Base | Use a runny brand for faster emulsification |
| Lemon Juice | Acid Catalyst | Use fresh squeezed to avoid the bitter "bottled" taste |
| Ice Water | Texture Modifier | Must be ice cold to achieve the pale white color |
| Chickpeas | Protein Structure | Rinse thoroughly to remove the metallic can taste |
Ingredients and Substitutes
- 1 can (15 oz / 425g) chickpeas, drained and rinsed Why this? Pre cooked for speed and consistent texture
- Substitute: Home cooked chickpeas (dried and soaked) for a heartier flavor.
- 1/4 cup (60ml) tahini Why this? Provides the creamy, nutty foundation
- Substitute: Sunflower seed butter. Note: Adds a stronger, toasted flavor.
- 2 tbsp (30ml) extra virgin olive oil Why this? Adds depth and healthy fats
- Substitute: Avocado oil for a more neutral taste.
- 3 tbsp (45ml) fresh lemon juice Why this? Cuts through the fat and brightens the flavor
- Substitute: Lime juice. Note: Shifts the flavor profile toward a zestier, citrusy note.
- 1 small clove (3g) garlic, minced Why this? Adds a pungent, savory kick
- Substitute: 1/4 tsp garlic powder for a milder, more uniform taste.
- 1/2 tsp (3g) salt Why this? Enhances all other flavors
- Substitute: Sea salt or kosher salt.
- 1/4 tsp (1g) ground cumin Why this? Adds an earthy, smoky undertone
- Substitute: Smoked paprika for a different, more vibrant warmth.
- 3 tbsp (45ml) ice cold water Why this? Essential for the whipped, pale texture
- Substitute: Cold aquafaba (the liquid from the chickpea can) for extra creaminess.
Necessary Equipment
You don't need a fancy kitchen to make this easy 3 minute hummus recipe, but a high speed blender is the real hero here. I use a standard NutriBullet, but a Vitamix or any blender with a strong motor works perfectly.
If you only have a food processor, you can still make it, but you'll need to process it for about 4-5 minutes instead of 2. The blade speed in a blender is simply higher, which is what gives us that "shatter" effect on the chickpea skins.
Right then, let's get into the actual steps.
The Blending Process

This is where the magic happens. Don't rush the first step, as the emulsion is what prevents the dip from feeling greasy.
- Pour the tahini, lemon juice, olive oil, and salt into the blender. Note: This creates the flavor base.
- Process for 30 seconds until the mixture looks pale and whipped.
- Add the drained chickpeas, minced garlic, and cumin to the jar.
- Blend on high for 1-2 minutes until the mixture is smooth, scraping down the sides with a spatula once.
- Switch the blender to low speed.
- Slowly drizzle in the ice cold water, one tablespoon at a time.
- Continue blending until the hummus reaches a velvety, spreadable consistency.
- Taste and add a pinch more salt if needed.
Chef's Tip: If you want an even silkier result, freeze your blender jar for 5 minutes before starting. This keeps the friction heat down, which helps the ice water emulsion stay stable.
Troubleshooting Common Issues
Even with a simple recipe, things can go sideways. Usually, it's a matter of ratios or temperature.
| Issue | Solution |
|---|---|
| Why Your Hummus Is Gritty | This usually happens if the blender isn't powerful enough or if you didn't blend the chickpeas long enough. The skins are still intact, creating a sandy texture. Just keep blending on high for another |
| Why It Tastes Bitter | Bitter hummus is almost always caused by two things: over processing the raw garlic or using low quality tahini. Raw garlic can develop a harsh, bitter edge when pulverized at high speeds. To fix this |
| Why It's Too Thick to Spread | If the mixture is too dense, you likely didn't add enough liquid. Remember that tahini absorbs moisture over time. You can always stir in another tablespoon of cold water after the blending is done to |
Common Mistakes Checklist
- ✓ Did you rinse the chickpeas? (Prevents metallic taste)
- ✓ Is the water actually ice cold? (Ensures the pale color)
- ✓ Did you blend the tahini/lemon first? (Creates the emulsion)
- ✓ Did you use fresh lemon? (Avoids bottled bitterness)
- ✓ Did you scrape the sides? (Ensures no whole chickpeas remain)
Flavor Variations
Once you have the base down, you can get creative. This easy 3 minute hummus recipe is a blank canvas for nutrition focused additions.
For a fresh, green twist, blend in a handful of baby spinach or fresh parsley. This adds vitamins and a vibrant color without changing the creamy texture. If you want something bolder, roasted red peppers blend in beautifully for a smoky, sweet profile.
If you're skipping the tahini, you can use a hummus recipe without tahini by substituting it with soaked cashews or extra olive oil. However, keep in mind that the tahini provides a specific nutty depth that is hard to replicate.
For a truly high protein version, I sometimes blend in a tablespoon of nutritional yeast for a cheesy, savory flavor.
Scaling Your Batch
Whether you're feeding a crowd or just yourself, adjusting the quantities is simple.
Scaling Down (1/2 Batch): Use a smaller blender jar if possible. Use half a can of chickpeas and reduce the blending time by about 20% to avoid overheating the smaller volume of ingredients. Be careful with the garlic, as half a clove can still be quite potent.
Scaling Up (2x-4x Batch): Don't just multiply everything linearly. For salt and cumin, only increase to 1.5x the amount first, then taste. For liquids, reduce the total water by about 10% initially, as larger volumes tend to hold more moisture.
I highly recommend working in batches; overloading a blender can lead to "dead zones" where the chickpeas don't get processed, leaving you with chunks.
| Desired Result | Action | Impact |
|---|---|---|
| Extra Creamy | Add 1 tbsp Greek Yogurt | Increases protein, adds tang |
| low fat | Reduce olive oil by half | Lighter feel, less richness |
| Bold Flavor | Double the garlic/cumin | More pungent, savory profile |
Debunking Hummus Myths
There are a lot of "rules" about hummus that just aren't true. Let's clear some things up.
One big myth is that you must peel the chickpeas to get a smooth texture. As we've seen, a high speed blender does this work for you in seconds. Peeling them by hand is a waste of time for a home cook.
Another common misconception is that you need to soak dried chickpeas for 24 hours. While that's great for the most traditional versions, canned chickpeas are a perfectly healthy, time saving alternative. Just rinse them well to remove the excess sodium from the canning liquid.
Storage and Zero Waste
This dip keeps remarkably well in the fridge. Store it in an airtight glass container for up to 5 days. I always leave a thin layer of olive oil on top of the hummus before sealing the lid, which acts as a natural barrier against oxidation and keeps the surface from drying out.
Regarding freezing, I don't recommend it. The emulsion can break during the freeze thaw cycle, leaving you with a grainy, separated mess. If you have too much, it's better to share it with a neighbor.
For zero waste, don't throw away the aquafaba (the liquid in the chickpea can). You can use it as an egg substitute in vegan baking or whip it into a foam for cocktails. If you have leftover lemon rinds, zest them and freeze them in a small bag for future recipes.
Best Pairing Ideas
To make this a complete, balanced meal, you need the right vessels for dipping. While carrots and celery are classic, I love serving this with Easy Homemade Naan Bread for a more filling experience. The soft, charred bread is the perfect contrast to the velvety hummus.
For a lighter option, a platter of sliced cucumbers, radishes, and bell peppers is the way to go. I also like to drizzle a bit of extra olive oil and a sprinkle of paprika on top of the dip for a professional look.
If you're serving this as part of a larger spread, it pairs beautifully with olives, feta cheese, and cherry tomatoes. Trust me on this, the combination of salty feta and zesty hummus is a winner every time.
Recipe FAQs
I can’t have gluten… will this still work?
Yes, this recipe is naturally gluten-free. All listed ingredients are safe for those with gluten sensitivities.
What if I skip the sesame oil?
Do not skip the tahini. This recipe uses tahini rather than sesame oil to provide the essential creamy base and nutty flavor profile.
Why is my hummus gritty?
Keep blending on high. A sandy texture occurs when chickpea skins are not fully broken down by the blender.
Why does my hummus taste bitter?
Use high-quality tahini. Bitterness is typically caused by low-grade tahini or over processing the raw garlic.
Is it true that I can freeze hummus?
No, this is a common misconception. The emulsion breaks during the freeze thaw cycle, resulting in a grainy and separated texture.
How to store leftover hummus?
Store in an airtight glass container. Keep it refrigerated for up to 5 days and cover the surface with olive oil to prevent oxidation. This pairs perfectly with crispy mini onion bites for a great appetizer spread.
How to get a velvety, spreadable consistency?
Drizzle in ice-cold water slowly. Add one tablespoon at a time while the blender is on low until the desired smoothness is achieved.
Easy 3 Minute Hummus

