Banana Pudding Cups: Creamy and Individual
- Time: Active 25 minutes, Passive 240 minutes, Total 265 minutes
- Flavor/Texture Hook: Velvety vanilla custard paired with a crisp cookie shatter
- Perfect for: Summer cookouts, holiday dessert tables, or easy meal prep
- Crafting the Ultimate Creamy Banana Pudding Cups
- Why These Layers Stay Perfectly Defined
- The Essential Components for Sweet Success
- Ingredients and Substitutes
- Step-by-Step Instructions
- Professional Fixes for Common Textural Mishaps
- Ways to Adapt This Sweet Treat
- Scaling for Large Groups
- Myths About Banana Pudding
- Preserving That Velvety Texture and Color
- Creative Ways to Present Your Dessert
- Recipe FAQs
- 📝 Recipe Card
Crafting the Ultimate Creamy Banana Pudding Cups
We've all been there at the neighborhood potluck, staring down a communal bowl of what looks like beige soup. You know the one, where the bananas have turned a ghostly grey and the vanilla wafers have dissolved into a texture best described as "wet cardboard." It is a tragedy because, when done right, this dessert is the king of comfort food.
I used to struggle with the consistency myself, often ending up with a pudding that was either too runny to hold layers or so stiff it felt like eating cold paste.
The fix isn't complicated, but it does require a bit of patience and a few tricks I picked up after many messy attempts. These individual Banana Pudding Cups are designed to stay bright, bold, and structurally sound.
By using individual glass jars, we eliminate the "scooping" mess that usually ruins the beautiful layers. You get a perfect cross section of cream, fruit, and crunch in every single bite.
This version is all about the contrast between the rich, dense custard and the airy, light whipped topping. We are moving away from the "instant only" flavor by adding real vanilla bean paste and a hit of citrus to keep the fruit fresh.
It is the kind of treat that makes people ask for the recipe before they've even finished their first cup. Trust me, once you see how these hold up in the fridge, you'll never go back to the big bowl method again.
Why These Layers Stay Perfectly Defined
Most people just toss everything together and hope for the best, but there is a reason some puddings weep liquid while others stay firm. It comes down to how we manage the moisture and the air we've worked into the mixture.
- The Lipid Barrier: By whipping the heavy cream to stiff peaks and folding only half into the pudding, we create a fat rich "shield" that prevents the moisture in the custard from immediately soaking into the cookies.
- Enzymatic Delay: The lemon juice isn't for flavor; it lowers the pH on the surface of the fruit, which effectively stalls the polyphenol oxidase enzyme that turns bananas brown.
- Starch Hydration: Allowing the pudding base to rest for exactly 30 minutes before assembly ensures the cornstarch in the mix has fully bonded with the milk proteins, preventing a grainy texture.
- Cold Chain Stability: Using ice cold milk and chilled condensed milk keeps the fat globules in the cream from melting during the whisking process, ensuring a velvety mouthfeel.
Since we are talking about making things ahead of time, if you're looking for something that travels just as well as these cups, you might enjoy my Chocolate Banana Protein Bread. It uses the same fruit base but in a much more portable, snack friendly format.
| Servings | Ingredient Adjustments | Container Size | Total Chill Time |
|---|---|---|---|
| 4 People | Half all ingredients; use 1.7 oz pudding mix | 8 oz jars (4) | 4 hours |
| 8 People | Standard recipe as listed in official data | 8 oz jars (8) | 4 hours |
| 16 People | Double all ingredients; 2 cans condensed milk | 8 oz jars (16) | 5 hours |
Managing the portion sizes early on helps you choose the right glassware. For a party, I usually stick to the 8 ounce size because it’s a generous portion without being overwhelming.
If you go larger, the weight of the pudding can actually crush the bottom layer of bananas before they have a chance to set properly.
The Essential Components for Sweet Success
Selecting the right ingredients is the difference between a "fine" dessert and one that people talk about for weeks. We aren't just looking for sugar; we are looking for specific fat contents and aromatic depths.
| Component | Science Role | Pro Secret |
|---|---|---|
| Heavy Cream | Provides structure and "lift" | Always use 36% fat or higher for rigid peaks |
| Condensed Milk | Acts as a thickener and primary sweetener | Chill the can for 2 hours to help it emulsify faster |
| Vanilla Bean Paste | Delivers intense aromatic flavor | The tiny black specks signal a high-quality homemade feel |
| Lemon Juice | Prevents oxidation of fruit sugars | Freshly squeezed works better than bottled concentrate |
The heavy cream is particularly important here. If you try to use a "light" whipping cream or a dairy substitute with lower fat, the pudding will eventually collapse under its own weight. We need those fat solids to act as the scaffolding for our parfaits.
Ingredients and Substitutes
To make these Banana Pudding Cups, you will need a few pantry staples and some fresh produce. I always recommend getting the bananas a day or two before you plan to bake so they reach that perfect "speckled" stage where the sugar content is highest.
- 1 can (14 oz) sweetened condensed milk: This provides the creamy, caramel like base. Why this? It creates a denser, more luxurious mouthfeel than sugar alone.
- Substitute: Cream of coconut (adds a tropical flair but changes the flavor profile significantly).
- 1.5 cups ice cold whole milk: Essential for the instant pudding to set. Why this? The fat in whole milk helps the pudding stay stable.
- Substitute: 2% milk (results in a slightly thinner consistency).
- 1 box (3.4 oz) instant vanilla pudding mix: The thickening agent. Why this? It provides a consistent, reliable set in 30 minutes.
- Substitute: Instant white chocolate pudding (adds a buttery, rich depth).
- 1 tsp pure vanilla bean paste: For flavor and aesthetics. Why this? It has a much more "real" flavor than imitation extract.
- Substitute: Vanilla extract (use 1.5 tsp to match the potency).
- 1 box (11 oz) vanilla wafers: The structural crunch. Why this? They soften into a cake like texture over time.
- Substitute: Graham crackers (provides a saltier, more honey forward base).
- 4 large ripe bananas: The star of the show. Why this? Use bananas with small brown spots for maximum sweetness.
- Substitute: Plantains are NOT a sub here; stick to standard Cavendish bananas.
- 2 tbsp fresh lemon juice: To keep the fruit bright. Why this? The acidity prevents the fruit from turning grey and unappealing.
- Substitute: Lime juice (adds a slight citrus tang to the overall flavor).
- 2 cups heavy whipping cream: For the stabilized topping. Why this? High fat content is required to hold stiff peaks.
- Substitute: Pre made whipped topping (sweeter and less "dairy" tasting).
- 0.25 cup powdered sugar: To sweeten and stabilize the cream. Why this? The cornstarch in powdered sugar helps the cream hold its shape.
- Substitute: Granulated sugar (may result in a slightly grainier texture).
- 1 tsp vanilla extract: For the whipped cream layer.
| Original Ingredient | Substitute | Why It Works |
|---|---|---|
| Vanilla Wafers | Biscoff Cookies | Adds a deep cinnamon, caramelized flavor. Note: Cookies are harder, so chill 2 extra hours. |
| Whole Milk | Evaporated Milk | Higher protein content leads to an even sturdier pudding set. |
| Vanilla Bean Paste | Scraped Vanilla Bean | The most authentic flavor. Note: One whole bean equals 1 tsp paste. |
For those who love a twist on these classic flavors, I often suggest looking at my Peanut Butter Pie. It uses a similar stabilized cream technique but incorporates a salty, nutty element that pairs beautifully with the sweetness of the bananas.
step-by-step Instructions
- Combine the chilled sweetened condensed milk and the ice cold whole milk in a large glass bowl. Whisk them together until the mixture is completely uniform and smooth.
- Add the instant vanilla pudding mix and the vanilla bean paste into the milk mixture. Whisk vigorously for exactly 2 minutes until the liquid begins to thicken and no lumps remain. Note: Using a glass bowl helps you see if any dry powder is stuck at the bottom.
- Place a piece of plastic wrap directly onto the surface of the pudding to prevent a skin from forming. Refrigerate this base for 30 minutes until it is firm and cold.
- Pour the heavy whipping cream, powdered sugar, and vanilla extract into a separate, pre chilled metal bowl. Beat with an electric mixer until the cream is thick and the peaks stand straight up when the beaters are lifted.
- Remove the pudding from the fridge and gently stir it to loosen. Use a spatula to fold exactly half of your whipped cream into the pudding until you see a light, pale yellow color with no white streaks.
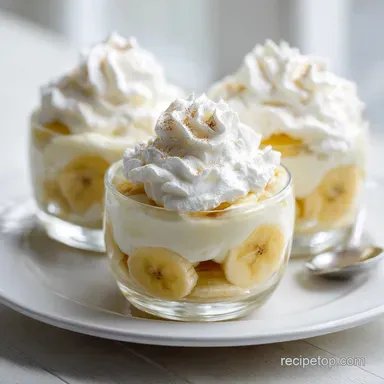
- Slice your 4 bananas into rounds about 1/4 inch thick. Place them in a small bowl and toss gently with the lemon juice until every slice has a shimmering, light coating.
- Line the bottom of your 8 ounce jars with a single layer of vanilla wafers. You can break them into pieces if needed to cover the entire bottom surface.
- Add a layer of the lemon coated banana slices over the wafers. Spoon a generous portion of the pudding mixture over the fruit until the bananas are completely submerged.
- Repeat the layers of wafers, bananas, and pudding one more time. Top each jar with a final, thick layer of the remaining whipped cream until the jar is filled to the brim.
- Place the lids on the jars or cover with plastic wrap. Chill in the refrigerator for 4 hours until the wafers have softened into a tender, cake like consistency.
Professional Fixes for Common Textural Mishaps

One of the biggest complaints with this dish is the "soupiness" that can occur after a few hours. This usually happens because the bananas release moisture as they sit. If you find your pudding is getting watery, it is likely because the bananas were overripe or weren't properly coated in the lemon juice.
Why Your Pudding Is Runny
If the pudding doesn't set, it is usually a temperature issue. Instant pudding relies on the interaction between the tetrasodium pyrophosphate in the mix and the proteins in cold milk. If your milk is room temperature, those bonds won't form correctly. Always use milk straight from the back of the fridge.
Why Your Wafers Are Too Hard
If you try to serve these immediately, the cookies will have a literal "crunch" that feels out of place. The magic happens during that 4 hour chill when the cookies absorb the moisture from the custard. If they are still hard, you likely need another 2 hours of resting time.
| Problem | Root Cause | Solution |
|---|---|---|
| Grey Bananas | Exposure to oxygen | Ensure every slice is tossed in lemon juice and fully covered by pudding. |
| Gritty Texture | Pudding mix not fully dissolved | Whisk for the full 2 minutes; don't stop early just because it looks thick. |
| Deflated Cream | Over beating or warm equipment | Chill your bowl and beaters for 15 minutes before whipping the cream. |
Common Mistakes Checklist
- ✓ Never use "Cook and Serve" pudding mix; it won't set without heat and will ruin the cold assembly.
- ✓ Don't skip the lemon juice; even if you think you don't like the flavor, you won't taste it in the final dish.
- ✓ Ensure the whipped cream reaches "stiff peaks" (where it stands up straight) rather than "soft peaks" (where it curls over).
- ✓ Use individual jars to prevent the "weeping" that happens when a large batch is sliced or scooped.
Ways to Adapt This Sweet Treat
While the classic version is iconic, there is plenty of room to play with the flavor profile. I once made a version with crushed ginger snaps instead of vanilla wafers, and it was a revelation for autumn.
The Tropical Twist
Swap the whole milk for full fat canned coconut milk and use a coconut flavored pudding mix. The combination of banana and coconut is naturally phenomenal. You can even top the finished cups with toasted shredded coconut for an extra layer of texture that mimics the original wafer crunch.
The Double Vanilla Method
If you really want to lean into the "homemade" aspect, use both vanilla bean paste and a high-quality vanilla extract in the pudding. This creates a multi layered vanilla flavor that cuts through the heavy sweetness of the condensed milk.
Dietary Swaps for Guests
For friends who can't do gluten, there are several brands of gluten-free vanilla wafers that work perfectly in this recipe. They tend to be a bit denser, so I usually recommend adding an extra hour to the chill time to ensure they soften properly.
| Premium Ingredient | Budget Alternative | Flavor Impact | Savings |
|---|---|---|---|
| Vanilla Bean Paste | Vanilla Extract | Slightly less "earthy" but still delicious | Save $15-20 per jar |
| Organic Whole Milk | Store Brand Whole Milk | Virtually no difference in final taste | Save $2-3 |
| Brand Name Wafers | Store Brand Wafers | Store brands can sometimes be crunchier | Save $1.50 |
Scaling for Large Groups
When you're making these for a crowd, like a wedding shower or a massive summer BBQ, you have to be careful about the ratios. You can't just double everything blindly because the liquid content can sometimes become unmanageable.
- Scaling DOWN (2-4 servings): This is very easy. Just use half a can of condensed milk and a small box of pudding. If a recipe calls for half an egg (though not this one), you'd whisk it and measure. Here, the pudding is very forgiving.
- Scaling UP (16-32 servings): When doubling or tripling, keep the salt and vanilla at 1.5x the original amount first, then taste. Overloading on vanilla can actually make the pudding taste slightly bitter.
- Assembly Line Method: If making 20+ cups, slice all bananas first and keep them in a bowl of lemon water (then drain), so they don't brown while you are assembling the first ten jars.
Myths About Banana Pudding
There are a lot of "old wives' tales" in the kitchen, especially regarding Southern desserts. Let's clear up a few that might be holding you back.
Myth: You must use Nilla brand wafers or it isn't authentic. The truth is that while Nilla is the standard, any high-quality vanilla butter cookie will work. In fact, some artisanal brands offer a more "shortbread" feel that absorbs the pudding even better, resulting in a richer final texture.
Myth: Adding more pudding powder makes it thicker. It actually makes it chalky. The ratio of liquid to starch is precisely calculated in this recipe. If you want a thicker pudding, use less milk (reduce by 1/4 cup), but don't just dump more powder into the mix.
Myth: Fresh bananas will stay white if the jar is airtight. Airtight jars help, but the internal oxygen trapped between the layers will still cause browning. The only foolproof methods are the citrus bath or fully encasing the fruit in the pudding so no air can touch it.
Preserving That Velvety Texture and Color
Storage is where most Banana Pudding Cups go to die. Because this is a fresh dairy and fruit dessert, it has a very specific shelf life.
- Fridge Life: These are best within the first 24 hours. They will stay "good" for up to 3 days, but the bananas will eventually start to soften too much, and the wafers will lose all their structure, turning into a uniform mush.
- Freezer Rules: Honestly, don't do it. Freezing pudding causes the water and fat to separate. When it thaws, you'll be left with a grainy, watery mess that no amount of whisking can fix. If you want a frozen treat, try making my Giant Double Chocolate Cookie and crumbling it over ice cream instead.
- Zero Waste Tip: If you have leftover bananas that are a bit too ripe for slicing, mash them up and whisk them into the pudding base itself. It will intensify the banana flavor. Leftover wafers? Crush them and use them as a "crust" for a cheesecake or a topping for yogurt.
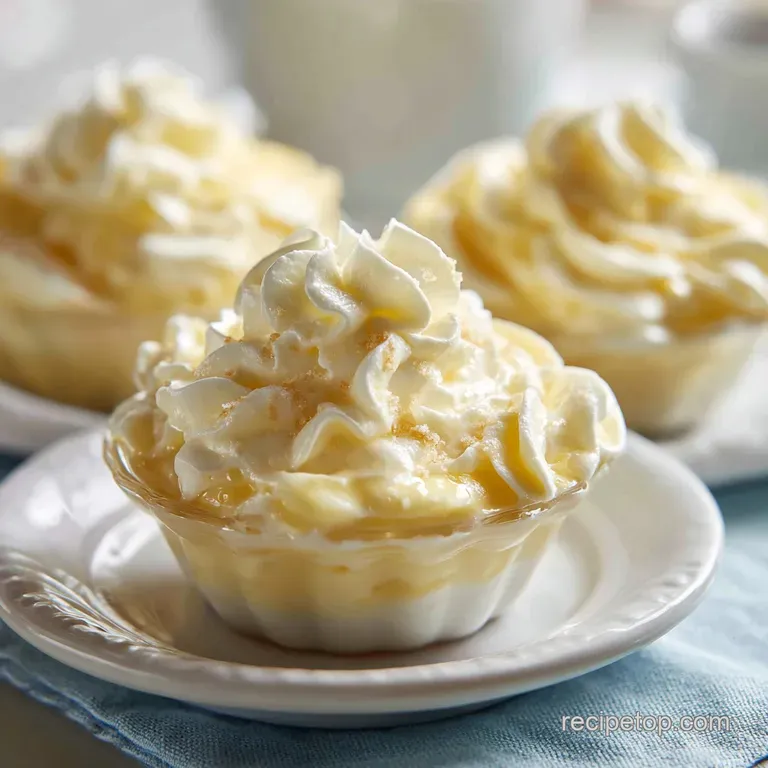
Creative Ways to Present Your Dessert
The visual appeal of individual servings is half the fun. Using clear glass is a must so people can see the distinct layers of white cream, yellow pudding, and golden wafers.
If you want to go the extra mile, save a few of the best looking wafers and crush them into a fine dust. Sprinkle this dust over the top of the whipped cream just before serving. It gives a "sand" effect that looks beautiful and adds a tiny hit of toasted sugar flavor.
You can also add a single fresh banana slice to the top, but do this right before you put them on the table so it doesn't have time to brown.
Another great trick is to use a piping bag for the final whipped cream layer. Using a large star tip makes the Banana Pudding Cups look like they came from a high end bakery. It’s a five minute effort that makes a world of difference in the presentation.
Whether you're serving these at a backyard party or just enjoying one on the couch on a Tuesday night, that extra bit of flair makes the experience feel special. Just remember to keep them cold until the very last second the contrast of the chilled custard against a warm summer day is what makes this recipe a true winner.

Recipe FAQs
What kind of cookies does Paula Deen use in her banana pudding?
Standard vanilla wafers are the traditional choice. This recipe specifically calls for an 11-ounce box of classic vanilla wafers to provide the necessary structure between the pudding and banana layers.
How do you keep bananas from turning black in banana pudding?
Toss the banana slices in fresh lemon juice before layering. This acidic coating slows enzymatic browning significantly, ensuring the fruit stays bright throughout the chilling period.
What can you use instead of Nilla Wafers?
Substitute with any plain, crispy butter cookie of similar size. While the flavor profile will shift, you can achieve a similar crunch using crispy oven baked crackers or shortbread style biscuits.
Do you use condensed milk in banana pudding?
Yes, it is a primary ingredient. The 14-ounce can of chilled sweetened condensed milk provides the necessary sugar and creamy body required to stabilize the pudding mixture.
Is it true I must cook the pudding over the stove to make it thicken?
No, this is a common misconception. Because this recipe utilizes instant pudding mix, you only need to whisk it vigorously with chilled milk for two minutes to achieve the proper consistency.
How to ensure the whipped cream topping holds its shape?
Beat the cream with powdered sugar until it reaches stiff, rigid peaks. Using a chilled bowl and high fat heavy cream ensures the mixture becomes stable enough to act as a durable moisture barrier for the cups.
How to prevent a skin from forming on the pudding while it chills?
Press plastic wrap directly against the surface of the pudding. Creating an airtight seal prevents air exposure, which is the direct cause of the thin, rubbery film that can develop during the 30-minute refrigeration phase.
Creamy Banana Pudding Cups
Ingredients:
Instructions:
Nutrition Facts:
| Calories | 698 kcal |
|---|---|
| Protein | 9.3 g |
| Fat | 34.8 g |
| Carbs | 90.6 g |
| Fiber | 2.1 g |
| Sugar | 62.4 g |
| Sodium | 315 mg |
