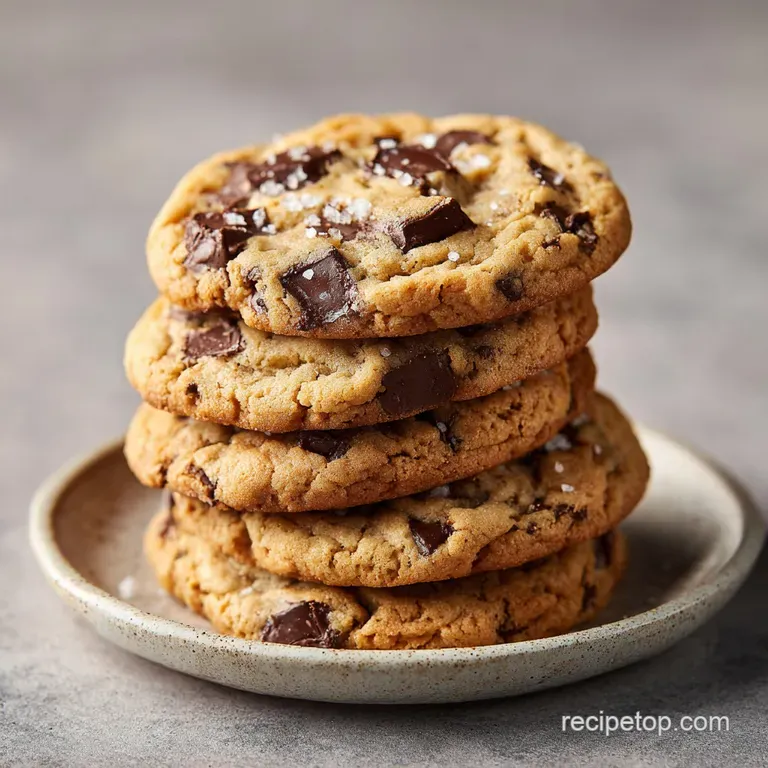
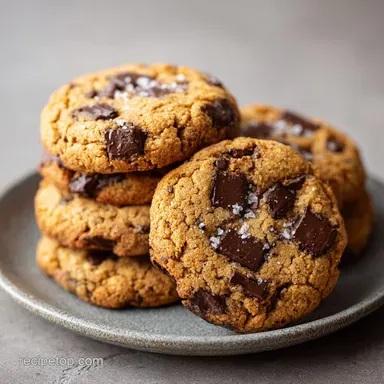
Brown Butter Chocolate Chip Cookies
- Time: Active 20 minutes, Passive 48 hours, Total 30 minutes
- Flavor/Texture Hook: Shatter crisp edges with a dense, velvety, fudgy center
- Perfect for: Holiday gifting, housewarming parties, or a cozy weekend project
- The Secret Physics of a Chewy Center
- Component Analysis for Optimal Texture
- Curating Your Pantry for This Batch
- Essential Gear for Professional Results
- From Prep to Plate: The Method
- Why Your Cookies Spread into a Puddle
- Proper Methods for Scaling Your Batch
- Brown Butter Changes the Flavor Profile Completely
- Chilling the Dough Improves Texture Significantly
- Storage and Zero Waste Strategies
- Enhancing the Experience with Perfect Complements
- Recipe FAQs
- 📝 Recipe Card
Imagine walking into a kitchen where the air is thick with the scent of toasted hazelnuts and warm vanilla. That isn't actually nuts you're smelling; it’s the butter transforming in a saucepan, turning a deep amber while the milk solids caramelize into little bits of gold.
This is the exact moment I realized that making a batch of cookies isn't just about mixing sugar and flour; it's about building layers of scent and taste that start long before the tray even hits the oven.
I first made these for a close friend's housewarming, and the aroma was so intense it actually drew the neighbors over to the front porch to see what was happening.
We've all had those flat, greasy cookies that look like puddles, or the ones that are so cakey they feel like a muffin in disguise. This recipe is the antidote to those disappointments.
It’s designed for that specific occasion where you want to show someone you care or when you just really need a win in the kitchen. The combination of the dark brown sugar and that 48 hour cold rest creates a profile that tastes like salted caramel and high end chocolate had a beautiful, chewy baby.
It’s simple, but the tiny details in the technique change everything.
I've made my fair share of baking blunders, from forgetting the salt to using butter that was way too hot. But through those messy kitchen sessions, I learned that the best chocolate chip cookies recipe isn't about complexity; it's about patience and choosing the right ingredients.
Trust me, once you smell that butter browning on the stove, there is no going back to the basic "melt and stir" method. You’re about to become the person everyone asks to bring the dessert to every single gathering.
The Secret Physics of a Chewy Center
- Moisture Retention: Dark brown sugar contains more molasses than light brown versions, which attracts and holds onto water molecules to keep the crumb soft.
- Enzyme Breakdown: Chilling the dough for 48 hours allows enzymes to break down large starches into smaller sugars, leading to much faster browning and a deeper, more complex flavor.
- Fat Emulsification: Cooling the brown butter to a pomade consistency before creaming ensures it can trap tiny air pockets, providing lift without making the cookie greasy.
- Protein Structure: Adding an extra egg yolk introduces more lecithin and fat, which interferes with gluten development to create a shorter, more tender bite.
| Dough Thickness | Baking Temp | Cooling Time | Visual Finish Cue |
|---|---|---|---|
| 3.5 cm (Scooped) | 175°C (350°F) | 5 minutes | Golden rims with pale, soft centers |
| 2 cm (Pressed) | 175°C (350°F) | 8 minutes | Uniform golden brown and crispy |
| 5 cm (Jumbo) | 170°C (340°F) | 12 minutes | Deeply bronzed edges and domed tops |
Selecting the right thickness depends entirely on your personal preference for "snap" versus "squish." If you use a standard 3 tablespoon scoop without pressing the dough down, you'll get that classic bakery look with ripples around the edges and a thick, soft middle.
For those who love a crunchier experience, pressing the balls slightly before they go into the heat will give you a thinner, crispier result.
Component Analysis for Optimal Texture
| Ingredient | Role in Recipe | Pro Secret |
|---|---|---|
| European Style Butter | Provides fat and flavor | High fat content (82%+) creates a silkier mouthfeel than standard butter. |
| Dark Brown Sugar | Humectant and sweetener | The acidity reacts with baking soda to provide a distinct lift and chew. |
| Dark Chocolate Chunks | Flavor and texture | Chunks create "pools" of chocolate rather than small isolated dots. |
The choice of sugar here is non negotiable if you want that deep, almost toffee like backbone. While you might be tempted to use whatever is in the pantry, the dark brown variety is the heavy lifter for that specific fudgy texture we’re chasing. If you find yourself enjoying these rich, buttery flavors, you might also want to try these Christmas M&M cookie bars which use a similar base but focus on a festive, colorful presentation.
Curating Your Pantry for This Batch
- 1 cup (225g) unsalted European style butter: Why this? Higher fat content means less water and more flavor.
- Substitute: Regular unsalted butter (flavor will be slightly less intense).
- 1 cup (200g) dark brown sugar, packed: Why this? Essential for that molasses heavy, chewy texture.
- Substitute: Light brown sugar mixed with 1 tsp molasses.
- 0.5 cup (100g) granulated sugar: Why this? Helps the edges get that necessary crispness.
- Substitute: Caster sugar or extra fine white sugar.
- 1 tbsp pure vanilla extract: Why this? Rounds out the salt and chocolate notes.
- Substitute: Vanilla bean paste for those beautiful black flecks.
- 2.25 cups (280g) all purpose flour: Why this? Provides the perfect protein balance for structure.
- Substitute: A mix of half bread flour and half pastry flour.
- 1 tsp baking soda: Why this? Encourages browning and provides the right amount of spread.
- Substitute: Not recommended to swap; essential for the reaction.
- 0.75 tsp fine sea salt: Why this? Sharpens all the sweet flavors so they aren't cloying.
- Substitute: Kosher salt (increase to 1 tsp).
- 1 large egg, room temperature: Why this? Binds the dough while adding moisture.
- Substitute: 1/4 cup unsweetened applesauce (yields a softer, denser cookie).
- 1 large egg yolk, room temperature: Why this? The secret to that professional, fudgy chewiness.
- Substitute: 1 tbsp of heavy cream.
- 1.5 cups dark chocolate chunks (60% cacao): Why this? Bitter notes balance the sweet dough perfectly.
- Substitute: Milk chocolate chips for a much sweeter, nostalgic flavor.
- 0.5 tsp flaky sea salt: Why this? The finishing touch that makes the chocolate pop.
- Substitute: Maldon or any large flake finishing salt.
Essential Gear for Professional Results
You don’t need a kitchen full of gadgets, but a few specific tools make the process much smoother. A light colored saucepan is my top recommendation for browning the butter because it allows you to actually see the color change before it burns.
If you use a dark or non stick pan, it’s almost impossible to tell when those milk solids turn golden. A sturdy stand mixer (like a KitchenAid) is also a massive help for the creaming stage, as you want to really whip that butter and sugar until it's light and aerated.
For the baking itself, heavy duty rimmed baking sheets prevent the bottoms of your cookies from scorching before the tops are done. I always use parchment paper rather than greasing the pan; it ensures a clean release and stops the cookies from spreading too aggressively.
Finally, a 3 tablespoon cookie scoop is the best way to ensure every single one is the exact same size, which means they all finish baking at the same time. No more half burnt, half raw trays!
From Prep to Plate: The Method
1. The Brown Butter Transformation
Place your 225g of unsalted butter in a small light colored saucepan over medium heat. As it melts, stay close and whisk constantly while it foams and spatters. Watch for the foam to subside and for little golden brown specks to appear at the bottom.
The aroma will shift from "buttery" to "toasted hazelnut." Immediately pour it into a heat proof bowl to stop the cooking. Let it sit on the counter until it reaches a semi solid, pomade like consistency (soft enough to spread but not liquid).
2. Building the Emulsion
In your stand mixer bowl, combine the cooled brown butter with 200g dark brown sugar and 100g granulated sugar. Cream these together on medium speed for 3 to 5 minutes. You are looking for the mixture to become noticeably lighter in color and fluffy.
This step is vital because the sugar crystals are literally cutting tiny air pockets into the fat, which will later expand in the oven.
3. Incorporating the Wet Ingredients
Add the whole egg, the extra egg yolk, and 1 tbsp of vanilla extract to the creamed mixture. Increase the speed to medium high and beat until the mixture looks pale and voluminous. It should almost look like a thick frosting at this stage.
Note: Using room temperature eggs prevents the butter from seizing up and keeps the emulsion stable.
4. Combining the Dry Goods
In a separate medium bowl, whisk together the 280g flour, 1 tsp baking soda, and 0.75 tsp fine sea salt. Turn the mixer to its lowest setting and gradually add the dry ingredients to the wet. Stop the mixer the very second you no longer see streaks of white flour.
Over mixing at this stage will activate too much gluten, turning your fudgy cookie into something tough and bread like.
5. The Chocolate Fold
Gently fold in your 1.5 cups of dark chocolate chunks using a spatula. Ensure they are evenly distributed so every bite has a mix of dough and melted chocolate. This is a great moment to appreciate the texture of the dough it should be thick, slightly tacky, and smell intensely of caramel.
6. The Cold Cure
Cover the bowl tightly with plastic wrap or transfer the dough to an airtight container. Place it in the refrigerator for at least 24 hours, though 48 hours is the "sweet spot" for flavor development.
Chilling the dough isn't just a suggestion; it allows the flour to fully hydrate and the fats to solidify, ensuring the cookies don't spread into a thin mess.
7. Preparing for the Heat
Preheat your oven to 175°C (350°F) and line two large baking sheets with parchment paper. Use your 3 tablespoon scoop to portion out the chilled dough. Place the balls about 3 inches apart on the sheets.
The kitchen will start to smell like a high end bakery as the oven reaches temperature.
8. The Golden Bake
Slide the trays into the oven and bake for 10 minutes. Listen for a faint sizzle as the edges set. They are done when the rims are a beautiful golden brown, but the centers still look slightly "underdone" and soft.
They will continue to cook on the hot tray once removed, so don't be tempted to leave them in longer!
9. Finishing Touches
Immediately sprinkle the tops with 0.5 tsp of flaky sea salt while the chocolate is still molten. Let the cookies rest on the baking sheet for 5 minutes to firm up before transferring them to a wire rack. This resting period is crucial for the internal structure to set properly.
Why Your Cookies Spread into a Puddle

One of the most frequent frustrations is watching your beautiful dough balls turn into one giant, flat sheet in the oven. This usually happens because the butter was still too warm when you started mixing, or the dough didn't spend enough time in the fridge.
When the fat is already near its melting point, it doesn't have the structural integrity to hold up the flour and sugar as the oven heats up. Always make sure your brown butter has returned to a soft, semi solid state before you begin creaming.
Another culprit is the temperature of your baking sheet. If you’re baking in batches, never place fresh dough onto a hot tray that just came out of the oven. The bottom of the dough will melt instantly, causing the cookie to lose its shape before it even starts to bake.
Always let your sheets cool completely, or run them under cold water and dry them thoroughly between rounds.
| Problem | Root Cause | Solution |
|---|---|---|
| Cookies are flat/greasy | Butter was too hot or liquid | Chill dough for 24+ hours and use pomade consistency butter. |
| Texture is cakey/dry | Too much flour or over mixing | Use a scale for flour and stop mixing as soon as white streaks vanish. |
| Bottoms are burnt | Oven rack is too low | Move the rack to the center and use light colored baking sheets. |
Common Mistakes Checklist
- ✓ Using cold eggs in warm butter (this breaks the emulsion and causes a curdled texture).
- ✓ Measuring flour with a cup instead of a scale (it’s almost always packed too tightly).
- ✓ Skipping the 24 hour chill (you lose out on the deep, complex "toffee" flavor notes).
- ✓ Opening the oven door too often (this drops the temp and ruins the rise).
- ✓ Using "oil heavy" chocolate chips instead of high-quality chunks or chopped bars.
Proper Methods for Scaling Your Batch
When you need to make a massive amount for a party, doubling this recipe is relatively straightforward, but you need to be careful with the leavening. For a double batch (48 cookies), you can double everything exactly, but I recommend only using 1.5 times the salt and baking soda to avoid a metallic aftertaste.
The moisture in larger batches can sometimes act differently, so keep an eye on the dough consistency.
If you are scaling down to a tiny batch of 6 or 12, the egg can be tricky. Since you can't easily halve a whole egg, I suggest whisking one egg in a small bowl and using exactly half of the liquid by weight. For the extra yolk, just use the yolk of a smaller egg if possible.
Always reduce the baking time by about 2 minutes for smaller batches, as the oven stays more consistent when it isn't crowded with multiple trays.
Brown Butter Changes the Flavor Profile Completely
There is a common misconception that browning butter is just about adding flavor. In reality, you are also removing water. Butter is usually about 15% to 18% water; as you simmer it, that water evaporates.
This means your dough has a higher fat to liquid ratio, which contributes to that insanely fudgy, melt in-your mouth texture. This is why the best chocolate chip cookies recipe almost always starts with a saucepan on the stove.
Some people also believe that you can substitute margarine or oil for the butter and get the same result. This is simply not true. Margarine has a much higher water content and lacks the milk solids that provide the toasted, nutty notes. If you're looking for a dairy-free option, you're better off looking at a recipe designed specifically for oil, like these no bake chocolate cheesecake bars which rely on different fats for their structure.
Chilling the Dough Improves Texture Significantly
The 24 to-48 hour rest isn't just some culinary legend designed to make you wait. It is a process called "hydration." Flour is quite thirsty, and it takes a long time for the starch molecules to fully absorb the moisture from the eggs and butter.
When the flour is fully hydrated, the dough becomes drier and more concentrated. This leads to a cookie that browns more evenly and has a much more "bendy," chewy texture rather than a crumbly one.
| Requirement | Conventional Method | This Gourmet Method | Impact on Result |
|---|---|---|---|
| Butter State | Melted or Room Temp | Browned & Re solidified | Adds toasted, nutty depth. |
| Sugar Type | Equal White/Brown | Heavy Dark Brown | Maximizes chew and molasses flavor. |
| Rest Time | 0 - 30 minutes | 24 - 48 hours | Deeper caramelization and better shape. |
If you absolutely cannot wait the full 24 hours, even a 2 hour chill is better than nothing. However, you will notice that the cookies bake up paler and have a slightly more "floury" taste compared to the ones that got the full cold cure.
The difference is honestly night and day once you've tasted both side-by-side.
Storage and Zero Waste Strategies
Store your finished cookies in an airtight container at room temperature for up to 5 days. To keep them extra soft, toss a single slice of white bread into the container. The cookies will actually pull the moisture out of the bread, keeping them from getting hard. For longer storage, these freeze beautifully.
I recommend freezing the dough balls individually on a tray first, then tossing them into a freezer bag. You can bake them straight from frozen; just add 2 minutes to the total baking time.
For a zero waste kitchen, don't throw away those leftover chocolate shards from chopping your bars. Save them in a small jar in the freezer to use as a topping for oatmeal or to fold into your next batch of brownies.
If you find yourself with a few "ugly" cookies that broke or didn't spread right, crumble them up and use them as a base for a cheesecake crust or as a decadent topping for vanilla bean ice cream.
Enhancing the Experience with Perfect Complements
While these cookies are a star on their own, pairing them correctly can turn a simple snack into a full blown dessert experience. A cold glass of whole milk is the classic choice, but if you want to lean into the sophisticated side of the dark chocolate and sea salt, try serving them alongside a bitter espresso or a smoky Earl Grey tea.
The tannins in the tea cut through the richness of the butter perfectly.
If you’re feeling extra indulgent, use two of these cookies to make a high end ice cream sandwich. A simple Madagascar vanilla or a salted caramel ice cream works best. Just make sure the cookies are completely cooled before assembly, or you’ll end up with a delicious but very messy puddle.
These treats also make a fantastic addition to a dessert board, paired with some tart fresh raspberries or a few wedges of sharp white cheddar the sweet and salty combo is addictive!

Recipe FAQs
What is the secret to making the best chocolate chip cookies?
The secret is browning the butter and chilling the dough. Browning the butter creates a rich, nutty depth, while a 24 48 hour chill hydrates the flour and intensifies the toffee notes.
What makes chocolate chip cookies chewy vs crispy?
The ratio of brown sugar to white sugar dictates texture. Higher brown sugar content increases moisture and chewiness, while a shorter bake time keeps the centers soft. If you enjoyed the fudgy texture in our other recipes, the same principle of controlling moisture applies here.
How to ensure cookies don't turn out cakey?
Use a kitchen scale to measure your flour. Packing flour into a measuring cup often leads to using too much, which dries out the dough and results in a cake like crumb instead of a chewy center.
How to fix dough that feels greasy before baking?
Refrigerate the dough immediately. If your butter was too warm when mixing, the fats separated; chilling helps re-solidify the butter and restores the intended structure of the cookie.
Is it necessary to use a stand mixer?
No, it is not strictly necessary. While a stand mixer makes creaming the sugars and butter easier to achieve a pale, voluminous base, you can achieve similar results with a sturdy whisk and arm strength.
How to bake cookies straight from frozen?
Place the frozen dough directly onto your parchment lined sheet and add 2 minutes to the 10-minute baking time. Ensure your oven is fully preheated to 350°F (175°C) before sliding them in to maintain consistent edges.
How to keep baked cookies soft for days?
Store them in an airtight container with a slice of white bread. The cookies will pull moisture from the bread, keeping them soft and chewy for up to 5 days.
Brown Butter Chocolate Chip Cookies
Ingredients:
Instructions:
Nutrition Facts:
| Calories | 221 calories |
|---|---|
| Protein | 2.1 g |
| Fat | 11.3 g |
| Carbs | 27.7 g |
| Fiber | 0.8 g |
| Sugar | 17.2 g |
| Sodium | 121 mg |
