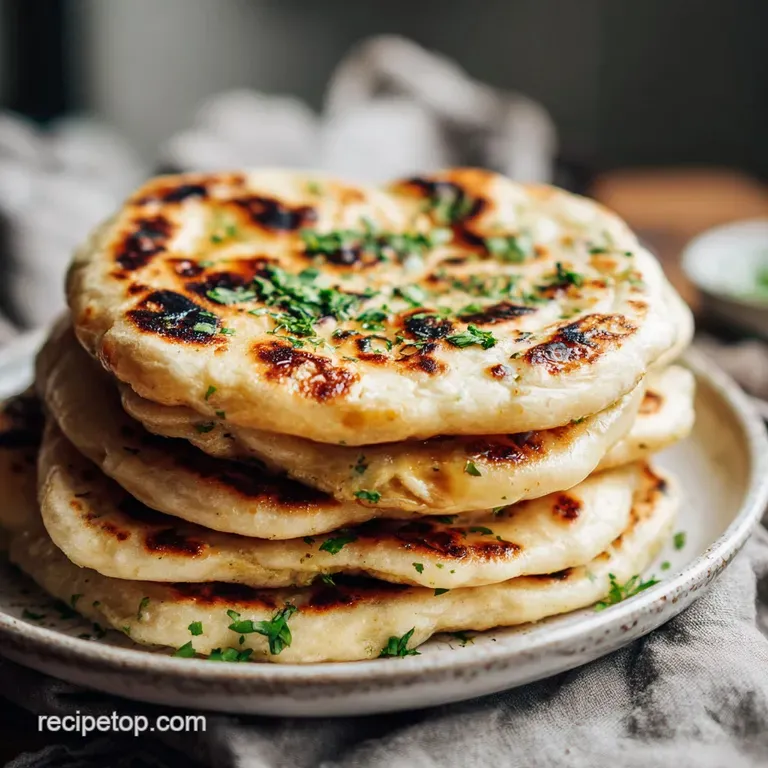
Vegan Gluten Free Naan Recipe Delight
- Time: Active 20 minutes, Passive 50 minutes, Total 1 hours 10 mins
- Flavor/Texture Hook: Charred, pillowy, and buttery
- Perfect for: Weeknight curry nights or a family-friendly snack
- Mastering My Vegan Gluten Free Naan Recipe Delight
- Essential Stats For This Recipe
- The Science Behind This Dough
- Crucial Components For Your Base
- Ingredients And Smart Flour Swaps
- Necessary Tools For Your Kitchen
- Simple Steps For Golden Flatbread
- Solving Common Dough And Pan Issues
- Easy Ways To Scale Up
- Fresh Versus Store Bought Comparison
- Debunking Common Flatbread Myths
- Storing and Reheating Your Naan
- The Best Sides For Serving
- Recipe FAQs
- 📝 Recipe Card
Mastering My Vegan gluten-free Naan Recipe Delight
I still remember the first time I tried to make a gluten-free flatbread for a Friday night curry. It was a disaster. I followed a basic recipe, but what came out of the pan looked more like a dry, cracked tile than anything edible.
When I tried to wrap it around a piece of cauliflower, it literally shattered in my hands. It was a total mood killer for what was supposed to be a cozy meal.
But I'm stubborn. I knew there had to be a way to get that soft, pillowy texture without the wheat. After about six months of trial and error, I found the secret. It’s all about the moisture balance and the binders.
Now, when I toss these into a hot skillet, they puff up beautifully, and the smell of toasted garlic fills the whole house. It’s become a weeknight staple for us because it’s actually faster than driving to the store for the cardboard like pre packaged stuff.
We’re going to focus on getting that characteristic char and a flexible crumb that feels velvety on the tongue. You don't need a tandoor oven or any fancy gear. Just a good heavy pan and a little bit of patience while the yeast does its thing.
Trust me, once you see those big bubbles forming in the pan, you’ll never go back to store-bought again. Let’s get stuck in.
Essential Stats For This Recipe
Before we start mixing, we need to talk about the roadmap. Making a vegan gluten-free naan recipe delight is different from standard baking because we aren't waiting for a massive rise, but we are waiting for the binders to hydrate. If you rush the resting phase, the dough will be sticky and impossible to handle.
| Method | Time | Texture | Best For |
|---|---|---|---|
| Cast Iron Skillet | 10 minutes | Charred and bubbly | Authentic smoky flavor |
| Non Stick Pan | 12 minutes | Evenly golden | Beginners who fear sticking |
| Oven Broiler | 5 minutes | Soft and pale | Making large batches at once |
Getting the timing right is the difference between a flexible wrap and a cracker. We want a over high heat, short duration cook. If the naan stays in the pan too long, all the internal moisture evaporates, and you lose that pillowy interior. It's a quick dance between the heat and the dough.
The Science Behind This Dough
The Physics of the Puff
Mechanism: Psyllium husk creates a mucilaginous gel that traps carbon dioxide bubbles produced by the yeast, mimicking the elastic protein network of gluten. This allows the bread to expand and hold its shape rather than collapsing into a dense mass.
You might be tempted to skip the yeast and just use baking powder, but that's a mistake. The yeast doesn't just provide lift; it provides flavor through fermentation. Without it, the bread tastes "flat" in more ways than one. The acidity in the coconut yogurt also plays a huge role.
It weakens the starch structures just enough to keep the crumb tender while providing a slight tang that cuts through the richness of the vegan butter.
The hydration level here is higher than a standard wheat dough. Because gluten-free flours (especially almond flour) are thirsty, they need extra liquid to stay supple. If the dough feels a bit tacky at first, don't panic. That’s exactly where we want it.
As it sits, the psyllium and the rice flour in your GF blend will soak up that moisture, turning a sticky mess into a workable, elastic dough.
Crucial Components For Your Base
Choosing the right flour blend is everything here. I always look for a blend that has a high ratio of superfine white rice flour and potato starch. If your blend is too heavy on the sorghum or bean flours, the naan will taste earthy rather than neutral.
| Component | Science Role | Pro Secret |
|---|---|---|
| Psyllium Husk | Structural binder | Use powder, not whole husks, for a smoother dough texture. |
| Coconut Yogurt | Fat and Acidity | Ensure it's room temperature to avoid shocking the yeast. |
| Super fine Almond Flour | Moisture retention | Prevents the bread from drying out during the over high heat sear. |
I've tried making this without the almond flour, and while it works, the naan gets stale within twenty minutes. The fats in the almond flour act as a natural preservative, keeping the bread soft even after it cools down. It's the same logic I use in my Vegan Apple Cake recipe to keep the crumb moist for days.
Ingredients And Smart Flour Swaps
Right then, let's look at what we're working with. Every ingredient here has a job. I've listed my favorite substitutes below, but keep in mind that changing the fat or the binder will slightly alter how the bread behaves in the pan.
- gluten-free All Purpose Flour (280g): Look for one with xanthan gum already included. Why this? Provides the base structure and starchy chewiness.
- Super fine Almond Flour (50g): Adds healthy fats and tenderness. Why this? Keeps the bread flexible and soft after cooking.
- Psyllium Husk Powder (18g): The glue that holds it all together. Why this? Creates the "stretch" that gluten usually provides.
- Plain Unsweetened Coconut Yogurt (120g): For tang and moisture.
- Instant Yeast (9g): For that classic bread aroma and light lift.
- Warm Water (240ml): Use a thermometer to hit 43°C exactly.
- Organic Cane Sugar (12g): Feeds the yeast.
- Avocado Oil (28g): A neutral oil with a high smoke point.
- Vegan Butter (42g): For the garlic herb finish.
- Garlic and Cilantro: For that restaurant style topping.
| Original Ingredient | Substitute | Why It Works |
|---|---|---|
| Coconut Yogurt | Soy Yogurt | Similar protein/fat ratio. Note: Ensure it is unsweetened. |
| Avocado Oil | Grapeseed Oil | Both are neutral and handle high heat well. |
| Cane Sugar | Maple Syrup | Liquid sugar still feeds yeast but adds a hint of caramel. |
Necessary Tools For Your Kitchen
You don't need a lot of gear, but a few specific items make this much easier. A cast iron skillet is my top recommendation because it holds heat like a beast. When that cold dough hits the hot iron, you get an immediate sizzle that creates those beautiful charred spots.
If you don't have cast iron, a heavy bottomed stainless steel pan works too. Just stay away from thin, cheap pans that have hot spots, or you'll end up with burnt edges and raw centers. I also highly recommend a digital kitchen scale.
Measuring flour by the cup is notoriously inaccurate, and with gluten-free baking, being off by 20 grams of flour can turn your dough into a rock.
Finally,, grab a rolling pin. If you don't have one, a smooth wine bottle works in a pinch. You want to be able to roll these out to about 5mm thickness. Any thicker and they won't cook through the middle; any thinner and they'll turn into chips.
Simple Steps For Golden Flatbread
- Activate yeast. Whisk 240ml warm water (43°C) with 12g sugar and 9g yeast in a small bowl. Note: Let it sit for 5 minutes until a frothy foam forms on top.
- Combine drys. In a large bowl, whisk 280g GF flour, 50g almond flour, 18g psyllium powder, 5g baking powder, and 6g salt.
- Mix wet ingredients. Add 120g coconut yogurt and 28g avocado oil to the yeast mixture and whisk until combined.
- Form the dough. Pour the wet into the dry. Stir with a wooden spoon until a shaggy mass forms, then knead with your hands for 2 minutes.
- Rest and hydrate. Cover the bowl with a damp cloth and let the dough sit in a warm spot for 60 minutes. Wait until the dough feels springy and less sticky.
- Divide and prep. Turn the dough onto a surface lightly dusted with GF flour and divide into 6 equal portions.
- Roll it out. Roll each piece into an oval about 5mm thick. Note: Don't worry about perfect shapes; rustic is better.
- Heat the pan. Place your skillet over medium high heat for 3 minutes until a drop of water sizzles and evaporates instantly.
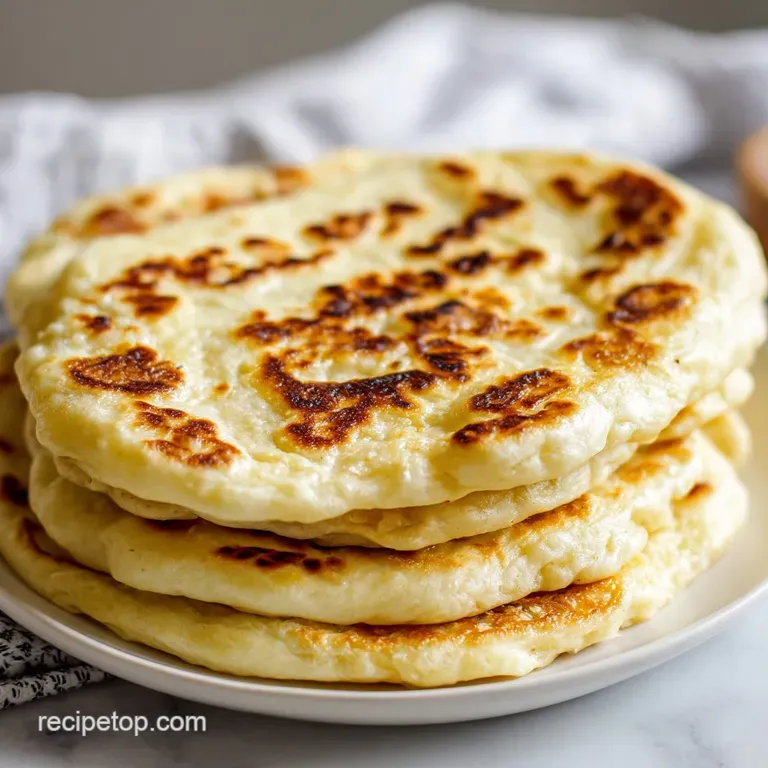
- Cook the naan. Lay one piece of dough in the dry pan. Cook for 2 minutes until large bubbles form and the bottom is charred.
- Flip and finish. Flip and cook for another 1-2 minutes. Immediately brush with the melted vegan butter, minced garlic, and cilantro.
Solving Common Dough And Pan Issues
Why Your Naan Stays Flat
If your bread looks more like a tortilla than a naan, your yeast might be dead or your water was too hot. Yeast is a living thing; if the water is over 50°C, you'll kill it instantly. Another culprit is the age of your baking powder.
If it's been in the pantry for over six months, it might have lost its chemical lifting power.
Rescuing Gummy Centers
This usually happens if the pan is too hot on the outside but doesn't give the inside enough time to cook. gluten-free doughs need a second longer to "set" than wheat doughs. If you're seeing gummy interiors, lower the heat slightly and cover the pan with a lid for the first 60 seconds of cooking.
This traps steam and helps the middle cook through.
| Problem | Root Cause | Solution |
|---|---|---|
| Dough is too sticky | Too much liquid or old psyllium | Add 1 tbsp GF flour at a time until workable. |
| Naan is brittle/hard | Overcooked or heat too low | Increase heat and cook faster; brush with butter immediately. |
| No bubbles forming | Dead yeast or dough too cold | Ensure water is 43°C and proof in a warm environment. |
Common Mistakes Checklist
- ✓ Always weigh your flour using a digital scale for accuracy.
- ✓ Don't skip the resting time - the psyllium needs an hour to fully hydrate.
- ✓ Ensure your pan is truly hot before the first piece of dough hits the surface.
- ✓ Keep finished naans wrapped in a clean kitchen towel to keep them soft while you finish the batch.
- ✓ Use room temperature yogurt to avoid slowing down the yeast fermentation.
Easy Ways To Scale Up
If you're hosting a big dinner, you can easily double this recipe. However, don't just double everything and hope for the best. When scaling up, keep the yeast and salt at 1.5x the original amount to avoid an overly salty or "yeasty" flavor. The liquids can be doubled exactly.
For small households, you can actually scale this down by half. Since the recipe calls for yogurt rather than eggs, it's very easy to divide. Just use a smaller bowl for proofing so the dough doesn't dry out.
If you're making a big batch, work in batches of two in the pan if you have a large enough griddle, but never overcrowd it, or the temperature will drop and the bread will steam instead of sear.
Chef's Note: If you're doubling the recipe, you might need to wipe out the pan every few naans. Flour buildup can burn and create a bitter taste on the bottom of your bread.
Fresh Versus store-bought Comparison
Is it really worth the effort to make this at home? In my experience, yes. Most store-bought gluten-free breads are loaded with preservatives and stabilizers to keep them shelf stable, which often results in a weird, chalky aftertaste.
| Feature | Homemade Naan | store-bought GF Naan |
|---|---|---|
| Texture | Pillowy and flexible | Often stiff or crumbly |
| Flavor | Fresh yeast and garlic | Heavily processed/acidic |
| Cost | Approx $0.50 per naan | Approx $1.50+ per naan |
Debunking Common Flatbread Myths
One of the biggest myths is that you need a "special" gluten-free flour for bread. While some brands are better than others, any high-quality all purpose blend with xanthan gum will work if you use psyllium husk. The psyllium is the real hero here, not the specific brand of flour.
Another misconception is that you can't get a "pull" with gluten-free bread. While it won't be exactly like a high protein wheat flour, the combination of almond flour and yogurt creates a fat rich crumb that has a satisfying, soft resistance when you bite into it.
It’s a different kind of "pull," but it’s just as good.
Storing and Reheating Your Naan
These are definitely best eaten within ten minutes of coming off the heat, but life happens. If you have leftovers, wrap them tightly in foil and keep them at room temperature for up to 2 days. Don't put them in the fridge! The cold air will crystallize the starches and make the bread go stale faster.
To reheat, avoid the microwave if possible it makes gluten-free bread chewy in a bad way. Instead, splash a few drops of water on the naan and toss it back into a hot dry skillet for 30 seconds per side. This re hydrates the crust and brings back that "just cooked" feel.
Zero Waste Tip: If you have naans that have gone a bit too hard, don't toss them. Brush them with olive oil, sprinkle with sea salt, and bake at 180°C for 5-7 minutes until they turn into crispy flatbread crackers. They are incredible for dipping into hummus!
The Best Sides For Serving
This naan is a versatile beast. It's obviously perfect for scooping up dal or curry, but we use it for so much more. Sometimes I'll use a piece as a base for a quick Mediterranean wrap. It pairs beautifully with a healthy mediterranean chickpea recipe if you want a light, protein packed lunch.
If you’re doing a full dinner spread, this flatbread is the ultimate companion to a fresh Arugula Salad with recipe. The peppery greens and lemon dressing cut through the rich garlic butter on the naan perfectly.
Decision Shortcut
- If you want a chewier naan, add 1 extra tablespoon of psyllium husk powder.
- If you want a crispier naan, increase the avocado oil by 1 tablespoon.
- If you want a lighter naan, use 1.5 teaspoons of baking powder instead of 1.
Honestly, don't worry about making them look like perfect circles. The best naans I've ever made were weird, lopsided ovals with giant charred bubbles. That’s where the flavor lives! Just get that pan hot, be generous with the garlic butter, and enjoy the sizzle. You've got this.

Recipe FAQs
Is it true that I must use a specific gluten-free flour blend for success?
No, but use a quality blend. While many blends work, ensure yours contains xanthan gum and favors superfine rice flour and potato starch for a neutral taste.
How to know if the dough has rested long enough for proper hydration?
Check for springiness and reduced tackiness. The dough should feel less sticky and slightly elastic to the touch after the 60-minute rest period; this means the psyllium husk has fully absorbed the necessary moisture.
Why does my naan taste flat or lack the traditional bread aroma?
You likely omitted or under activated the yeast. The yeast provides crucial fermentation flavor, not just lift; skipping it results in a one-dimensional taste, unlike the depth you get when you master proper fermentation techniques, which you use in our [Spinach Dip Cheese recipe].
How to achieve the characteristic charred, bubbly exterior on the naan?
Use a scorching hot cast iron skillet. Heat the dry pan for three full minutes until a drop of water sizzles instantly, and cook the naan quickly about 2 minutes per side to maximize the char.
Can I substitute the coconut yogurt with another acidic dairy-free option?
Yes, unsweetened soy yogurt is a good substitute. It offers a similar fat and protein ratio needed to balance the dough structure and acidity, keeping the crumb tender.
What is the best method for reheating naan to restore its pillowy texture?
Heat it quickly in a dry, hot skillet. Avoid the microwave, which makes GF bread chewy; instead, splash a few drops of water on the naan and reheat for 30 seconds per side on the stovetop.
How to prevent the naan from turning dry and brittle after cooling?
Ensure adequate fat content in the dough. The almond flour acts as a natural preservative, keeping the fats in place; if you want to make a light side dish later, our Coleslaw Crunchy Side recipe also relies on balanced fat content for optimal texture.
Vegan gluten-free Naan Delight

Ingredients:
Instructions:
Nutrition Facts:
| Calories | 347 calories |
|---|---|
| Protein | 5.1g |
| Fat | 17.3g |
| Carbs | 43.2g |
| Fiber | 4.8g |
| Sugar | 2.4g |
| Sodium | 388mg |
