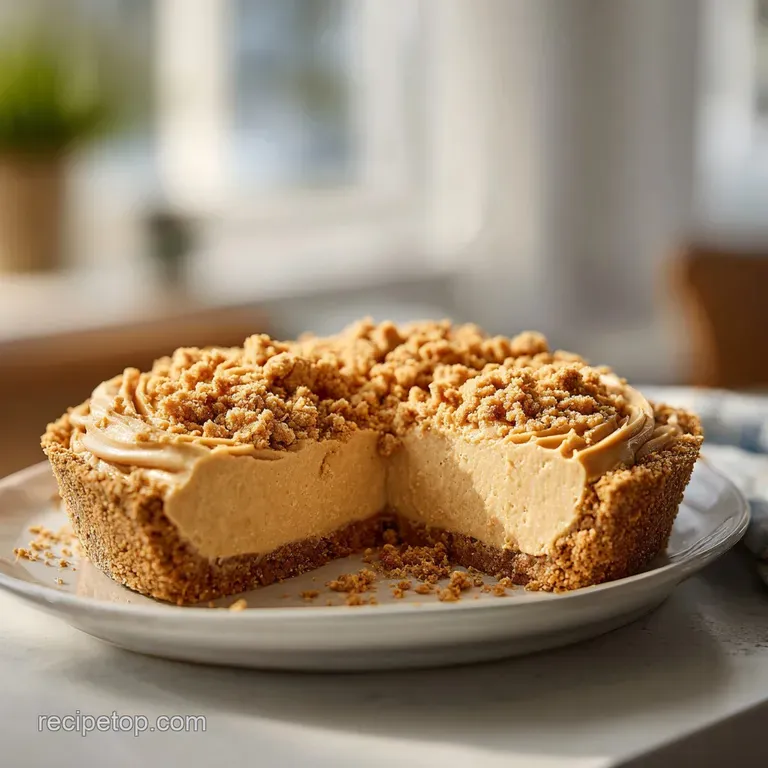
Unbelievable Peanut Butter Pie
- Time: Active 20 minutes, Passive 4 hours, Total 4 hours 20 mins
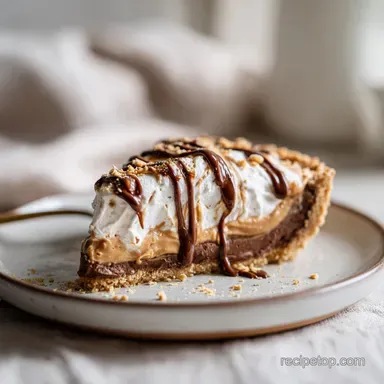
- Flavor/Texture Hook: Velvety peanut mousse with a dark chocolate shatter
- Perfect for: High impact dinner parties or weekend treats
- Creating An Unbelievable Peanut Butter Pie
- Science Behind the Silky Filling
- Essential Recipe Specifications
- Deep Dive Into Key Ingredients
- Tools for a Flawless Finish
- Step-by-Step Filling and Assembly
- Troubleshooting and Common Fixes
- Flavor Variations and Creative Swaps
- Myths About Peanut Butter
- Proper Storage and Freezing Tips
- Garnish and Presentation Ideas
- Recipe FAQs
- 📝 Recipe Card
Creating An Unbelievable Peanut Butter Pie
The first time I brought this out at a summer barbecue, the silence was immediate. You know that specific sound of a dozen people simultaneously hitting a "flavor wall"? It’s just the clinking of forks against plates and the occasional muffled sigh.
I watched my friend Sarah take a bite, eyes go wide, and she immediately asked if I’d used an entire jar of sugar. She couldn't believe it when I told her the sweetness came from maple syrup and the tang from Greek yogurt.
Most versions of this dessert are so sugary they make your teeth ache after two bites. I spent months tweaking this one because I wanted the actual peanut to be the star. I wanted that deep, roasted, slightly bitter edge to play against a dark chocolate ganache.
It’s all about the contrast the cold, velvety filling meeting the crisp, salty snap of a chocolate wafer crust.
We aren't just making a dessert here; we’re building layers of texture. If you’ve ever struggled with a filling that’s too heavy or a crust that turns into a soggy mess, you’re in the right place.
This unbelievable peanut butter pie is the result of every "failed" runny filling I’ve ever made, finally perfected into something that holds its shape while remaining impossibly light.
Science Behind the Silky Filling
Cold Emulsification: Whipping chilled heavy cream into the room temperature peanut base creates a stable foam that traps air bubbles, providing structure without the need for excessive gelatin or thickeners.
Acidic Stabilization: The lactic acid in Greek yogurt and reduced fat cream cheese slightly denatures the proteins in the peanut butter, helping the filling "set" into a firm yet spreadable consistency.
Starch Gelatinization: Briefly baking the chocolate wafer crust at 350°F (180°C) allows the butter and sugars to fuse with the cocoa starches, creating a moisture resistant barrier that stays crisp.
| Servings | Ingredient Adjustments | Pan Size | Chill Time |
|---|---|---|---|
| 5 people | Half all ingredients | 6 inch springform | 3 hours |
| 10 people | Standard recipe | 9 inch pie plate | 4 hours |
| 20 people | Double all ingredients | Two 9 inch plates | 6 hours |
When I first started playing with this recipe, I realized that the ratio of fat to air was everything. If the peanut butter is too warm, the whipped cream collapses. If it’s too cold, it won’t incorporate, leaving you with little oily clumps.
Success lies in that middle ground where everything is just soft enough to dance together but cold enough to hold its breath.
Essential Recipe Specifications
| Ingredient | Science Role | Pro Secret |
|---|---|---|
| Natural Peanut Butter | Primary fat/flavor | Use "drippy" style; the oil to solid ratio ensures a smoother mouthfeel than stabilized brands. |
| Greek Yogurt | Tang/Acidity | Provides a "clean" finish that cuts through the heavy lipids of the nuts and cream. |
| Vanilla Bean Paste | Aromatic depth | The tiny flecks add visual appeal and a more concentrated floral note than standard extract. |
Deep Dive Into Key Ingredients
To make an unbelievable peanut butter pie, we have to talk about the quality of your components. I always reach for grass fed butter because the higher fat content and lower water ratio mean a sturdier crust that won't slump.
- 1.5 cups chocolate wafer crumbs: Use a high-quality dark cocoa wafer for a bitter contrast.
- Substitute: 1.5 cups crushed graham crackers with 2 tbsp cocoa powder. Why this? Maintains the structure while mimicking the dark chocolate flavor profile.
- 1 cup natural creamy peanut butter: Look for the kind where the only ingredients are peanuts and salt.
- Substitute: Roasted almond butter for a more subtle, floral nut flavor. Why this? Similar fat profile allows for a near identical set.
- 0.5 cup pure maple syrup: This provides a complex, caramel like sweetness that white sugar lacks.
- Substitute: Honey, though it will add a distinct floral note. Why this? Liquid sweeteners blend seamlessly into the cold dairy.
- 1 cup heavy whipping cream: Ensure this is at least 36% milkfat for a stable whip.
- Substitute: Full fat coconut cream (chilled overnight). Why this? High saturated fat allows it to whip into stiff peaks similarly to dairy.
- 4 oz 70% dark chocolate: The bitterness is essential to balance the rich filling.
- Substitute: Semisweet chocolate chips if you prefer a sweeter finish. Why this? High cocoa butter content ensures a glossy, melt in-the mouth ganache.
Tools for a Flawless Finish
You don't need a professional kitchen, but a few specific tools make this much easier. A 9 inch glass or ceramic pie plate is my go to because it conducts heat evenly when setting the crust. You’ll also want a sturdy stand mixer or a reliable hand mixer.
Trying to whip this filling by hand is a workout you probably don't want on a Saturday afternoon.
Chef's Tip: Freeze your mixing bowl and whisk attachment for 10 minutes before whipping the heavy cream. This keeps the fat molecules cold, resulting in a much more stable and voluminous foam.
If you're using a springform pan instead of a traditional pie plate, you can actually turn this into a "cake style" pie. This makes for a stunning presentation when you release the sides and show off those distinct layers of dark crust and pale tan filling.
Just make sure to run a thin knife around the edge before popping the latch.
step-by-step Filling and Assembly

- Prep the base. Preheat your oven to 350°F (180°C). Combine 1.5 cups chocolate wafer crumbs, 3 tbsp coconut sugar, 5 tbsp melted grass fed butter, and 0.25 tsp fine sea salt. Note: The salt is non negotiable for flavor balance.
- Bake the crust. Press the mixture firmly into your 9 inch pie plate. Bake for 8 minutes until fragrant and slightly darkened. Let it cool completely.
- Cream the peanut base. Beat 1 cup natural creamy peanut butter with 8 oz softened cream cheese and 0.5 cup pure maple syrup until pale and fluffy.
- Fold in tang. Add 0.5 cup plain Greek yogurt and 1 tsp vanilla bean paste. Mix until no white streaks remain.
- Whip the cream. In a separate chilled bowl, whip 1 cup heavy whipping cream until stiff peaks form. Don't overbeat, or it will turn to butter.
- Combine the layers. Gently fold the whipped cream into the peanut mixture using a spatula. Move in a "J" motion until the filling is airy and uniform.
- Fill the crust. Pour the mixture into the cooled shell. Smooth the top with an offset spatula.
- Heat the ganache. Combine 4 oz chopped dark chocolate and 0.33 cup heavy cream in a small bowl. Microwave in 20 second bursts until glossy and pourable.
- Drip and chill. Pour the ganache over the pie. Sprinkle with a pinch of flaky sea salt until the surface looks like a speckled mirror.
- Set the pie. Refrigerate for at least 4 hours until the center doesn't jiggle when shaken.
Troubleshooting and Common Fixes
Why Your Filling is Runny
If your pie doesn't set, it’s usually because the heavy cream wasn't whipped to stiff enough peaks, or the peanut butter was too oily. Natural peanut butter varies wildly by brand. If yours is particularly liquid, you might need to chill it for 20 minutes before mixing to help the fats solidify.
Why Your Crust Is Crumbly
A crust that falls apart often lacks enough "glue." This happens if the butter wasn't fully incorporated or if the crumbs were too large. Make sure your wafers are processed into a fine sand like texture. If it still feels dry, add another tablespoon of melted butter.
| Problem | Root Cause | Solution |
|---|---|---|
| Grainy Filling | Cold cream cheese | Ensure cream cheese is completely room temp before mixing. |
| Cracked Ganache | Chilled too fast | Let ganache sit at room temp for 10 mins before putting pie in fridge. |
| Soggy Crust | No pre baking | Always bake the crust for 8-10 mins to seal the starches. |
Similar to the technique used in our 3 ingredient peanut recipe, managing the temperature of your ingredients is the secret to a perfect set.
Common Mistakes Checklist: ✓ Ensure the cream cheese is truly "softened" (leave out for 2 hours) to avoid lumps. ✓ Never pour hot ganache over the filling; let it cool to lukewarm first.
✓ Pat the Greek yogurt with a paper towel if it’s very watery to avoid excess moisture. ✓ Use a heavy bottomed glass to press the crust into the corners for even thickness.
Flavor Variations and Creative Swaps
Scaling this recipe is straightforward. If you want a deep dish version for a larger crowd, you can increase the filling ingredients by 50% while keeping the crust measurements the same.
For a single serving "jar" version, simply layer the crumbs and filling into mason jars no baking required for the crust if you're eating it with a spoon!
- For the "Loaded" Variation: Fold in 0.5 cup chopped roasted peanuts and 0.25 cup mini chocolate chips into the filling before chilling.
- The "Keto Friendly" Swap: Replace the maple syrup with a monk fruit based liquid sweetener and use almond flour plus cocoa for the crust.
- The PB&J Twist: Swirl 0.25 cup of raspberry preserves into the filling before the final chill for a nostalgic flavor profile.
| Premium Option | Budget Alternative | Flavor Impact | Savings |
|---|---|---|---|
| Vanilla Bean Paste | Pure Vanilla Extract | Less visual "speckle" | Save $10-15 |
| Grass fed Butter | Standard Unsalted Butter | Slightly less rich | Save $3-5 |
| 70% Dark Bar | Chocolate Chips | Less gloss, sweeter | Save $2-4 |
If you're looking for another decadent treat that uses a similar whipped dairy base, try my Eggless Cheesecake Delight recipe. It’s a great way to use up any extra cream cheese you might have from this project.
Myths About Peanut Butter
Myth: Natural peanut butter makes pies greasy. This isn't true if you emulsify it properly. The "grease" usually comes from the oil separating when the mixture gets too warm. By keeping your dairy cold and folding gently, the oil stays trapped within the protein structure of the cream and yogurt.
Myth: You need gelatin for a firm no bake pie. While gelatin provides a rubbery set, the combination of saturated fats from the cream cheese and the aeration of the heavy cream provides plenty of structure.
This results in a "mousse" texture rather than a "pudding" texture, which is far more sophisticated.
Proper Storage and Freezing Tips
Storage: This unbelievable peanut butter pie will keep perfectly in the fridge for up to 5 days. Cover it loosely with plastic wrap, but try to use a pie dome if you have one to prevent the ganache from sticking.
Freezing: This is actually a fantastic "icebox" cake. You can freeze the entire pie for up to 3 months. Wrap it tightly in a double layer of plastic wrap and then foil. To serve, let it thaw in the fridge for 2 hours or eat it semi frozen for a texture that mimics premium ice cream.
Zero Waste: Don't throw away those leftover chocolate wafer crumbs! Stir them into your morning yogurt or sprinkle them over vanilla ice cream. If you have leftover ganache, let it harden in the fridge, roll it into small balls, and dust them with cocoa powder for instant chocolate truffles.
Garnish and Presentation Ideas
To really lean into the "unbelievable" nature of this pie, presentation is key. I love to save a few of the chocolate wafers and crush them into large, jagged shards. Just before serving, I press these into the top of the ganache at various angles. It adds height and tells the eater exactly what’s in the base.
Another trick is to use a vegetable peeler on a room temperature peanut butter cup to create "shavings." It looks much more professional than just chopping them up. If you want to go the extra mile, a drizzle of slightly warmed peanut butter over the dark ganache creates a beautiful "tiger stripe" effect that always gets a few "oohs" and "aahs" at the table.
Trust me, once you master that ganache drape, you'll never go back to store-bought toppings again. Right then, let's get that oven preheating for the crust!

Recipe FAQs
Can I substitute natural peanut butter with stabilized peanut butter?
No, use natural creamy style. Stabilized brands contain added hydrogenated oils which can make the final filling heavy and waxy rather than velvety.
How to prevent the whipped cream from deflating into the peanut mixture?
Fold gently using a large spatula. Introduce the whipped cream in three separate additions, cutting down the middle and scooping from the bottom up until just combined; overmixing introduces air back out.
Is it true that the crust must be baked to stay crisp?
Yes, baking fuses the fats and sugars. A brief 8 minute bake creates a moisture barrier against the filling, preventing a soggy base later on.
How to achieve a glossy, crack free dark chocolate ganache top?
Ensure the ganache cools slightly before pouring. If you master the technique of stable emulsification found in our One Pan Lemon recipe, you can maintain the gloss on this chocolate topping.
What is the role of Greek yogurt in this peanut butter pie filling?
It adds necessary acidity and cuts richness. The tanginess from the yogurt prevents the heavy peanut and cream components from tasting overly sweet or flat.
How long can I safely make this pie ahead of time?
Assemble up to 24 hours in advance for optimal texture. The full chilling time of 4 hours allows the structure to set completely before serving.
How to ensure the cream cheese incorporates smoothly without lumps?
Ensure the cream cheese is completely softened to room temperature. Mix the cream cheese and peanut butter thoroughly until pale before adding any cold dairy, which helps stabilize the emulsion you are building.
Unbelievable Peanut Butter Pie
Ingredients:
Instructions:
Nutrition Facts:
| Calories | 558 calories |
|---|---|
| Protein | 10.8 g |
| Fat | 42.1 g |
| Carbs | 39.8 g |
| Fiber | 3.9 g |
| Sugar | 25.7 g |
| Sodium | 225 mg |
