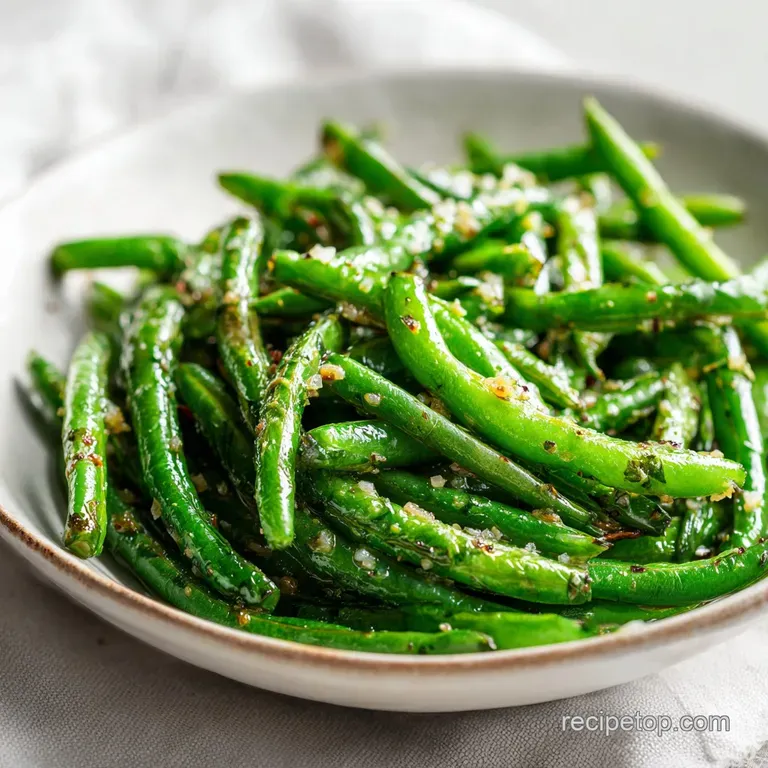
Garlic Lemon Green Beans: Blistered and Zesty
- Time: Active 5 minutes, Passive 10 minutes, Total 15 minutes
- Flavor/Texture Hook: Blistered, snappy, and zesty
- Perfect for: Busy weeknight dinners or a quick holiday side
- Master This Garlic Lemon Green Beans Recipe Fast
- The Logic Behind the Perfect Blister
- Deep Dive Into Our Primary Elements
- Essential Items for Your Kitchen Prep
- Choosing the Right Cooking Tools
- Step-by-Step Guide to the Perfect Sizzle
- Fixing Common Problems and Kitchen Mistakes
- Adjusting the Recipe for Different Crowds
- Creative Ways to Customize Your Flavor Profile
- Keeping Your Leftovers Fresh and Flavorful
- What to Serve Alongside These Zesty Beans
- Debunking Kitchen Myths About Green Beans
- Recipe FAQs
- 📝 Recipe Card
Master This Garlic Lemon Green Beans Recipe Fast
The second those bone dry beans hit the shimmering olive oil, you hear it, that sharp, energetic pop and sizzle that tells you you're doing something right. It’s a sound that used to scare me because I thought it meant things were burning, but now I know it’s the sound of the skins blistering and the natural sugars starting to caramelize.
I remember a Tuesday night about three years ago when I was trying to get dinner on the table in under 20 minutes while my toddler was literally using my leg as a climbing wall.
I threw the beans in the pan, got distracted for three minutes, and instead of the mushy, boiled mess I usually made, I found these beautiful, charred spears that actually tasted like something.
That was the night I realized that the secret to a great green bean isn't boiling, blanching, or steaming it into submission. The secret is the over high heat sear. We are going for a texture that is tender but still has a distinct "snap" when you bite into it.
If you've ever felt like your vegetables were the most boring part of the plate, this is the recipe that changes your mind. It’s simple, it’s fast, and it uses basic pantry staples to create a side dish that feels much more intentional than it actually is.
We are focusing on the fresh green bean as our hero here. While you can find frozen or canned versions easily, they simply cannot handle the high heat of a skillet without turning into mush. The fresh bean has a structural integrity that allows it to blister on the outside while staying vibrant and juicy on the inside.
When you pair that crunch with the sharp bite of fresh garlic and the bright acidity of a lemon, you get a balance that cuts through heavier main dishes like roasted chicken or pan seared steak.
The Logic Behind the Perfect Blister
The reason this method works so well comes down to a few basic principles of how heat interacts with moisture. When we use high heat and a small amount of fat, we are initiating a fast evaporation process on the skin of the bean.
- over High heat Sealing: The initial sear creates a barrier on the skin, trapping the internal moisture so the bean steams from the inside out while the outside chars.
- Late Stage Aromatics: Garlic and lemon zest contain delicate oils that turn bitter or evaporate if exposed to high heat for more than a minute. Adding them at the end preserves their brightness.
- Acid Timing: Squeezing the lemon juice in the final 30 seconds ensures the acid doesn't react with the chlorophyll, which is what usually turns green beans that unappetizing shade of army drab gray.
| Method | Time | Texture | Best For |
|---|---|---|---|
| Stovetop Sauté | 10 minutes | Blistered and snappy | Quick weeknight meals |
| oven-roasted | 20 minutes | Shriveled and sweet | Hands off meal prep |
| Classic Blanch | 15 minutes | Soft and uniform | Traditional casseroles |
Choosing the stovetop method is almost always the winner for a family dinner because it gives you the most control. You can see the beans changing color and feel the resistance when you stir them.
It's about being present in the kitchen for those few minutes to ensure nothing goes from "perfectly charred" to "actually burnt."
Deep Dive Into Our Primary Elements
Selecting your ingredients is the only real "work" you have to do for this dish. Since there are so few components, each one needs to carry its weight. I always look for beans that are firm enough to snap when bent; if they just bend without breaking, they've been sitting on the shelf too long and will end up stringy.
| Ingredient | Science Role | Pro Secret |
|---|---|---|
| Green Beans | Provides structure and fiber | Pat them bone dry to ensure they sear instead of steam. |
| Fresh Garlic | Adds pungent aromatics | Mince it finely so it clings to the beans in every bite. |
| Lemon Juice | Breaks down tough fibers | Use room temperature lemons for maximum juice yield. |
| Olive Oil | Conducts heat evenly | Use extra virgin for the flavor, but don't let it smoke too long. |
If you find yourself short on time, you can prep the garlic and lemon zest while the beans are doing their first three minute sear. Just make sure you don't walk away from the pan for too long. This 10 minute arugula salad uses a similar vibe of fresh citrus and greens if you want to keep the meal light and vibrant.
Essential Items for Your Kitchen Prep
To make this garlic lemon green beans recipe, you don't need a pantry full of exotic ingredients. Most of these are likely already in your kitchen, but the quality of the specific items makes a massive difference in the final result.
- 1 lb fresh green beans, trimmed: Look for "haricots verts" if you want a thinner, more delicate bean, but standard string beans work perfectly here too. Why this? Fresh beans maintain the "snap" that frozen versions lose during the freezing process.
- 2 tbsp extra virgin olive oil: A good quality oil provides the fat needed for the sear and a peppery finish. Why this? It has a lower smoke point than vegetable oil but much better flavor.
- 4 cloves fresh garlic, minced: Please, for the love of all things flavorful, avoid the pre minced stuff in the jar. Why this? Jarred garlic has a metallic aftertaste that ruins the freshness of the lemon.
- 1 large lemon, zested and juiced: You need both the oil from the skin and the acid from the juice. Why this? The zest provides the aroma while the juice provides the "zing."
- 1/2 tsp sea salt and 1/4 tsp cracked black pepper: Basic seasoning that brings out the natural sweetness of the beans.
- 1/4 tsp red pepper flakes: Just enough to provide a tiny back of-the throat warmth without being "spicy."
- 2 tbsp freshly grated Parmesan cheese: This adds a salty, umami kick that ties the lemon and garlic together.
- 1 tbsp fresh parsley, finely chopped: For a hit of herbal freshness at the very end.
| Original Ingredient | Substitute | Why It Works |
|---|---|---|
| Fresh Garlic | Garlic Powder (1 tsp) | Use if in a pinch. Note: Lacks the pungent bite of fresh cloves. |
| Parmesan | Nutritional Yeast | Great for a vegan option. Provides a similar nutty, salty flavor. |
| Olive Oil | Unsalted Butter | Adds a rich, nutty flavor. Note: Watch closely as butter burns faster. |
If you decide to use butter instead of oil, wait until the beans are almost done before adding it. Butter has milk solids that will burn at the high temperatures needed to blister the beans. I usually stick with oil for the cooking and maybe toss in a tiny knob of butter at the very end for luxury.
Choosing the Right Cooking Tools
The equipment you use is just as important as the ingredients. You want something that can hold onto heat. A thin, cheap non stick pan will lose its temperature the moment you add the beans, which leads to steaming rather than searing.
I almost always reach for my cast iron skillet or a heavy bottomed stainless steel pan. These materials distribute heat evenly and can handle the medium high flame without warping. You'll also want a microplane or a fine grater for the lemon zest and the Parmesan.
A box grater works, but a microplane creates those tiny wisps of zest that melt into the oil instantly.
Chef's Tip: If your beans are different sizes, group the thicker ones in the center of the pan where the heat is strongest, and keep the thinner ones toward the edges. This ensures everything finishes at the exact same time.
step-by-step Guide to the Perfect Sizzle

This is a fast process, so have all your ingredients measured and ready before you turn on the stove. There is no time for chopping once the beans hit the pan.
- Prep the beans. Wash the 1 lb of green beans and pat them completely dry with a kitchen towel. Trim the stem ends but leave the curly tails if you like that rustic look.
- Heat the pan. Place your heavy skillet over medium high heat and add the 2 tbsp of olive oil. Wait 1-2 minutes until it is shimmering and just starting to show tiny wisps of smoke.
- The initial sear. Add the dry beans to the pan. Spread them out into a single layer. Note: If they overlap too much, they will steam instead of blister.
- Hands off. Let the beans sit undisturbed for 2-3 minutes. You want to see dark brown spots forming on the side touching the pan.
- Toss and repeat. Give the pan a good shake or use tongs to flip the beans. Let them sear for another 2 minutes.
- Create a clearing. Push the beans to the edges of the pan, leaving a circle of open space in the middle. Reduce heat to medium.
- Bloom the aromatics. Add the 4 cloves of minced garlic and the lemon zest into the center. Sauté for exactly 60 seconds until the garlic is pale gold and fragrant.
- Season everything. Toss the beans back into the center to coat them in the garlic oil. Sprinkle in the 1/2 tsp sea salt, 1/4 tsp black pepper, and 1/4 tsp red pepper flakes.
- The citrus finish. Pour the juice from the lemon over the beans. Cook for 30 seconds until the liquid mostly evaporates, coating the beans in a glossy glaze.
- Final garnish. Remove from heat immediately. Sprinkle with the 2 tbsp Parmesan and 1 tbsp fresh parsley. Serve while they are still piping hot.
Fixing Common Problems and Kitchen Mistakes
Even with a simple recipe, things can go sideways if the heat or moisture levels are off. The most common issue I see is people being afraid of the heat, which results in "sweaty" beans rather than seared ones.
Why Your Green Beans Came Out Mushy
If your beans are soft and limp rather than snappy, they likely spent too much time in the pan at too low a temperature. This happens if the pan isn't preheated properly or if the beans were still wet when you added them.
Water on the surface of the beans turns into steam instantly, which cooks the inside of the bean before the outside has a chance to crisp up.
Why Your Garlic Tastes Bitter
Garlic burns in the blink of an eye. If you add it at the beginning with the beans, it will be black and acrid by the time the beans are cooked. That's why we wait until the final two minutes to add the aromatics.
If your garlic does burn, honestly, it's better to wipe the pan and start that step over than to eat bitter beans.
| Problem | Root Cause | Solution |
|---|---|---|
| Gray/Dull Color | Cooked too long with acid | Add lemon juice only in the final 30 seconds of cooking. |
| No Blistering | Pan overcrowded | Cook in two batches or use a larger 12 inch skillet. |
| Tough/Stringy | Old beans | Remove the "string" along the seam before cooking or buy younger beans. |
Common Mistakes Checklist
- ✓ Never cover the pan; lids trap steam and turn the beans mushy and gray.
- ✓ Use a kitchen towel to dry the beans paper towels can leave lint behind.
- ✓ Don't skimp on the salt; green beans need a generous amount to bring out their flavor.
- ✓ Keep the garlic pieces uniform so they all brown at the same rate.
- ✓ If using a stainless steel pan, don't try to flip the beans until they "release" naturally from the surface.
Adjusting the Recipe for Different Crowds
When you're cooking for a larger group or just for two, you can't just double or half everything without making a few small tweaks. Heat management changes when the volume of food in the pan changes.
If you are cutting the recipe in half for 2 people, use a smaller skillet (8 or 10 inch) so the oil doesn't just spread out and disappear. You might find they cook about 20% faster because there’s more surface area for the heat to hit each bean.
When doubling the recipe for 8 people, do not try to shove 2 lbs of beans into one pan. You will end up with a pile of steamed vegetables. Instead, work in two separate batches, or use two pans simultaneously.
For the spices, if you double the beans, you don't necessarily need to double the red pepper flakes unless you want a significant kick. Start with 1.5x the spice and adjust at the very end.
The lemon juice should also be added cautiously; too much liquid at once will drop the pan temperature and stop the searing process.
| Servings | Green Beans | Garlic | Pan Size | Cook Time |
|---|---|---|---|---|
| 2 people | 0.5 lb | 2 cloves | 10 inch | 8 minutes |
| 4 people | 1.0 lb | 4 cloves | 12 inch | 10 minutes |
| 6 people | 1.5 lb | 6 cloves | 12 inch (batches) | 15 minutes |
| 8 people | 2.0 lb | 8 cloves | Two 12 inch pans | 10 minutes |
Creative Ways to Customize Your Flavor Profile
Once you have the base method down, you can start playing with the "extras." I love the parmesan version, but sometimes the occasion calls for something a little different.
If you want a Mediterranean twist, swap the parsley for fresh mint and add a handful of toasted pine nuts at the end. The coolness of the mint against the heat of the red pepper flakes is incredible.
For a more savory, "umami" forward dish, you can skip the parmesan and toss the finished beans with a teaspoon of white miso paste thinned out with a little warm water. It creates a deep, salty crust that is addictive.
- For a Crunch: Add slivered almonds or crushed hazelnuts during the last 2 minutes of cooking.
- For a Vegan "Cheesy" Finish: Use a heavy sprinkle of nutritional yeast instead of Parmesan.
- For a Richer Profile: Finish with a drizzle of browned butter and a pinch of nutmeg.
Keeping Your Leftovers Fresh and Flavorful
These beans are best eaten immediately while the texture is at its peak. However, if you have leftovers, they don't have to go to waste.
Storage: Keep them in an airtight glass container in the fridge for up to 3 days. They will lose their "snap" and become softer as they sit, but the flavor will actually deepen as the garlic and lemon marinate the beans.
Reheating: Avoid the microwave if possible; it will turn them into rubber. Instead, throw them back into a hot, dry skillet for 2-3 minutes just to take the chill off and restore a bit of the exterior texture.
Zero Waste Tip: If you have just a handful of beans left, chop them up and throw them into a morning omelet or a grain bowl. You can also take the woody ends of the beans (the parts you trimmed off) and throw them into a bag in the freezer for your next batch of homemade vegetable stock.
Even the lemon rinds can be tossed into a jar of white vinegar to make a natural, citrus scented kitchen cleaner!
What to Serve Alongside These Zesty Beans
Because these beans have a strong personality thanks to the garlic and lemon, they act as a fantastic "brightener" for richer proteins. I love serving these alongside this lemon herb tilapia for a full meal that feels light but satisfying. The citrus in both dishes ties the whole plate together.
If you're looking for a meatless Monday vibe, these beans are substantial enough to be the star when served over a bed of creamy polenta or alongside a Garlic Butter Roasted Cabbage. The key is to keep the other side dishes relatively simple so the textures don't compete.
Debunking Kitchen Myths About Green Beans
There is a lot of old school advice out there that actually makes cooking vegetables harder and the results worse. Let's clear some of that up so you can cook with confidence.
Myth: You must blanch green beans in boiling water before sautéing. Truth: This is unnecessary and often leads to overcooked beans. Sautéing them raw at a high heat allows the beans to cook in their own juices, which preserves more flavor and nutrients.
Blanching is only needed if you are preparing them for a cold salad or a casserole where they won't get direct heat.
Myth: Adding baking soda to the water keeps them green. Truth: While baking soda does preserve the color, it also breaks down the hemicellulose in the plant's cell walls, making the beans mushy and soapy tasting.
The best way to keep them green is to cook them quickly and add the acid (lemon juice) at the very last second.
Myth: Frozen beans are just as good for sautéing. Truth: Frozen beans have been blanched and then frozen, which breaks the cellular structure. When they thaw, they release a lot of water.
You can still cook them, but you will never get that iconic "blister" that makes this garlic lemon green beans recipe so special. Save the frozen beans for soups or stews!

Recipe FAQs
Why do restaurant green beans taste so good?
They use high heat searing to create a blistered, caramelized exterior. By skipping the steamer and using a heavy bottomed skillet over medium high heat, restaurants lock in a smoky depth of flavor that boiling just cannot replicate.
Are green beans good for diabetics?
Yes, they are an excellent choice. Green beans are low in calories and have a low glycemic index, making them a fiber rich, blood sugar-friendly side dish for any meal.
What's the secret to flavorful green beans?
Bone dry beans and a hot pan are the keys. If you enjoyed mastering the high heat searing technique used here, you can apply that same principle for perfect results with our Italian Artichoke Salad. Moisture is the enemy of browning, so ensure your beans are completely dry before they hit the oil.
How do you add lemon juice to green beans?
Squeeze the juice over the beans during the final 30 seconds of cooking. This timing ensures the acid brightens the dish without stripping the vibrant green color from the beans.
Is it true I should cover the pan to help the beans cook faster?
No, this is a common misconception. Covering the pan traps steam, which will turn your crisp tender beans mushy and gray rather than blistered and bright.
How to keep garlic from burning?
Push the beans to the edges of the skillet to create a space in the center. Adding the minced garlic to the middle of the pan only after reducing the heat to medium prevents it from scorching while it cooks for the required 60 seconds.
How to tell when the beans are done?
Look for a blistered, golden brown skin and a bright green interior. The beans should be tender but still provide a distinct "snap" when bitten, which usually happens after about 10 minutes of total cook time.
Garlic Lemon Green Beans

Ingredients:
Instructions:
Nutrition Facts:
| Calories | 112 kcal |
|---|---|
| Protein | 3.0 g |
| Fat | 7.7 g |
| Carbs | 9.6 g |
| Fiber | 3.1 g |
| Sugar | 1.5 g |
| Sodium | 325 mg |
