Ultimate Cheesy Beefy Garlic Butter Rice

- Time:10 minutes prep + 25 minutes cook = 35 minutes total
- Flavor/Texture Hook: Savory, buttery, and velvety
- Perfect for: Busy weeknight dinners or meal prep
- The Perfect Ultimate Cheesy Beefy Garlic Butter Rice
- Why This Recipe Outperforms Others
- Accurate Timing and Yield
- Ingredients for the Best Flavor
- Essential Tools for the Job
- Cooking the Meal Perfectly
- Avoiding Common Skillet Mistakes
- Tasty Swaps and Variations
- Storing and Using Leftovers
- How to Finish the Dish
- Myths About Rice and Beef
- Recipe FAQs
- 📝 Recipe Card
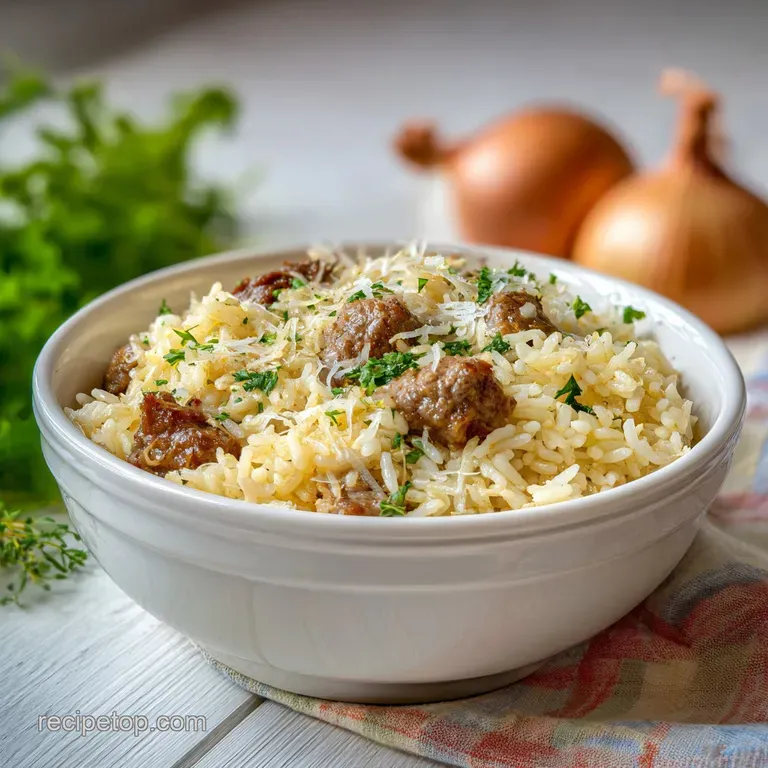
The Perfect Ultimate Cheesy Beefy Garlic Butter Rice
Close your eyes and listen to that sharp, aggressive sizzle the moment a pound of ground beef hits a screaming hot skillet. It’s that initial contact where the magic happens, transforming boring gray meat into those deeply browned, crispy edged bits that hold all the flavor.
Then comes the butter four fat tablespoons of it melting into the beef fat and foaming up as you toss in six cloves of minced garlic. The aroma is enough to bring anyone into the kitchen asking when dinner is ready.
Honestly, it’s the kind of smell that makes you realize you'll never go back to those boxed rice mixes again.
I remember the first time I tried making this. I was tired, it was a Tuesday, and I just threw what I had into a pan. I made the mistake of not rinsing my rice, and the whole thing turned into a gummy mess that stuck to the roof of my mouth. But then I learned the trick: rinsing and toasting.
When you toast those grains in that garlic infused butter, they take on a nutty profile and hold their shape, even after being buried under a blanket of melted cheddar and mozzarella. It’s the difference between a sad, mushy bowl and a masterpiece of texture.
We aren't just making a meal here; we're creating a bowl that feels like a warm hug after a long day. You get the crunch from the seared beef, the silkiness of the melted cheese, and the aromatic bite of the garlic.
It’s fast, it’s relatively cheap to throw together, and it uses ingredients you likely already have in your pantry. Trust me on this, once you see how those cheeses pull apart in long, stretchy strings, you’ll be hooked.
Why This Recipe Outperforms Others
Understanding how ingredients interact transforms you from someone following a list into someone who actually knows how to cook. It isn't magic; it’s just a few simple mechanics that ensure every bite is better than the last.
- Starch Management: Rinsing the rice removes excess surface starch, preventing the grains from clumping together and becoming "gloppy" during the simmer.
- The Toasting Phase: Sautéing the dry rice in butter coats each grain in fat, which creates a protective barrier that helps the rice maintain its individual structure.
- Residual Heat Melting: Adding the cheese after removing the pan from the heat ensures it melts into a velvety texture rather than breaking into a greasy oil slick from high heat.
- Maillard Mastery: Searing the beef undisturbed for 4 minutes creates complex flavor compounds through browning that simply can't be replicated by stirring constantly.
| Beef Thickness | Internal Temp | Rest Time | Visual Cue |
|---|---|---|---|
| Crumbs/Small bits | 160°F | 2 minutes | Deep brown with no pink |
| 1/2 inch chunks | 160°F | 3 minutes | Crispy edges, moist center |
| 1 inch patties | 160°F | 5 minutes | Firm texture, browned exterior |
Before we get into the nitty gritty of the ingredients, let's talk about the foundation of this dish. Most people think the beef is the star, but it’s actually the marriage of the garlic butter and the rice grains that carries the load.
If you use a high-quality low sodium beef broth, you control the saltiness while maximizing that "beefy" essence that makes this recipe live up to its name.
Accurate Timing and Yield
Getting the timing right is the secret to a stress free kitchen. You don't want to be chopping garlic while the beef is already overcooking, so getting your prep done upfront is a non negotiable step for this one pan wonder.
| Component | Science Role | Pro Secret |
|---|---|---|
| Long grain Rice | Structural base | Rinse until water is clear to avoid gummy textures. |
| Unsalted Butter | Flavor carrier | Let it foam before adding garlic to release fat soluble aromas. |
| Lean Ground Beef | Umami source | Use 90/10 lean to fat ratio to prevent an overly greasy bowl. |
| Mozzarella | Texture/Stretch | Use low moisture mozzarella for that classic, long cheese pull. |
The quantities here are designed to feed four hungry people comfortably. If you’re cooking for two, you’ll have the best lunch of your life waiting for you the next day in the fridge.
Ingredients for the Best Flavor
To make this Ultimate Cheesy Beefy Garlic Butter Rice, you need ingredients that punch above their weight class. I always reach for sharp cheddar because it has more "bite" than the mild stuff, which can get lost against the garlic.
- 1 lb lean ground beef (90/10): Why this? Provides rich flavor without excessive grease to drain.
- Sub: Ground turkey or plant based crumbles.
- 1.5 cups long grain white rice: Why this? Stays fluffy and separate when cooked correctly.
- Sub: Jasmine rice (reduce broth by 1/4 cup).
- 4 tbsp unsalted butter: Why this? Adds creaminess and a nutty toasted flavor.
- Sub: Ghee or avocado oil.
- 6 cloves garlic, minced: Why this? The aromatic backbone of the entire dish.
- Sub: 2 tsp garlic powder (add with other spices).
- 2.75 cups low sodium beef broth: Why this? Hydrates the rice with deep savory notes.
- Sub: Chicken broth or vegetable stock.
- 1 cup sharp cheddar cheese, shredded: Why this? Delivers a tangy, bold cheese flavor.
- Sub: Monterey Jack for a milder, creamier melt.
- 1 cup low moisture mozzarella cheese, shredded: Why this? Provides that signature velvety stretch.
- Sub: Provolone or Muenster.
- 1 tbsp Worcestershire sauce: Why this? Adds a hidden layer of salty umami.
- Sub: Soy sauce or tamari.
- Spices: 1 tsp kosher salt, 0.5 tsp black pepper, 1 tsp onion powder.
- 2 tbsp fresh parsley: For a hit of brightness at the end.
Essential Tools for the Job
You don’t need a professional kitchen to pull this off, but the right pan makes a huge difference. I almost always use a heavy 12 inch cast iron skillet because it holds heat like a champ, which is exactly what you need for that initial beef sear. According to Serious Eats, a heavy bottomed pan ensures even heat distribution, preventing hot spots that might scorch your rice.
If you don’t have cast iron, a deep stainless steel skillet or a Dutch oven works just as well. Just make sure it has a tight fitting lid. If the steam escapes while the rice is simmering, you’ll end up with crunchy grains in the center.
A simple wooden spoon is my favorite tool for breaking up the beef and scraping up the "fond" those brown bits on the bottom of the pan that are basically concentrated flavor gold.
Cooking the Meal Perfectly
Let's get into the flow of the kitchen. Follow these steps, and you'll have a meal on the table in about 35 minutes that tastes like you spent all afternoon on it.
- Sear the beef. Place the ground beef in your skillet over medium high heat. Spread it out flat and leave it alone for 4 minutes. Note: This creates a savory crust.
- Season and crumble. Break the beef into chunks, add salt, pepper, and onion powder. Cook until no pink remains.
- Drain the fat. Tip the pan and remove about 80% of the rendered fat, leaving just enough to coat the bottom.
- Infuse the butter. Drop the butter and minced garlic into the pan. Sauté for 1 to 2 minutes until the garlic is fragrant and butter is foaming.
- Toast the rice. Add the rinsed rice to the garlic butter. Stir constantly for 2 minutes until the grains look slightly translucent at the edges.
- Deglaze the pan. Pour in the beef broth and Worcestershire sauce. Scrape the bottom until all browned bits are loosened.
- Simmer. Bring the liquid to a boil, then immediately drop the heat to low. Cover tightly.
- Wait patiently. Simmer for 15 to 18 minutes. Do not lift the lid during this time or the steam will escape.
- The big melt. Remove from heat. Sprinkle the cheddar and mozzarella over the top. Fold them in gently until the cheese is velvety and smooth.
- Garnish. Toss on the fresh parsley and serve immediately while it’s still hot and stretchy.
Avoiding Common Skillet Mistakes
Even the best cooks run into trouble sometimes. The most common heartbreak with rice dishes is ending up with something that looks more like porridge than a fluffy pilaf. This usually happens because of three things: too much water, too much stirring, or not enough rinsing.
Why Your Rice Is Mushy
If your rice comes out soft and sticky, you likely didn't rinse it enough or the heat was too high, causing the grains to burst. Rinsing is the most boring part of the prep, but it's the one step that ensures your Ultimate Cheesy Beefy Garlic Butter Rice stays distinct and firm.
Why the Cheese Is Oily
If you see a layer of orange oil on top of your bowl, the cheese "broke." This happens when the cheese gets too hot. Always pull the pan off the burner before adding the dairy. The residual heat of the rice and beef is more than enough to melt it without separating the fats.
| Problem | Root Cause | Solution |
|---|---|---|
| Burnt garlic | Heat too high or added too early | Add garlic only after butter melts; keep heat at medium. |
| Dry rice grains | Lid wasn't tight enough | Add 2 tbsp broth, cover, and let sit for 5 minutes. |
| Greasy texture | Fat wasn't drained from beef | Drain 80% of fat before adding butter and rice. |
Common Mistakes Checklist
- ✓ Rinse your rice in a fine mesh sieve until the water runs completely clear.
- ✓ Let the beef sit undisturbed for the full 4 minutes to get that "shatter" crunch.
- ✓ Use a heavy lid; if yours is loose, place a piece of foil under the lid to seal it.
- ✓ Shred your own cheese from a block for a smoother melt than pre shredded bags.
- ✓ Don't skip the rice toasting; it's what gives the dish its nutty backbone.
Tasty Swaps and Variations
I love a recipe that acts as a canvas. Once you’ve mastered the base, you can start playing with the flavors based on what’s in your pantry or your mood. If you want to lean into different flavor profiles, check out this resource on enhancing flavor for more inspiration.
For a spicy version, I like to add a diced jalapeño in with the garlic or a healthy squeeze of Sriracha right before serving. If you’re looking for something lighter, you can swap the beef for ground turkey, though you might want to add an extra tablespoon of butter since turkey is so lean.
You could even turn this into a "Steakhouse" version by using cubed sirloin instead of ground beef and adding a dash of dried thyme.
| Method | Time | Texture | Best For |
|---|---|---|---|
| Stovetop Skillet | 35 minutes | Crispy beef, fluffy rice | Everyday dinners |
| Dutch Oven | 40 minutes | Very even cook, soft grains | Larger batches |
| Rice Cooker | 45 minutes | Set it and forget it | Hands off prep |
If you're looking for a perfect side dish to cut through the richness, these Garlic Lemon Green Beans are incredible. The acidity from the lemon balances the heavy butter and cheese perfectly.
Storing and Using Leftovers
This dish keeps surprisingly well, making it a star for meal prep. Store leftovers in an airtight container in the fridge for up to 4 days. When you go to reheat it, the rice will have absorbed more moisture, so it might seem a little stiff.
Just add a tiny splash of water or beef broth before microwaving it to bring back that velvety texture.
For freezing, this recipe lasts about 3 months. I recommend freezing it in individual portions. To reheat from frozen, let it thaw in the fridge overnight and then warm it up in a skillet with a lid to trap the moisture. For zero waste cooking, save those parsley stems!
You can mince them very finely and add them in with the garlic for extra flavor, or toss them into a freezer bag for your next batch of homemade broth.
How to Finish the Dish
The final fold of cheese is where this bowl comes to life. Don't just dump the cheese on and stir vigorously; you want to "marble" it into the rice so you get those distinct pockets of gooey goodness.
I find that using a rubber spatula works better than a spoon here because it’s gentler on the rice grains, keeping them from breaking.
If you’re feeling extra, you can put the whole skillet under the broiler for 2 minutes at the very end to get some browned, bubbly cheese spots on top. It adds a "lasagna edge" vibe that is absolutely killer. Serve it in deep bowls, garnish with a massive handful of fresh parsley, and maybe a few cracks of fresh black pepper. After a dinner this satisfying, you might want to follow it up with a Rice Krispie Chocolate Chip Cookie for the ultimate "sweet and salty" night.
Myths About Rice and Beef
There are a few "rules" people swear by that aren't actually true. Let's clear the air so you can cook with confidence.
- Searing seals in juices: This is a classic kitchen myth. Searing is about flavor (the Maillard reaction) and texture, not juice retention. The brown crust is what makes the beef taste "meaty," but it doesn't act as a waterproof seal.
- Never rinse jasmine or long grain rice: Some people think rinsing removes nutrients. While it might remove a tiny bit of surface fortification, the textural benefit of removing that sticky starch far outweighs the loss. Rinsing is the key to fluffy rice.
- You must use boiling water/broth: You can start with cold broth just fine. As long as you bring the skillet to a boil before covering and lowering the heat, the rice will cook perfectly. Starting with cold liquid actually gives you more control as the pan heats up.

Recipe FAQs
How to ensure the ground beef develops a deep, savory crust?
Spread the meat into a single, flat layer and sear undisturbed for 4 minutes. Resisting the urge to move the beef allows the Maillard reaction to occur, which creates the flavor foundation for the entire dish.
Is it true I should wash the rice before cooking?
Yes, rinsing is essential. Washing the rice under cold water until it runs clear removes excess surface starch, ensuring the final dish stays fluffy rather than gummy when combined with the cheese.
Why is it necessary to toast the rice in the garlic butter?
Toasting adds a nutty depth and helps keep the grains separate. If you enjoyed mastering the rice texture here, you will find this same browning technique crucial for building complex flavors in other grain based meals.
How to properly melt the cheese into the rice without it breaking?
Remove the skillet from the heat entirely before folding in the cheddar and mozzarella. Using only the residual heat prevents the cheese proteins from tightening, resulting in a velvet smooth finish rather than a greasy or separated texture.
Can I store this for meal prep later in the week?
Yes, it keeps well in the refrigerator for up to 4 days. Store it in an airtight container and add a small splash of beef broth when reheating to rehydrate the rice and restore the creamy consistency.
Is it true that freezing this dish ruins the cheese texture?
No, this is a common misconception. While the cheese may slightly change consistency, freezing in individual portions for up to 3 months works perfectly as long as you thaw it overnight and reheat it slowly in a covered skillet.
How to salvage the dish if the rice is still firm after 18 minutes?
Add a few tablespoons of beef broth and continue simmering covered on low heat. Check the pan every 2-3 minutes until the liquid is fully absorbed and the rice reaches your desired tenderness.
Cheesy Beefy Garlic Rice

Ingredients:
Instructions:
Nutrition Facts:
| Calories | 512 kcal |
|---|---|
| Protein | 29.4 g |
| Fat | 24.1 g |
| Carbs | 43.5 g |
| Fiber | 1.2 g |
| Sugar | 0.8 g |
| Sodium | 765 mg |
